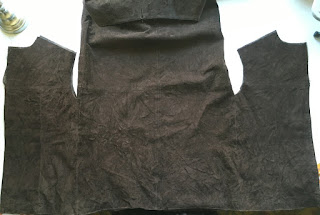
I started with a leather skirt and a leather jacket that was the same exact suede brown leather as the skirt I'd bought many years ago. Apparently the jacket was very old too as some of the leather was quite brittle.
Here's the process I used:
Step one: Harvest the zipper from the old jacket.
Step 2: Take off the sleeves.
Here you can see how the leather from the old jacket ripped very easily!
Step 4: Trace the pattern for the front of the jacket onto the bak of the skirt. (The back of the skirt had a slit, so I needed the front of the skirt for the back of the jacket.) I used the Downton Duffle pattern for my template. I found it easiest to use chalk to mark on the leather.
Here you can see how I preserved the side seams of the skirt for the side seams of the jacket! The less sewing on leather, the better because leather retains every hole you make in it. This also allowed me to easily keep the lining of the skirt together with the leather since I was using the same hem.
Step 5: Next I traced the front of the jacket onto one side of the skirt back. Then I flipped it over to ensure that the two sides of my jacket back would be perfectly even.
Step 6: I traced the collar piece (from yet another pattern!) onto the remains of the skirt. I needed two collar pieces and two collar stand pieces and got them from the skirt.
Step 7: I wanted to reuse those cool pockets from the original jacket, so I traced around them and cut them out.
Step 8: I cut out my 4 pocket flaps from the sides of the original jacket, under the arms where there didn't seem to be as much decay.
Step 9: I sewed one of the lower pockets from the original jacket onto the lining only. My son had requested a secret interior pocket.
Step 10: I sewed the new pockets I'd made onto the fronts. So the patch pockets on the new jacket front actually have 2 pockets, one behind the zipper and one under the flap!
Step 11: I inserted the zipper in an totally unconventional way! I just separated the lining from the skirt along the edge and slipped the zipper in. Then I topstitched the two back together.
At this point I stopped taking photos, but it was pretty standard for jacket making. I sewed the shoulders together on both the lining and the leather, separately to have inclosed seams. Then I attached the collar stand and collar. Finally, I attached the sleeves, using the set in method. I ended up having to open up the back seam and narrow down the jacket for my very thin son. But he's totally enamored with the fininshed results, and I'm pretty proud I stuck with it until the end. There were some points there where I was ready to give up!


2 comments:
Always deeply impressed by the detailed work you do! Love the outcome on this :)
Andrea EOD
That's such a cool outfit!! I bet your son was thrilled to bits with it!!
Post a Comment