Monday, October 31, 2011

:(

I did my English presentation today!!! For those who don't know, I was doing an English talk on refashioning with a short demonstration in class, and today I finally did it. It was rather awful :( I'm not the best at delivering talks, and I could feel my face getting redder and redder as i got further tangled in the autumn cape I was supposed to be making! The talk on whole was over twice the allotted time and by the end of it I was so hot and bothered I had to wait a minute to catch my breath! FAIL!!! Oh well, my class and my teacher were very supportive and asked lots of questions bless them , even though I know they were only pity questions, they still seemed interested in what I was saying and said they were inspired to try it themselves, so that was the main aim :)


Oh well, in the mean time, here is an old lace tablecloth that I'm going to experiment with, maybe I'll try another satchel or a nice scarf....

Roisin xx :P

It's a Wrap

Skirt created from a single piece of fabric - no sewing!
The skirt I "made" was a piece of fabric I just wrapped around me to see how wide it was and then thought, hey! that looks kinda neat. I fooled around with it a bit more, this way and that and then, the next thing I knew - it was complete. I tried to see if I could find any fault with it, but no, it just looked good tied and draped like it was. So, a no-sew skirt. True confessions: I actually did end up running a few hand sewn stitches down the center where it folds together so it didn't accidentally fall open when I sat down...
Detail of tied knot in front - but could be worn on side or even the back!

I put it on and wore it that evening with a pink silk slip, my taupe silk and lace top, and my taupe tank top under that. woohoo. See Project Minima for all these refashions.
Detail of skirt "hem" which is just the frayed edge of the fabric


I refashioned this simple little pink and white cropped jacket by adding lace and silky tatters to the hemline, a satin flourish to the collar and pink lace trim to the back collar. Rolled up the sleeves and there you have it.

Ghouls and Gals...meet Veronica Lodge

Halloween has got to be one of my all time favorite holidays.  The orange, purple, & black decor, the CHOCOLATE, the haunted houses, scary movies, the CHOCOLATE, and of course, the excuse to dress up in costume all day and not have to worry about someone calling the psych ward. Unfortunately for me, I have a training function off island during Halloween this year, so no coordinating costumes for me and the Little Guy *tear*.  With that bit of bad news, I was determined to celebrate Halloween in my usual fashion.  I am going to be in Waikiki after all, the mecca of party cities (here in Hawaii, anyway), and I knew that I would be in great company.  My only problem...what to wear?  Since I'm planning to take only a carry-on (God help me!) I needed a costume that was compact and didn't require a whole bunch of accessories.  Of course my instinct was to go as a Honeybadger (insert Beavis & Butthead laugh here), but didn't want to be mistaken as a skunk.  Not wanting to be one of the many Lady Gaga or Nicki Minaj impersonators, I decided on the following:
Black & white polka dot skirt=$0.50 garage sale
Red T-shirt sale rack at K-mart=$2.50
Black tie belt=free from clothing stash
Little Guy posing redneck chic complete with popsicle=priceless

With this awesome color combo and my lack of packing space I thought that a Veronica Lodge costume would be perfect.
 Veronica Lodge and her ever faithful sidekick Iron Man.
Happy Halloween Everyone!
Maui Girl

more details on how I achieved the look 

Saturday, October 29, 2011

Chevron Skirt

I originally refashioned this knit top into a tunic but never wore it.


refashioned never worn tunic:

So, I refashioned the refashioned tunic into a skirt! I just cut off the bodice and made a waist band out of stretchy black fabric and attached to the fabric

more at jillians refashions

Sweater to sweater dress x 2

Hello again!

This is going to be my 3rd winter here in US and I am not looking forward to it. I love looking at snow, but I hate having to venture out in the cold. What baffle me most are 1) that I will have to suffer a lot of static shocks on a regular basis and 2) the right amount of clothing so as to ensure that I am warm enough. I'm never warm enough!

In preparation, I made 2 sweater dresses from sweaters (and other thrifted items).


Sweater dress #1:


Sweater dress #2:


For more on this project, come and visit me at my blog.

Peace,
Far @ memoryseed

Introducing myself...and a t-shirt refashion


Hello there fellow refashion enthusiasts! I am Staley. I am a wife, homeschooling mama, and portrait photographer (www.kcphotoparty.com), and thrift store junkie.

I have loved a good thrift store outing since I was in high school. I used to only look for things that fit someone in my home but now that I have caught the refashioning bug size doesn't slow down my shopping at all. I thoroughly enjoy looking at something and seeing what it could be with a little tweaking. Finding time to do that tweaking is another issue all together.

I am really excited to be a new contributor here!

My first official refashion to be posted is a simple t-shirt refashion from man's XL basic t-shirt to a fun "my size" split sleeved, banded waist casual top.

Sorry there is no before picture. I did this one before I knew I would be posting and it was all experimental anyhow.

I started with an orange XL man's AE Outfitters t shirt with ribbed neck that was kind of stretched out. I loved the orange and wanted to make it a little more fememinine but still keep it casual and this is what I came up with.

Simply cut off the neck and the bottom of the sleeves then split the sleeves up the top to the shoulders.

I cut a few inches off the bottom since it was really long on me and I folded that piece over to make the bottom band. I just wrapped it around my hips to get the size where it would hit. I then gathered the lower cut edge of the shirt and sewed it to the newly made band. I initially intended for the sewn edge to be on the inside but I was tired and did it inside out. Decided it was fine because it was kind of cute like that with the seam on the outside kind of like a little ruffle. The shirt was too large at the shoulders so I made some big basting stitches across the shoulders and gathered them then made a sloppy running stitch in a dark thread that matches the print on the shirt. TaDa! Super cute top that will look awesome with skinny jeans and brown boots (both also purchased at the thrift store).

Friday, October 28, 2011

Cuben Fiber Bags


There is some major thinking going on here.
Mr C brought home some Cuben Fiber sailcloth for me to play with. We are looking at ways to recycle a used up gennaker. So I made some bags. I did think about making rain gear with it, but this sailcloth is too stiff. I know some of the lighter fabric is used for mountain gear, if this sort of stuff interest you, Mr Ultra-Lite Skunk Works is the king as he sews all of his mountain gear himself.
I am not entirely satisfied with them but some bigger ideas are bubbling up so stay tuned. There might even be some Christmas shenanigans involved which you'll be able to read about on the Crafty Christmas Club. A great place to talk about our secret evil plans to shower our loved ones with handmade gifts.


Another Sweater Refashion

I've been out of commission for most of this month. My mom passed away suddenly four weeks ago.
I did this refashion a while ago. I started out with this sweater/dickey combo thing.


At 1x, it was too big and I wasn't thrilled with the shiny false-shirt fabric. So I removed the dickey, took in the sides, and used scrap yarn to crochet a decorative neck edge.

I love this sweater now.
SSS '11 Day 17 SSS '11 Day 17

the funky red shirt


v-neck.
check

pocket.
check 

but then it looks like a scrub top right?

oops. 

so, this is what i have come up with thus far:


for more pics of the after & different sleeve options, come visit me!

Thursday, October 27, 2011

More shoe clips

Another weekend, another wedding to attend. And this time it's a formal evening wedding, so once again, I need fancier shoes.

So I took my basic black dress shoes....

....and, in a similar fashion to the brown shoes I fancied up for this month's other wedding, I made clip-on embellishments. This time they were made using some extra-fancy buttons and some chiffon ruffly ribbon, as well as the earring clips. (I had to buy all of these materials new because I had nothing on hand that would work, but this sort of thing could easily be done with stuff around the house.)

A close-up view. What can I say....I'm like a magpie in my ability to resist sparkly objects.

And, just like the other pair of shoes, these are completely removable. (Which is good, because I'm probably going to end up wearing the shoes plain for the rehearsal dinner tonight!)

Tablecloth to aprons

I took this circular tablecloth


and made two aprons out of it


Here's what the slightly shorter one looks like on 


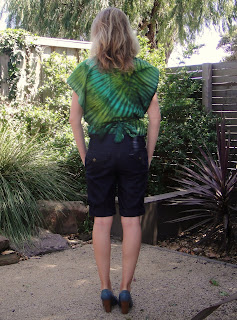
DIY Tie-Dye Wrap Blouse

Based on a vintage advert for "wrapped cloth" in the LIFE Archives, Whitney, who blogs at freshlygiven, created her own DIY wrap blouse from her grandmothers old skirt, and wrote a tutorial on her blog so I decided to give it a go myself..

DIY Wrap Top


Tie at the back

I used a piece of tie-dyed fabric purchased from Vinnies op shop ($4)


More here

Smelly Coat Reimagined - Memoryseed Style

Hello! One year ago I never even heard of the term refashion. Fast forward to today, here I am being included in the Refashion Co-op community. Yay! I'm so excited! :)

I am a Malaysian born and bred, presently living in Iowa with my husband and son. Always been into making things, I love cooking and do a lot of handsewing (mostly home deco stuff and crafts). My husband bought me my very first sewing machine 2 years ago, but I only braved myself to have a go at using it last year. My goal this year is to teach myself garment sewing, and that's what I've been doing for the past few months...


For my first post, I am sharing with you my Cape/Cloak/Capelet project that I completed last month. It took me about a month from start to finish, but I am super proud (and relieved) that it's done!


Materials
:
  • 1 Smelly long tan suede coat (fabulous faux fur collar came with it) found at a consignment shop (cost $20)
  • 1 thrifted men's plaid wool jacket (cost $0.25)
  • Thread from stash
Unfortunately, I do not have a before picture of the coat and jacket, but here they are reimagined:


And here I am at the park wearing the cape/cloak/capelet, fit for chilly fall in the Midwest.


If you are interested to read more on this project, come and visit me at my blog
Memoryseed (I'm very green at blogging too!). I have a few projects on the works, so I will be back soon.

Peace,

Far @ Memoryseed

Wednesday, October 26, 2011

Ruffle Dress Refashion

This was my first clothing refashion (and my first post on here by the way) and I am addicted! This was also a no-waste refashion. I got the dress for $3 at a thrift store.

I was stupid and didn't take a before picture, but it looks like the before shot of the dress in this post:

It's pretty much the same, except mine had a piece of teal ribbon tacked down in two places to seem like a be a belt. Here's what I did:
  • Cut off several inches from the bottom
  • Took off the ribbon and used it as bias tape for the hem
  • Use half of the fabric from the bottom to create the ruffle around the neck
  • I cut the strip of remaining fabric in half and made two small, loose ruffles which I attached to the armholes to make sleeves.
It was so much fun! A friend even borrowed it for a theme party. She was supposed to be a 1940s farmer. Here's me in the dress (it's a yucky cell phone picture):

...and my friend
.

I definitely will be sewing up some more adorable things in the future, but I don't have a sewing machine. I have to wait until I go home to use my mom's.

PS: I blog about clothing and feeding yourself cheaply at my new blog.

Old + Old = New

While I was searching through my closet for items for a clothing swap, I found two doubtful things. I still liked them, but was never wearing them because they were just not right. The skirt was too long for my slightly short legs and the all-grey dress was just a tad boring. So when my friend came with the story about people who customized old clothes into new ones for a year long, these items seemed to be the perfect ones to start with.

The skirt

The dress

I got rid of the top layer of the dress (I might use that for something else) so just the lining was left.

I replaced the top layer with the skirt and sewed it on in the same shape the original layer was attached.


And tadaa!


And then there was my brand new dress.

Tuesday, October 25, 2011

Pillowcase to PJ's

Elliott and I have both been full of cold these past few days. So while he slept yesterday afternoon, I whipped him up something cosy to snuggle up in for the evening..
I'd thrifted this vintage flannelette pillowcase a week or two ago with plans to make him some cosy Mini Boden'esque PJ bottoms. I just LOVE flannelette/brushed cotton. Unrivalled in terms of cosiness on chilly winter nights, in my humble opinion. I planned to use a pair of his jeans to draft a basic pattern...


Then I remembered this PDF pattern from Made. Score! I made a few minor changes in terms of size/length and then joined the front and back piece together and cut them as one. Less cutting, less sewing! This way I needed to cut only 2 pattern pieces instead of 4, which negated the need to sew any side seams. Just the crotch seams, front and back, and the inseam.


He loves them but they only just fit him in the waist. Ooops. I miscalculated seam allowances, doh! Easily rectified on the next go. They're so soft and cosy though and only took about 40mins to make including pattern alterations. Which is just as well because leaning over a cutting table and sewing machine when you've got a runny nose is not fun!
Px

A Baby Sweater From Old Thrifted Adult Sweaters


This is a nice idea for winter for your little ones. I collect sweaters at thrift shops and garage sales and cut them up to make a wide variety of things. Once you shrink them they don't really unravel and are easy to work with. To see my tutorial click here at Sew Country Chick.

Monday, October 24, 2011

Halloween costume in progress

Hello all! Sorry I've been silent lately, but high school has filled up my schedule quite a bit! I've been working on my little brother's costume as Eye-in-stein (Einstein). My mom is making the lab coat, while I'm doing the eye in a stein work. So far, I've drawn the stein on the (very) large t-shirt that used to belong to my mom, and started on the eye made out of scrap felt. This is what it looks like:


I'll be adding some veins and eyelashes to the eye. I'll post up the finished results as soon as I can!

-Kiki


Cardigan & Jumper Combination


Unfortunately, I don't have a before photo. This is a combination of a horizontal striped jumper and a plain grey cardigan. 
I cut the back and front of the jumper into the shape of sleeves. I attached some extra pieces to the end of the sleeves to create cuffs and did a double row of crochet to finish the edges.
I removed the grey sleeves of the cardigan and sewed on the newly made striped ones.
To finish off I sewed the rib from the jumper to the bottom of the cardigan