Friday, August 31, 2012

Demure for Sure Cardigan


My favourite model, Penelope Hanger has been working hard to showcase all my refashions when I said to her to take a load off and relax. She agreed that it was time to take a break and demurely arranged herself on my 1970's white wicker outdoor setting.


So here is Penelope at the start of her working day in her uber plain black cardigan 

And here she is Demure for Sure, kicking back and relaxing in her  refashioned cardigan.

To see the full transformation please visit me @ my blog.

T-Shirt Kimono Tunic

I tried my hand at Love Flow Creations' T-shirt refashion posted here.  Mine came out way too large, so I modified it and came up with this version:

tunic front
and back
  • I used a total of 2 t-shirts.  
  • The main shirt is just cut open at the sides and the sleeves are removed.  
  • The other 1/2 of a shirt is folded in half and sewn along the top to continue a shoulder seam. (Its neckline & sleeves had already been removed.)  
  • The raw edge of the folded 1/2 shirt is sewn to the raw edges of the main shirt to form a sleeve.  
  • The folded side should face outwards so you can cut a slit 1/3 of the way down it.  That way you can fit your arm through like a kimono sleeve.  
  • I left the bottom of the sleeve unstitched. 
    It was already hemmed since it's the bottom of the original shirt.  So is the main shirt.  
  • Then I added pockets to the bottom of the main shirt using the sleeves I had removed. 

here's what it looks like spread out on the floor

To see me wearing it, go to my blog Project Minima, "T-Shirt Tunic Mod"


Maternity Dress Refashion


And no I am not pregnant! This was a freecycled dress that I was originally going to toss, but then I looked at it, and felt bad for it, and since we all saw this today on Facebook, and it's all true, here is today's refashion!

Here is the dress:
Adding insult to injury, the straps were originally tied together with a hair tie (? seriously ?)
But it's a maternity dress alright! See?
I cut off the straps, and the top part, above the folds:
Took it in the back:
Rearranged the straps:
And ...
Much better! I was also excited to find a use for that belt I thrifted at the Goodwill outlet!
Also - this is a no sewing machine tutorial! I did it all by hand!
Have a good day! For more fun and Russianness go to http://beingzhenya.wordpress.com!
Xo,
Z

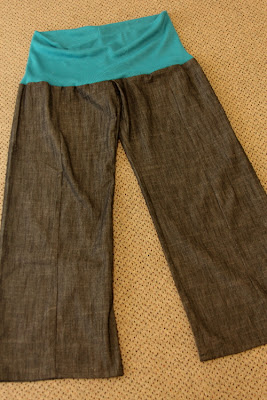
Maternity Pants & Belly Bands

Hi everyone, it's been a while! I realised that I haven't done any sewing at all since I was 6 weeks pregnant, and now I'm 15 weeks. Eeek! So I pulled out some supplies, and made a few simple maternity things today. 


This is the first pair of pants that I made. They look a bit funny because I had to cut a lot of the top of the pants off (the seams in the butt were starting to split!), but you don't even notice if I wear a tunic top over them. 


These are my favourite ones! I made a jumpsuit that wasn't fitting properly before I was pregnant into a pair of awesome maternity pants. 


I also tried making a few large scrap pieces of fabric into belly bands using this tutorial. I don't know how well they work yet, because I haven't had a chance to see if they hold my pre-preggo pants up properly but they were fun to make anyway.  Feel free to visit my blog if you'd like to see some more pics & details of what I did! 

Dress Refashion and Children's Shorts

I have a few refashions to share.  The first is a thrifted dress that I finally got around to restyling.


I don't have any sewing-in-action photographs, except for the initial sizing up of dresses, but I've chopped off the sleeves and collar to re-design the dress into a sleeveless number.  I've pinched the fabric together at each shoulder, and hand stitched using invisible thread to stay in place, which makes them less boxy, similar to TwoButterflies technique (thanks for the inspiration!)

My Duct Tape Dress-Form got her first work out too!


The second sewing projects I've been doing, are men's shirts refashioned into little boys cargo shorts.  I've used  Seamingly Smitten's BOYS Classically Cool Cargo Shorts pattern for these (available here)


Thanks for reading!

Photobucket

A simple sweater dress refashion

This is a super simple refashion! I thrifted this very long grey cashmere cable knit sweater dress for a few dollars a couple of years ago. It was way too long for my short frame and the neckline was unflattering for my stumpy neck.


First a quick cut and hem at the knee. Then use the cut off material to make a circle and attach it to the neckline. Voila! A much better sweater dress for me. I can't wait to wear it this Fall/Winter season!

Thursday, August 30, 2012

Denim refashion week!

Hiya! I decided yesterday I'd start a week of denim refashions as I have quite a few pairs of jeans & a couple of skirts that don't fit me!
For my 1st refashion I took these gifted jeans a friend bought for a dollar at our local market...they were super tiny..how she imagined I'd squeeze into them I will never know!
 So I figured they could make for awesome lil skinny jeans for Mr 6...I chopped off the bottom & cut all the way up the side seams:
 Then tapered them and sewed back together...and after 3 fittings which Mr 6 was not very impressed about here they are:
I love how they turned out & they fit him great! To follow my denim refashion week come on over to my facebook page and please feel free to share your own denim refashions too! =)

2-Minute T-Shirt upcycle - Sleeve Headband

This is an amazingly easy (and effective!) way to make a headband for taming long or wild hair. My partner is growing his hair long for the first time (nothing to do with my influence, honest! :p) and it’s getting to the point where he finds the bits in his face a bit annoying. This is an idea suggested by a friend of his – using the sleeve of an old tshirt as a headband.

I started with an old t-shirt which had already had bits chopped off it for other projects


Chopped off one sleeve, removed the hem (this would not always be necessary but i started with a fairly small t-shirt so the sleeve wouldn't fit with the hem stopping it from stretching!) and cut it down to make a headband about 3" wide. The underarm seam goes at the back of the neck when you have the headband on. I left the black one plain for my boyfriend and made a pink one for me which i decorated with some scraps and a button. Finished products:


If you would like a bit more detail on what i did you can find it here.

Kermit I have your Ombre Sneakers

This should have been a relatively easy refashion. Bought my cheap chain store sneakers and the plan was to use them for my tai chi classes. Yes I know that you are meant to wear black for tai chi.....but I struggle with the whole totally black sombre thing and those that follow my refashions will know that I like a bit of colour. Anyway I thought that I would tone down a bit by creating a soft sage green ombre effect sneaker. So I start with my soft sage tube of paint and create a block colour on the toes. At this stage I thought that it all looked a bit Kermit but I convinced myself that the paint was wet and that is why it was sooooooo bright green. I continued on with my ombre plan and that worked quite well.

Upon drying my sneaker still remained bright green. I did wear them to tai chi(It was too late to back out of my Kermit sneakers) but I was very self conscious in a sea of black. Okay so I don't think that I can continue to wear my ombre bright sneakers to tai chi. So this is were I need your help. Do I leave them as they are and just wear them for fun? Are ombre brights okay or is it too left field? Perhaps I should mix in black with the green paint(I googled how to create a sage green) and repaint them? Or should I just give up, laugh it off, put it down to experience and give poor Kermit his sneakers back.

Thank you in advance as your kind words of wisdom are going to be much appreciated.

Blindingly white sneakers ready for their soft calming sage green ombre effect

Hmmm......paint is still wet I am sure these with dry into a nice soft sage colour

Ombre effect has worked well.

Okay Kermit come and get your sneakers back!

Black & White at The Night Circus


It’s literature inspiration week at the Sew Weekly. Friends, I LOVE TO READ!! Heck, I’m in school studying librarianship! It is my favorite thing to do. Followed by making things. For this week’s challenge I had my heart set on channeling one of my absolute favorite protagonists (EVER) one Ms. Lisbeth Salander from The Girl with the Dragon Tattoo.
Visit my blog to read about how I ended up sewing something inspired by The Night Circus, and made almost entirely from my hubby's old t-shirts, instead!


Black & White & Night Circus

Black & White & Night Circus
Three of my kiddies! The oldest is the one taking the pictures ;o)
Black & White & Night Circus
The white portions are unevenly cut, intentionally, so that more or less of the b&w fabric shows from each side. Overall, the look's not bad. One more shirt with a bit of pizzazzzzz to add to my go-to fall jeans and tee uniform. And a dead simple, dead comfy little slip of a skirt to throw on with tunics. Leave it to me to use a fantastical, magical, transcendent work of art to make practical, casual basics!

Wednesday, August 29, 2012

Black and White and Big All Over

When I found today’s refashion, I was immediately drawn to it’s funky black and white swirly print.  But clearly there is WAY too much of it happening here and clearly it’s way too big for me.


I started out by taking the whole thing, including the armholes.  Then I lopped off some of the length.


I added a necklace, belt and flats to finish off the look!


See how it all happened at Refashion Forward!

-Laura M.
Refashion Forward

Jeans Refashion - Plain Pants to Crazy Pants!

This was more of an embellishment project than a major refashion, of two pairs of plain short jeans with the addition of lots of little stars and hearts cut from old socksthat had holes in the heel or had lost their partners, all painstakingly hand stitched on. The name 'crazy pants' is my partner's doing, he definitely thought i was a bit mental to be using socks as a decorative material. But i think they have turned out well!

Here are the before pictures of both pairs (the blue ones i had started to decorate while on holiday a couple of years ago so they already had some bits on)


And here are the finished articles!


What do you think? Too crazy? Or just right?!

More photos and details on my blog :)