Thursday, July 30, 2020

diy tutorial ruched dress


As my before fabric I used too long and too big  dress from viscose.  
Colors of the dress red orange and some claret fit perfectly for hot summer days . 
As first I resized it a little as it was too large as you can see on photos  next I added ruching on both sides of the dress, thanks it you can change the lenght of the dress and wear it as you like in this moment . My last move was to gather some material on the top , it changed the neckline and made it more fitted to the body .


Whole process how to do it you can see on my channel 
and more tutorial photos on my blog


Wednesday, July 29, 2020

The Paper-Bag Skirt

Hello Refashion Co-op. I have been wanting something with a paper-bag style waistband for a while. I found an easy way to make one. I used this black skirt. It was a little too roomy in the waist. That was perfect for what I needed.

I cut the skirt at the bottom, right above the hem. That was going to be my belt.

I stitched the belt at the right height in the back. I stitched right next to the zipper but not on top of it. I thought attaching the belt in the back would help keep it in place.

The belt is an easy way to gather the waistband together and get that "paper bag" look I wanted. And it can be bigger or smaller depending how the Corona snacking is going that day.

Thanks for reading along, for more pictures and details go to I Can Work With That.

Saturday, July 25, 2020

How to make cami slip top


As my before fabric  I used lovely but too big blouse in beautiful lilac color , it's 100 % silk that's why my ideas how to refashion it  spin around cami slip top , resized blouse or just top.  
Finely  I decided cami slip top will be the best option.  I did inspire myself by Alexander Wang and added lace at the top, I think it was good move as lace gave this top chic. 


Whole process how to do it you can see on my channel sparrow refashion 
and more tutorial photos on my blog .


Friday, July 24, 2020

Summer Colors

Hello Refashion Co-op. I hope you are doing well. I had an outfit with beautiful colors that were perfect for summer. The fit was not what I wanted. The pants were too long but I liked those wide legs. The shirt was light and bright and actually fit well but the sleeves made it look really big on me.

The pants needed to be shortened to a nice cropped length. The waist needed a couple tucks to make it fit better and give the whole outfit some shape. 

The shirt was so pretty. I just needed to make those sleeves a little bit smaller.

That was it. I was done with my work. I liked this summer outfit a lot now.

Thanks for reading along, for more pictures and details go to I Can Work With That.

Sunday, July 19, 2020

Green with Envy Refash

I have slowly been chipping away at the mountain of clothes my mom gifted me. Here is 1 shirt perfect for summer! Cute pattern!
DSCN1982
I decided that this top needed new life with a brand new color! I tried my luck with Green!

DSCN1983
Ready to go into the dye bath!

DSCN1990
After the dye. Turned out pretty good! :)

DSCN1991
Took in the sides for a more fitting look.

DSCN1992
The Front!

DSCN1993
The Back!

PhotoCollage7_19_2020_4_00_29_PM
Happy Refashioning!
Check out my stash of refashions on my blog!

Friday, July 17, 2020

Polo Shirt Scraps

Hello Refashion Co-op. How are things with you? I posted about a polo shirt-to-shorts refashion last time. I wanted to share what I did with the rest of the shirt.
(Hint- I made a shirt.)

I had the shoulders and sleeves. I needed a body for my shirt.

The shirt was too big. I cut it own on the sides and made the shirt a bit smaller all over.
(I am sorry I did not lay it out smoother. It looks a little wonky here.)

I thought the shirt was great with jeans and also the shorts I made last time. If I do a Zoom call people will only see the Polo shirt and not the lounge shorts. .

Thanks for reading along, for more pictures and details go to I Can Work With That.

Thursday, July 16, 2020

how to sew bucket hat [free pdf pattern ]


To sew this black denim  bucket hat I used old jeans but you can use any material of your choose  like cotton, linen or wool for colder days. On photos you can see only one version but on my printable pattern (on my blog) you will find four different models so you can decide which one will be more suitable for you.
I also added some jewelry  in gold color but not everyone will like such so check my inspiration board on my blog and find your own style. 
I must say bucket hats are now ''must have'' in fashion so sewing machines in hands !


Whole process how to do it you can see on my channel sparrow refashion 
and more tutorial photos on my blog .


Wednesday, July 15, 2020

Work From Home Wear

Hello Refashion Co-op. Are you working from home now? Some of my work is at home online in video calls. That means business casual on top and pajamas on the bottom.

My husband didn't want this blue Polo shirt. That means I can take it for my self. I used a pattern to make some shorts. That hanger is to hold the pattern down.

The fabric made very soft shorts. Yay! I made a quick elastic waistband.

A shirt that looks business casual is all I needed to join in a video meeting.

Thanks for reading along, for more details and pictures go to I Can Work With That.

Tuesday, July 14, 2020

Shopping my closet: Denim Shirts and Jackets "Light Refashions"

Denim shirts and jackets in my closet needed changes to be in rotation this fall.
I am grateful to re-fashion and alteration skills that help to make clothing fit my body shape.
My body shape includes:
  • narrow shoulders
  • smaller breasts in proportion to my overall large chest circumference
  • smaller thighs and seat area in proportion to my pouchy tummy.


#26 Women's Denim Shirt
  • Shoulder was fine. Sleeves were too long
  • Removed cuff and interfacing.
  • Basted and stitched cuff in place.
  • Removed collar. Top stitched collar band in place.
      After: Large men's shirt.           Before: Pin shows my shoulder edge.


#27 This men's shirt was large. Shoulders hung over, sleeve covered my hands.
  • Removed sleeves. Cut shoulder back several inches, but not to my shoulder. 
  • New arm hole was much larger than sleeve head. 
  • To take in the arm hole, I took several inches out of back of yoke and shirt bottom. This raised the yoke fairly high. 
  • Replaced the pleat in back with gathers.
  • Next time I would take more out of the shirt bottom and less than yoke. 
  • Replaced, stitched, serged sleeve.
  • Removed collar.


#28-29-30 Denim Jackets: Sleeves were too long. Placket area facings were not tacked down or top stitched in place other than the decorative jean stitching. 
  • Cut off sleeve length.
  • Serged, turned, itoned, hemmed.
  • Removed interfacing at front plackets.
  • Top stitched at placket areas in navy which blended in. 

Saturday, July 11, 2020

shoulder pad mini dress


XXL big man's shirt in beautiful navy blue color is my before fabric . 
 It's 100 % linen with viscose  which make it perfect as summer dress.
I changed too large and long sleeves into very trendy lately padded shoulders but mine are fake  .
From excess material I obtained from shirt I made corset waist .
 Shoulder pad mini dress makes perfect combination with corset waist in my opinion 💕


Whole process how to do it you can see on my channel sparrow refashion 
and more tutorial photos on my blog .


Wednesday, July 08, 2020

The Warm Shoulder Top

Hello Refashion co-op. How are all of you doing? I found this top at a clothes swap long ago when people met in groups. Ugh, I miss that. Those open shoulders are a no-no for work. So, I got to work on those sleeves.

I cut those low hanging sleeves off and narrowed the sides of the shirt a little. I finished the armholes. I wasn't done because I can't wear sleeveless tops like this to work either.

When I cut the sleeves off the shirt this is what they looked like.

I attached them to the armholes and they made fluttery little cap sleeves. I loved the new look of this top and they were work place approved.

Thanks for reading along, foe more pictures and details go to I Can Work With That.

Tuesday, July 07, 2020

Shopping my closet for t-shirt "Light Refashions"

EDIT: I added notes  on methods used.
I am shopping for " light re-fashions" from my closet.  
Work was needed to keep many items in the rotation.
I learned new skills and practiced old skills that will be useful in "full-on refashions". 
This post is lounge, sleep, yard-work, exercise  t-shirts that I worked on this week.


#10 #11 Neckline  Raised  Learning how to raise t-shirt necklines was a much needed skill.   
  • #10-11 started as several sizes too large. Leaving the body large creates a tunic style. 
  • Remove sleeves. Gently pull the thread in the seam in that will release the rest of the stitching.
  • Cut shoulder seam off. Pin/baste so that trim edges and shoulder edges meet up. Ease back or front shoulder in if one is longer than the other. 
  • Seam shoulder seams to raise neckline. Make several seams and check for fit on each seam. Take only a pressure foot seam at a time - the neck raises quickly. Check that you have room to go over your head. 
  • Do not let back neckline become too short. You can cut more off of the front and create a slight hi-low hem. 
  • Trim the new shoulder seam. Press to back. Top-stitch. 
  • Reinsert sleeves. The shoulder seams create a smaller arm hole. 
  • Fold the sleeve to find the cap. Place a pin to mark the cap of the sleeve, pin at to the shoulder seam and at the side seam.  Ease the sleeves back in. Seam.
  • Overlarge sleeves can be altered at the original seam. Large sleeves were good on these at-home Ts. 


#12 #13 are the same style. Neckline  Raised.
  • #12-13 methods follow #10-11
  • These started as several sizes too large.
  • Removed sleeves. Seamed shoulder seams to raise neckline.
  • Reinserted sleeves.
  • Released tight elastic in lower sleeves.


#14 Neckline Raised and Ruffles Removed
  •  Seamed shoulder seams to raise neckline.
  • After I cut the original seams, the back shoulder was wider. I eased it in. 
  • I also cut more off of the front creating a slight high low hem. 
  • The ruffles were worn. I un-stitched and saved in the scrap bin.


#15 Neckband Replaced.
  • Ruffle from #14 was used to cut a neckband for #15
  • Press the ruffles and trim to 2" width with rotary cutter.
  • Press in half and iron.
  • Cut length to 3/4 neckline length.
  • Pin/baste. Stitch. Press. Top-stitch.


 #16 Navarro College t-shirt shoulders narrowed
  • remove sleeves, cut off shoulder width
  • take side in below sleeve re-placement
  • replace sleeves

#17 Neckline Raised
  • Elastic inserted to raise the neckband
#18 Trim removed from neckband   Trim is often the 1st to show wear.


#19 Removed elastic to raise neckline


#20 Oversized t-shirt was altered. 
  • This oversize shirt needed standard fit, not tunic fit.
  • remove sleeves, cut off shoulder width Measure shoulder width on a good fitting T.
  • take side in below sleeve re-placement 
  • replace sleeves
  • Cut off length, save for mending bin, hem. Shirt was torn at hem and much longer than needed.
#21  T-shirt was mended using #20 scraps. 

 
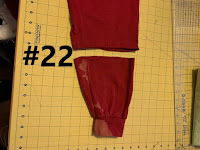
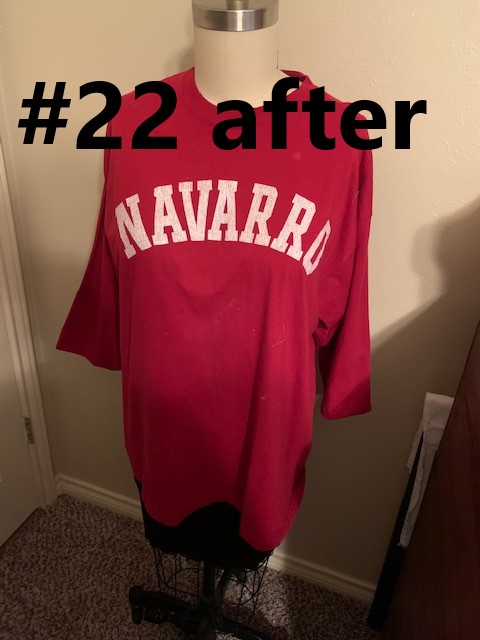
#22 Bleach Stains removed.
  • Long sleeves cut to 3/4. Hemmed.


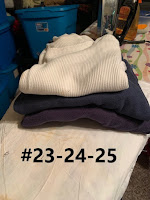
 # 23-24-25 Hand mending seams put these back in rotation.