
Along with my partner, Dan Leo, we have a business, Dyed Stitches, where we upcycle used clothings into items that I can't help but make. I live and breathe new designs. I no longer look at a shirt and see just a shirt, but instead how many pieces of clothing and/or accessories I can turn it into. I've been cutting up clothes for quite a few years now making them into something different, however, with Dan's help my stash of about-to-be-cut-up clothing is magically transformed by his tie-dyeing techniques. So when I went through my stash of tie-dyed t-shirts and found this baby sitting amongst them all, I decided to try something new.
 |
| tie-dyed t-shirt before |
First of all, how could I possibly cut up the peace sign? Nuttin' doin'. Couldn't happen. So, for the first time I had to figure out a way to make this skirt to be longer than the ones I'd done previously when cutting them under the armpits and folding the top over for an elastic waistband. Somehow I had to use the whole shirt without the neckband and sleeves as part of the skirt.
 |
| shirt with sleeves and neckband extracted |
 |
| and off with the sides and shoulders! |
 |
| front waistband pinned to the front of the skirt |
What I decided to do so the 1/2" wide elastic wouldn't roll in the waistband after it was sewn was to cut it into two pieces -- one for the front and one for the back. Therefore, I had to cut a front waistband and then a back waistband. I normally don't do it this way, but thought it would be better in the long run for this fit.
 |
| I sewed the front waistband to the front of the skirt with black thread so you could see it better. |
I cut out a strip 2" wide x 20 1/2" long (the length of the top of the skirt), sewed the strip right sides together with the top of the skirt. Then I folded it in half, wrong sides together and sewed it along the same seam line as the previous one. This created a waistband where I could insert the 1/2" wide elastic.
 |
| elastic with elastic pinned at seam allowance |
So, what you see in the above photograph is what the waistband looks like on the front side after sewing it to the skirt and after threading the elastic through the side seam. I pin the elastic in place so that it doesn't slip through.
I sewed the back as I did the front, and then when both are done, I pinned the side seams from the waistband to 8" above the hemline. You should pin them right sides together, but as you'll notice from the photos the back of mine is wrong side out. I left it that way. Apparently, I'm not planning on selling this one!
I sewed the back as I did the front, and then when both are done, I pinned the side seams from the waistband to 8" above the hemline. You should pin them right sides together, but as you'll notice from the photos the back of mine is wrong side out. I left it that way. Apparently, I'm not planning on selling this one!
 |
| On the inside I clipped the seam allowance near the waistband so that I could zigzag it to prevent fraying. |
 |
| I sewed the side seams to 8" above the hemline and clipped the seam. |
The reason for clipping the seam is so that I was then able to turn under the seam allowance below the clip all the way to the hemline. I turned in the seam 1/4" and then another 1/4" so no raw edge is showing. This gives me plenty of room to walk or sit while wearing the skirt and it's not prohibitively narrow around the knees. Sometimes a seam will break if there's no walking room in the width of the skirt.
 |
| the turned-under seam allowances above the hemline |
The last thing to do was to stitch close to the turned under edge of the seam allowance, sewing across the other side below the clipped seam, cutting any long threads, and then put it on and wear it with pleasure!
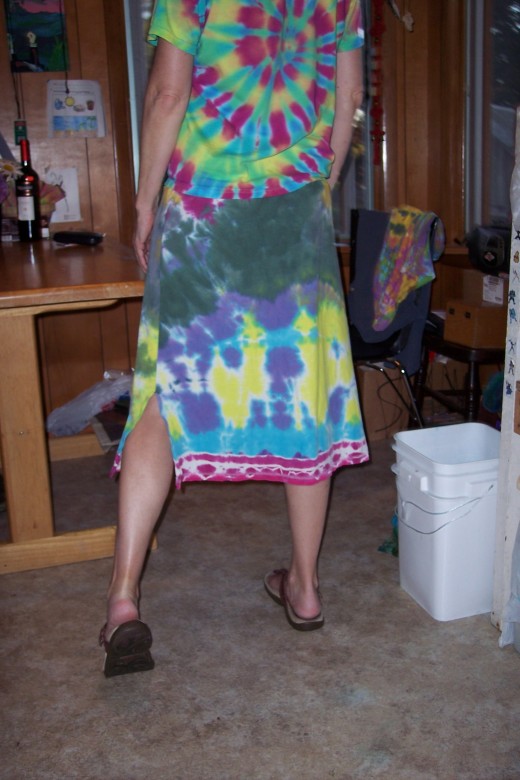 |
| Here's the back with the slit splayed so you can see it. Picture by R.J. Leo |
 |
| and here's the front Picture by R. J. Leo |
This is the first of many of these skirts that I plan on making. I feel so very fortunate to be able to have the selection of tie-dyed t-shirts from my partner, Dan. His tie-dyes are just exceptional!
I also wore this as a dress with the "waistband" under my armpits. It made for a great swimsuit cover-up!
Also, if you're sewing on a regular sewing machine, not a serger, with these knits, I highly recommend using a ball point needle and stretching the fabric while you sew, especially the waistband. Otherwise, your stitches will pop when you stretch the skirt over your hips. Just sayin' -- been there, done that, my friends! Now, happy sewing and thanks for stopping by!
1 comment:
Thank you Jill for such an in depth and interesting post. I like how you kept the bottom of the skirt and the peace sign intact.
Debbie
EOD
Post a Comment