Showing posts with label RanchHouse. Show all posts

Monday, July 17, 2017

Re-fashion #2 for Quilted Vest

#86 Back to School Wardrobe

BEFORE: Vest in the Mending stash.
#1 Re-fashion last year from quilted jacket to vest included:
  • Used sleeves to cut/insert side gussets
  • Replaced buttons. 
  • Added denim and leatherette trim.
  • Faced the arm-cyles with binding. 
GOAL for this Refashion: Replace or recover peeling leatherette trim.

STEPS: I liked the original trim, which took time to apply.
I did not want to seam rip and replace the trim. 
  • Leave the trim in place.
  • Hand weave gold trim in place over the peeling trim.
AFTER:  Re-fashion #2. Vest is saved from the mending pile and ready to wear.

AFTER:  Re-fashion #2.
Vest is ready to wear

AFTER:  Re-fashion #2.
Vest is saved from the mending pile
New gold woven into trim
 over peeling leatherette.
Gold trim woven
over peeling leatherette.
BEFORE: Peeling trim from 1st Refashion
I  did not want to take time to replace it.


Friday, July 14, 2017

RanchHouse Summer Time Lounge Shorts

#85 Back to School Wardrobe

REFLECTIONS:   During this year of no new clothes, Texas RanchHouse shorts come from stash, not store.

BEFORE: Men’s pants from Refashion stash. I had taken them apart. They were oddly shaped.

STEPS: Original pants needed to be pieced due to deconstruction process.
  • Cut the legs off at shorts length.
  • Use cut-off legs to piece side inserts between the front/back.
  • Use one seams pants pattern to recut shorts.
  • Use stash t-shirt to cut knit waist band.
AFTER:  Casual RanchHouse Shorts.

  • Loose fit, to wear at home. Gardening, walking to the mail-box on the dirt road in Texas heat!!!
AFTER: Casual RanchHouse shorts.
I hear the song "Summer in the City"
It is summer at RanchHouse and it is hot!!
Top stitched seams


T-shirt knit elastic waistband. 
Original pants 
pieced/recut 
for new shorts.


One-seam pants pattern

BEFORE: Mens pants from
Refashion stash.
Already deconstructed.


Monday, July 10, 2017

Faux Sheep Hoody Vest

#84 Back to School Wardrobe

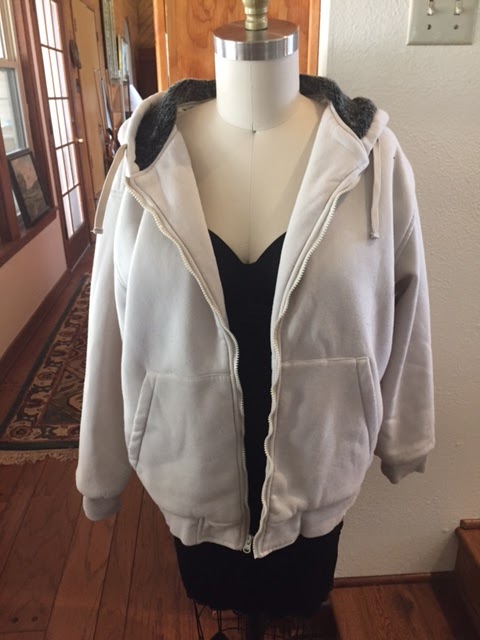
REFLECTIONS:  Who knew? Another sweat jacket hoody hiding out in the closet. Unworn!

BEFORE:
  • Another sweat jacket hoody from the closet.
  • Bulky faux sheep lining, made sleeves too tight and limited movement and layering underneath.
STEPS: 
  • Seam rip sleeves from jacket. Open jacket sides.
  • Cut and insert side gusset cut from sleeves.
  • Serge all edges to make them manageable.
  • Self face arm cyles with lining.
  • Put all together and top stitch arm cycles.
KEPT:
  • Faux sheep bodice lining to warm body core, and cause it was too cute to loose.
  • Kept the sheep hood lining, which was not too thick and lay flat during wear.
AFTER:  Sheep lined Vest ready for the winter wear.

AFTER: Sheep lined vest.
Side insert cut from sleeves.

AFTER


Kept faux lining in core and hood.

BEFORE: Fully lined.
Too bulky and tight.  

BEFORE: Fully lined.
Too bulky and tight.  


Sunday, July 09, 2017

Less Bulky Sweatshirt Jacket Hoody

#83 Back to School Wardrobe

REFLECTIONS:  Re-fashion is slow during the summer transition from full-time teaching to semi-retirement.  It will pick-up with a clearer vision of my new life-style.

BEFORE: Sweat jacket hoody from the closet. Not worn much due to bulky quilted lining, which made sleeves too tight and limited movement and layering underneath.

STEPS:  
  • Seam rip sleeve bulky lining from sleeves.
  • Serge edge of bodice lining.
  • Hand stitch in place.
KEPT:
  • Bodice lining to warm body core.
  • Fur hood lining as design feature, not too thick and lay flat during wear.

AFTER:  Simple, but effective Re-fashion. Sweat jacket hoody with bodice lining to warm body core.

AFTER: Inside of jacket
without sleeve lining.

Serge and hand stitch bodice lining,

AFTER: Without sleeve lining.

AFTER: Full jacket ready to wear. 

BEFORE: Inside out with bulky quilted lining. 


Monday, June 26, 2017

Tunic and Vest from Dress and Jacket

#82 Back to School Wardrobe

REFLECTIONS:  Current focus on Re-fashions includes pre-retirement University professional clothing to fit the current lifestyle.   
Current part-time work needs are:
  • Professional clothing, but not at the University level.
  • Business casual clothing.    

BEFORE: Unstructured suit-dress that fit the on-campus University life-style.
Imagine:
  • hose and heels for fall / spring
  • sandals for summer  

STEPS:  I wanted a looser tunic style fit. I switched rolls.  Original sleeveless dress becomes tunic with sleeves. Original jacket becomes vest.
  • Remove sleeves from jacket. Open sides of jacket and dress.
  • Cut 4” strips from the bottom of the dress.  Insert strips into sides of original dress (now tunic), original jacket (now vest), and sleeves.
  • Re-insert sleeves.

AFTER:  Vertical stipes in the inserts against original horizontal stripes was a good design element.  
  • Tunic with new sleeves.
  • Vest to layer over tunic.    


AFTER:
New tunic / vest
for more casual part-time work

AFTER:
Looser tunic style
Sleeves switched to create vest and tunic.

New vertical insert
cut from dress length
adds design element

Looser tunic style top

BEFORE:
On-campus unstructured suit-dress.
Imagine hose and closed toe shoes.

BEFORE:
On-campus sheath dress with jacket.
No sleeveless allowed. 


Saturday, June 24, 2017

Saving a Shirt with Shoulder Seam Adjustment


 #81 Back to School Wardrobe

REFLECTIONS:  Last August I self-challenged to: Shop from the closet. 
  • No new / used clothing for this school year, until this August.
  • This year of no shopping has expanded to include Charlie’s closet..
BEFORE: From Charlie's closet.
  • Thrifted nearly new, shirt was too large in shoulders.
  •  Shoulders were too wide and the sleeves came down below his elbows.
  • Narrow shouler adjustments were needed in many of my own Re-fashions.  
STEPS:
  • Remove sleeves.
  • Trim 2 1/2 “ total, 1 1/2“ off on the shoulder and 1” off of the sleeves.
  • Re-insert sleeves. Serge.
NOTE: When I trimmed the shoulders back, the arm cycle was naturally enlarged. The sleeve was adjusted to fit into the larger opening. And ½” seam was taken to adjust the arm cycle opening at the side seam.

AFTER:  Charlies shirt that fits.
  • Much appreciated in this no shopping year.

AFTER
Edge of board marks
change in shoulder seam
DURING

AFTER: Edge of board marks shoulder
seam spot before adjustment
Removed 1 1/2"' inch shoulder
1" from sleeve cap
   
BEFORE:
Paper marks before width of shouler
BEFORE: Too wide shoulder
Too long sleeve

Wednesday, June 21, 2017

Garden Clothes from Worn Loungers

#79 and #80  Back to School Wardrobe

REFLECTIONS:  Last August I self-challenged with: Back to Elementary School Wardrobe. 
School is done, but the 1 year challenge is till August. 
  • Goal #1: 10 Re-fashions each month beginning last August when I returned to teaching.
          ** Goal was 120 Re-fashions total for the year.  I have done 80 with 40 more to go.
  • Goal #2: Shop from the closet. No new / used clothing for this school year.
         **Bought 3 winter tights and 1 “Aggie Grandma” t- shirt for Granddaughters graduation party.                                            Whoop!!!
  • Goal #3: Shop from the sewing stash for Re-fashion materials.
        **Bought 2 small fabrics for a Re-fashion.  Whoop!!! Whoop!!!

Todays Re-fashions are garden clothes for Texas RanchHouse 100 degree plus summer days. 
I need garden clothes that take the abuse of dirt, sweat, and daily washing.

#1 BEFORE: Years ago, the 1st Re-fashion was to cut off stirrup ankles and hem these pants. They are favorite at home loungers and very worn. Ready for the garden.

STEPS:
  • Cut legs to above the knee; open inside seam.
  • Use scraps to add a crotch panel to mend and support the worn crotch.
  • Insert fabric strip in the inseam to enlarge new shorts.
  • Serge all seams.
AFTER:  Perfect RanchHouse knit summer shorts for the garden.

BEFORE: Worn loungers,
Years ago 1st re-fashioned from stirrup pants.

Cut legs to create inside seam insert,,
to enlarge and reinforce wear.

AFTER: Perfect garden shorts
that take dirt and daily washings.

Enlarged in the inseam. 


#2 BEFORE: Years ago, the 1st Re-fashion was to add a black knit insert to enlarge this t-shirt. It was a favorite sleep shirt and was very worn. Ready for the garden.

STEPS:
  • Remove the old black insert. Even for the garden, I did not like it.
  • Cur the sleeves to shorten.
  • Insert fabric strip / gusset made from red t-shirt scrap and striped sleeve to enlarge the sides. .
  • Serge all seams.

AFTER:  Perfect RanchHouse knit summer t-shirt for the garden.


AFTER: Red stripes replace tired black stripe.
And add color pop. 

AFTER: Red strip / red knit
enlarge tight side.

AFTER: Green strip / red knit
enlarge tight side.

AFTER: Red color pop.

AFTER: Red color pop. 

AFTER: Ready for the garden


BEFORE:  wanted short sleeves

BEFORE:  Black inserts  were no fun.

BEFORE:  Black insert not fun 

BEFORE:  Black insert needd to go.


Friday, June 02, 2017

Too Long Basketball Shorts Saved

#78 Back to School Wardrobe

REFLECTIONS:  We are home for the summer at the Texas RanchHouse with 100 plus weather.
  • Shorts are the dress of the day.
  • My Grandpa age husband felt these below the knee Basketball shorts were not his style.
  • He wanted to toss, but I am still in a no new/thrifted clothes year, 
BEFORE: Husbands below the knee, too long Basketball shorts. 

STEPS:
  • Before cutting; ran stitching to hold the shorts lining to the outside shorts.
  • Cut 4” off hem. Serged.
  • Turned and top stitched.
AFTER:  Perfect RanchHouse summer shorts for the husband.

AFTER: Perfect for Grandpa's summer days at the RanchHouse.
Or maybe a cruise?
The Basketball style and 4" removed. 

AFTER

BEFORE: Below the knee, too long Basketball shorts. 

Friday, May 12, 2017

Finally Fit Down-sized Jeans

#77 Back to School Wardrobe

REFLECTIONS: In my retire/rehire teaching job, teachers wear jeans daily.

BEFORE: I don't wear skinny jeans, but these already resized jeans needed more down-sizing.
  • 1st Re-fashion was to run both side and inside seam. 
  • Stopped just below and did not ruin the pocket.
STEPS:
  • 2nd resizing: Took total of 1" off of each leg.
  • Ran a Serger seam 1/4" wide.  On both outside & inside seams.
  • Pink was already on the Serger, but used true color on straight seams.
  • Then straight stitched in blue just inside serger seam. 
  • Cut ½” off hem. Serged / hemmed.
AFTER:  Perfect fit jeans.
  •  Not tight fit, but perfect for this retired/rehired teacher.
  • Amazing what 1" total will do. 
WHAT I LEARNED:
  • Several tries was worth the work.
  • One large seam in the 1st resizing might have been too much and could not be put back.
  • Small gradual re-sizing finally worked.

AFTER: Finally fit jeans
Pink was on the serger.
Straight stitched in blue.

Had been resized earlier.
Now 1/4" seam on both inside/outside legs.
1" total was a big change 

New hem 

Stopped new seam just below the pocket.
Waist fit fine.

Inside seam refit seat