
 This is what I call a “sleevelet,” made from the sleeve of a shrunken wool sweater. It’s cozy and comfortable and great for the coming chilly months. A fun little eye-catching accessory. And they’re so quick, you can make a whole bunch in a jiffy! Read on to learn how you can make a sleevelet too.
What you need: One sleeve from a shrunken wool sweater (the sleeve needs to fit your wrist and arm snugly), scissors, embroidery thread, and a yarn needle.
 1. (A) Cut any ribbed cuff off of one sleeve.
2. (B) Cut the remaining sleeve into at 7" tube. (You can make the sleevelet longer or shorter if you want to incorporate part of a design or motif.)
3. (C) Turn the tube inside out. Turn one end of the tube right side out until the end meets the center of the tube. So for a 7" tube, turn the end 3 1/2" toward the center of the tube.
4. Repeat for the other end of the tube. Now both ends of the tube should meet in the middle. This is the RIGHT side of your sleevelet (the side with the seam showing.)

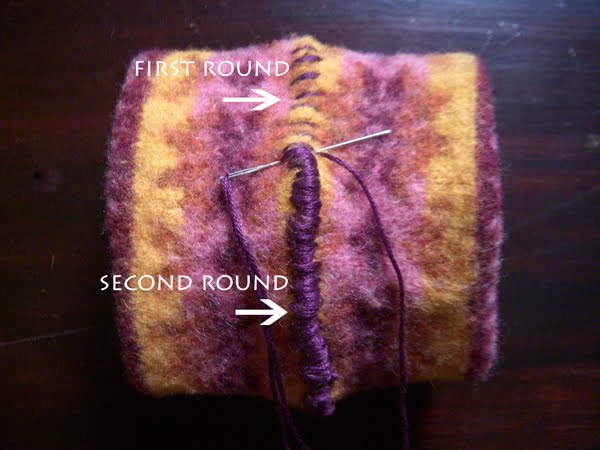 5. Thread your yarn needle with a long length of embroidery thread, using all six strands. (As an alternative, you could also use perle cotton or even yarn). Tie a knot at one end. Starting at the sleeve seam, bury the knot in between the two layers of the tube. Take two rounds of stitches. For the first round, use a whipstitch to sew the two ends of the tube together all the way around the tube, making stitches 1/4" apart. For the second round, make stitches close together to completely cover the raw edges where the two ends of the sleeve meet. No need to stitch through both layers of the sleevelet; only stitch through the top layer. When you need to start or end your thread, simply knot the thread and bury it in between the tube layers.
And that’s about it. All done.
If you like making stuff out of stuff that’s already been made—upcycling, repurposing, refashioning, and the like—you can check out my book ReSew (here's a video about it). I also blog at the wildcards.


