So, yeah! This is a top that on paper...shouldn't work...but absolutely does! It's made from this thrifted crepe jersey skirt and was a bit of an experiment that kinda really worked out!
The skirt itself is a quarter circle construction so everything is kinda on the bias. The resulting top therefore drapes in a really interesting way. The side seams are not actually horizontal but twist slightly around the body and it drapes differently on one side than it does on the other. Hence the “wonky” moniker! But hey…if Levi can get away with twisted denim… I think I can call it a design element on this top right??
You can see in the images above the difference in drape. It's fairly standard on the left (middle pic). But the circle element is really apparent on the right; giving the whole thing a really interesting asymmetric feel.
Step by step on the blog.
Have an awesome Monday!
Monday, November 02, 2015
Sunday, November 01, 2015
Adding side slits to too tight sweaters
I love this really warm and soft thrifted merino wool sweater. I refashioned the neckline last year so that it doesn't choke my neck anymore:
But I still find the bottom ribbed band too tight. It 'showed off' my bulging lower abdomen a bit too much for my liking. So I decided to go 'on trend' and created side slits for this sweater. I carefully ribbed out the yarn that sewn the side seams together all the way up the ribbed band. I think it looks a little better and I don't have to constantly pull the sweater down because the ribbed band was creeping up my waist:
It took less than 30 minutes to do. Another easy peasy refashion!
Checkout my other creations and refashions at my blog.
But I still find the bottom ribbed band too tight. It 'showed off' my bulging lower abdomen a bit too much for my liking. So I decided to go 'on trend' and created side slits for this sweater. I carefully ribbed out the yarn that sewn the side seams together all the way up the ribbed band. I think it looks a little better and I don't have to constantly pull the sweater down because the ribbed band was creeping up my waist:
It took less than 30 minutes to do. Another easy peasy refashion!
Checkout my other creations and refashions at my blog.
All Dolled Up
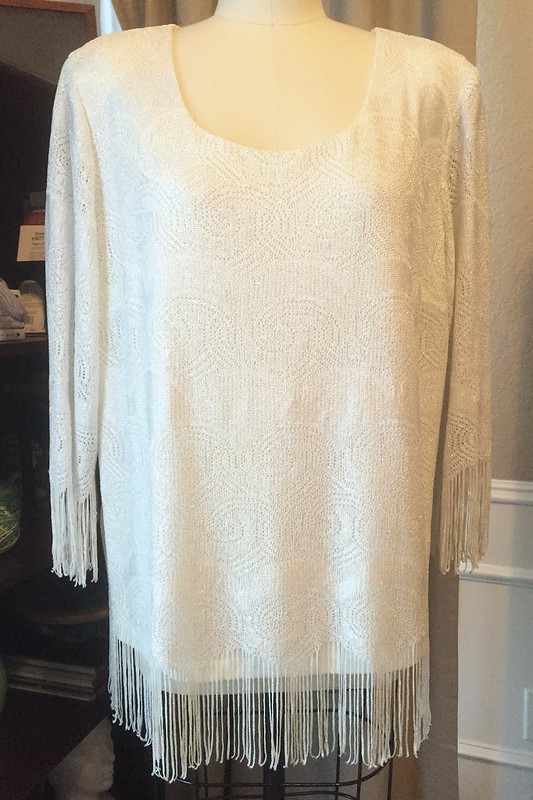
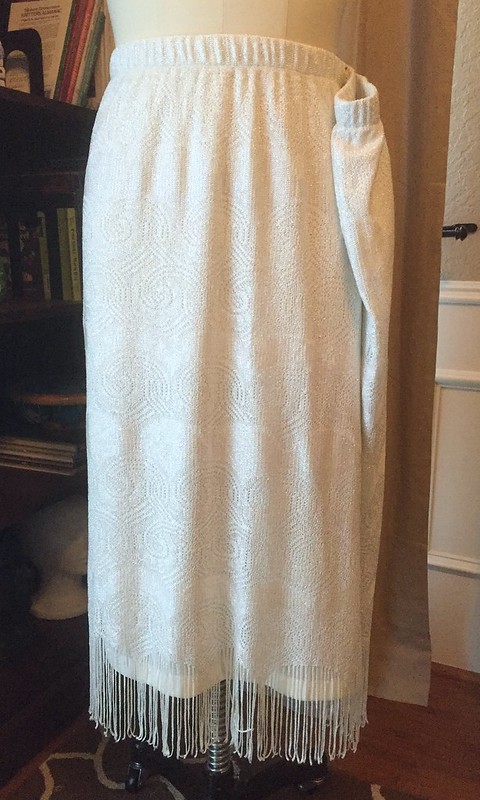
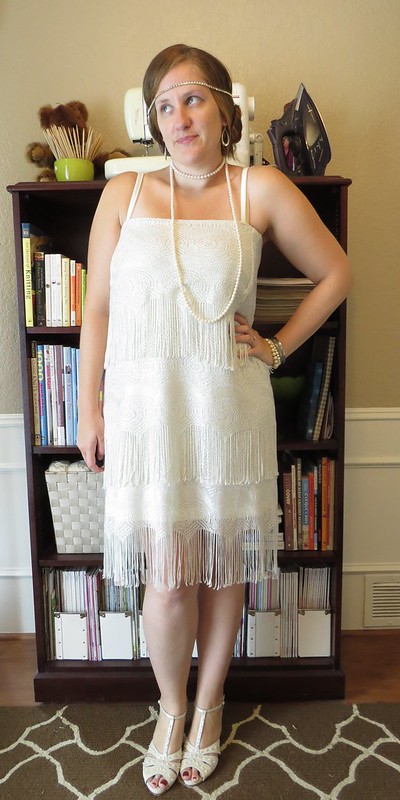
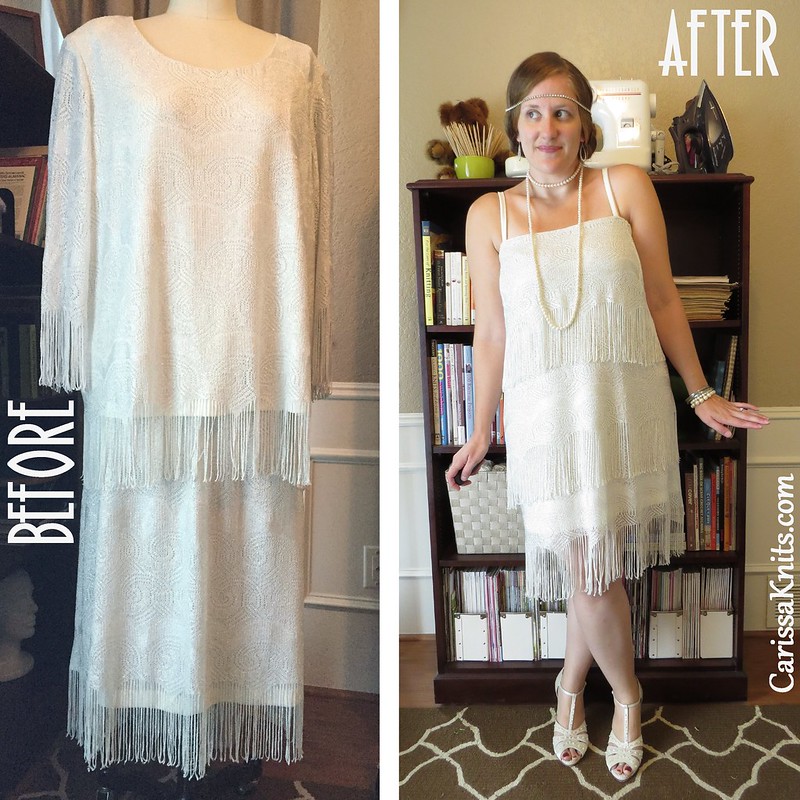
The moment I saw this two-piece lacy, fringed number at last week's clothes swap, I knew exactly what it wanted to become - a 1920s flapper girl costume!
I used the skirt as a base and create two more tiers of fringe from the body and sleeves of the shirt. I added a couple bust darts at the top and used the original shirt's lining to make a couple shoulder straps. Add in all the rhinestones and pearls I could find in my jewelry box and my thrifted inlaid-pearl t-strap heels, and I was all set to hand out candy to the kiddies!
You can read all about the conversion on CarissaKnits!
I used the skirt as a base and create two more tiers of fringe from the body and sleeves of the shirt. I added a couple bust darts at the top and used the original shirt's lining to make a couple shoulder straps. Add in all the rhinestones and pearls I could find in my jewelry box and my thrifted inlaid-pearl t-strap heels, and I was all set to hand out candy to the kiddies!
You can read all about the conversion on CarissaKnits!
Peplum top
I had this remnant of an old refashion and decided to do something with it. I wanted to do just a basic shell top for work but cut it too short that it showed my middrift. The left over fabric was too short for a nice peplum so I added some bias tape to the edge. To 'make it work' (love Tim Gunn!) I made a flower brooch to tie it all together. I also added a zipper to the back. I made a scarf from another old refashion becasue I love the 2 prints together.
Labels:
J
#1 Terry Bathrobe Refashioned to Personal Face-Cloths
RanchHouse Mid-October Sewing Goal: *Mend, alter, refashion 10 Personal Items from Clothing Items.
These Face Cloths:
*Started as a heavy terry bathrobe.
*Fit the need for more personal face clothes, used only by me.
Before: Heavy Terry Bathrobe already cut into squares and left from another Refashion project. Lace from the stash jar. These were short ends saved from other projects or removed from other garments. Per the KonMari Method: My stash sparks joy.
After: Nearly 50 personal face-clothes to be used only by me to clean my face in my bathroom.
Steps: I used my rotary cutter to cut the squares 1/2 the size of regular bath-cloths. I pinned and stitched lace from my stash jar. I serged the edges.
What I Learned: Fabrics and laces/trims from other Refashion projects can be used for so many things. The KonMari Method might not work well in my sewing room. I would pick up each scrap and find joy in each item.
These Face Cloths:
*Started as a heavy terry bathrobe.
*Fit the need for more personal face clothes, used only by me.
![]() |
| After: Nearly 50 Personal Face-Clothes. Heavy Terry and Lace. |
![]() |
| After: Half the size of bath cloths. |
After: Nearly 50 personal face-clothes to be used only by me to clean my face in my bathroom.
Steps: I used my rotary cutter to cut the squares 1/2 the size of regular bath-cloths. I pinned and stitched lace from my stash jar. I serged the edges.
What I Learned: Fabrics and laces/trims from other Refashion projects can be used for so many things. The KonMari Method might not work well in my sewing room. I would pick up each scrap and find joy in each item.
![]() |
| Before: Terry Bathrobe, already cut from another project. |
![]() |
| Stash Lace: Small pieces saved from other projects. Per the KonMari Method: My stash sparks joy. |