Showing posts with label Ladygirl Vintage. Show all posts

Sunday, November 20, 2016

Red Plaid Dress

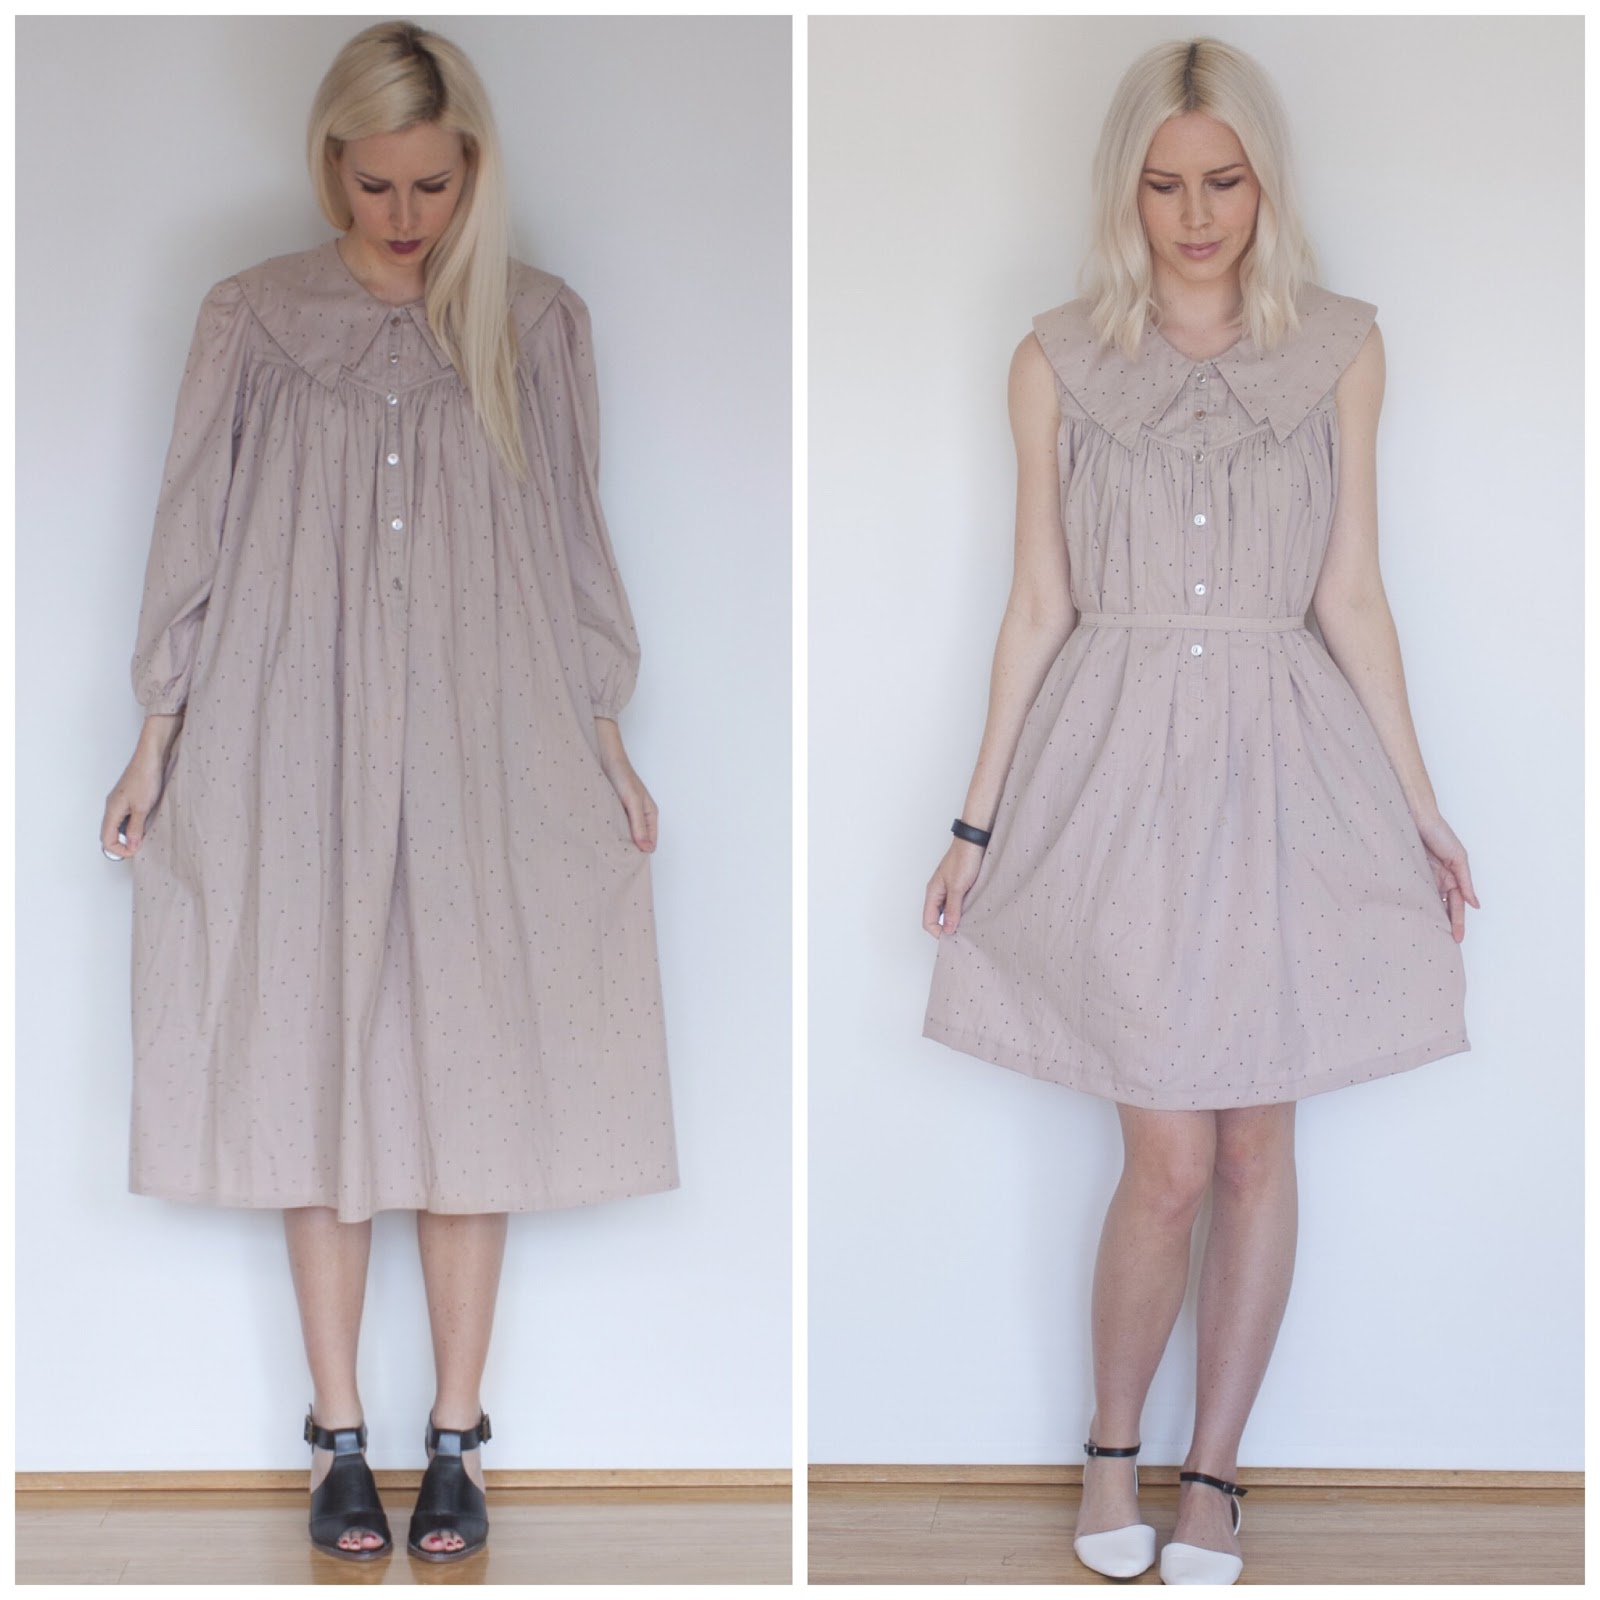
Ok, so this is one of my favorite refashions I've ever done. I was initially pretty scared of the original dress. The pleats seemed daunting and I wasn't sure how I would make it wearable and modern. 

Here is the before:


What I did:
1. Cut the dress in half and moved up the waist/skirt.
2. Removed the sleeves and hemmed at shoulder seam.


Here's what it ended up as:


Side by side:


More refashions on my instagram HERE <3

Sunday, July 31, 2016

Safari Animal Dress Makeover

This dress had me immediately. I just knew it had so much potential with that amazing fabric.


I cut off the purple sleeves, the pink trim on the bottom, and unstitched all of the trims around the edges (this part honestly took the longest). Then I hemmed up the bottom and the sleeves.

Ta da!


Side by side


 More refashions on my instagram and blog.
<3

Monday, June 06, 2016

Little Yellow Polka Dot Summer Dress

My adorable little niece was my model for this refashion.

Original 


What I did:

1. Cut the dress to her length (about 20 inches off), zig-zagged the edges and hemmed it.
2. Tapered in the bodice area to fit. 
3. Moved up the pockets. Unstitched and restitched into place.
4. Made a little belt out of the excess fabric.

Result! 


Side by side


This dress is great because it can be worn as a looser shift dress or with a little belt to be little more girly.

More refashions on my blog or instagram!

Monday, May 30, 2016

Little Plaid Dress Refashion

I used my niece as a model for this one. :) 


Here's the original 


What I did:

1. Cut the sleeves off and hemmed them to the edge using this method.
2. Took off about 18 inches from the bottom and hemmed it.
3. Tapered in both of the sides to fit.
4. Added some triangle panels on each side of the skirt to give it more of a fit and flare shape (sorry I didn't get a great photo of them!).
5. Unstitched the pocket and moved it higher up.
6. Added a button and buttonhole at the very top of the neck.
7. Changed the buttons (to heart buttons!).
8. Made a little belt out of the excess fabric.

New dress! 


Side by side:


More refashions on my blog and instagram !

XO

Tuesday, May 24, 2016

Floral and Paisley Long Sleeve Dress Remake

When I first saw this dress, I really wasn't pay attention to much else beside the amazing fabric. I loved the patterns and knew I could make something beautiful out of this.

Dress before 


What I did:  
1. Trimmed the sleeves and did a rolled hem (tutorial to come!) on the edges to give the 
sleeves an organic flowy look rather than a solid flat hem.
2. Brought up the length and hemmed it.
3. Added a belt!

Here's the after 


Side by side


More refashions on my blog HERE and on Instagram HERE 

Wednesday, May 04, 2016

Paisley Pleated 80's Dress Makeover

This is the original dress:

Baggy short sleeves to the elbow, baggy bodice area, shoulder pads, and an awkward mid-length skirt. Ok but the collar is amazing, right?!


What I did:
1. Cut and hemmed the sleeves to a sleeveless/cap sleeve (using this technique)
2. Cut and hemmed the skirt to just above the knee.
3. Tapered in the bodice for a better fit around the torso.
4. Removed the belt and added a thinner, sleeker one.


Here's the new dress:


Side by side:


Follow along on instagram or my blog for more refashions!

Tuesday, April 12, 2016

Floral Linen Dress Makeover

When I first saw this dress, I had serious tunnel vision toward the fabric. The linen with floral print had me sold, so I knew I had to make something pretty out of this.


Here's the original. Shapeless with an awkward length (but that fabric!!)
 ↴ 

Here's the result

What I did:

I cut about 6-7 inches off the bottom and finished the hem. Then, using that excess fabric, I created short sleeves using a super simple method. I placed the fabric underneath the shoulder, pinned it and sewed over the top of the edge. I didn't have to unstitch or turn anything inside out, and I think it turned out pretty nicely!


The ol' side by side.

Follow my BLOG and INSTAGRAM for more refashions.

XOXO

Tuesday, February 23, 2016

Tulip Shirt Makeover

Changing and updating collars is always a bit of an extensive project, but I never end up regretting it. It completely changes a piece.

This is the original shirt I used. See that amazing and pointy 70's collar? It had to go.


I unstitched the collar from the neckline.  Then, I removed the collar and flipped it inside out.  Once it was inside out, I mapped out and measured the width I wanted the collar to be.  Then I sewed the new Peter Pan collar shape.  I flipped it right side out, carefully pinned it back into the neckline, and stitched it back into place.  Lastly, I stitched about 1/4 inch around the perimeter of the collar to give it the finished look.

Then, I changed the sleeves using this method. 

Heres how it turned out:


Tucked in


Close-up side by side

Side by side


More refashions on my blog HERE and my instagram HERE. <3

Thursday, January 14, 2016

Easy Sleeves Fix (Tutorial on my blog!)

Here's the original:


Here's the after!


 Close up


Side by side


I've posted a super simple step-by-step tutorial on how to alter sleeves like this ^^

Check it out HERE

xo


Saturday, December 12, 2015

Oversized Red Plaid Dress Refashion

This is the original dress I found.  It was ill-fitting everywhere, had a dropped waist, faux pockets, and baggy long sleeves. Can it be saved?!........ Of course it can.


Here's what I did:

1. Cut the sleeves and hemmed them to the shoulder.
2. Cut the bodice away from the skirt and tapered both to be smaller.
3. Reattached the skirt to the bodice at the natural waist.
4. Made a matching belt with the excess fabric from the sleeves. :)


Voila!


Details


Side by side


More refashions and pretty dresses on my blog HERE
or my instagram HERE.

Friday, November 06, 2015

Red Striped Dress Makeover

Here is the dress originally. 
 It's not so bad, but I felt like it wasn't something I'd wear often. The fabric is so 
lightweight and flowy, but I felt like the length was weighing it down.


1. Hemmed dress about 6" shorter. Using these methods.
2. Used excess fabric to create cap sleeves.


Result 


Side by side 


Head over to my blog or instagram to see more details and other reafashions! I think this one maybe be a personal favorite :) 

Saturday, October 24, 2015

Floral Chambray Dress Refashion

This is the original dress. A white open collar, a bit of a dropped waist, wide elbow length sleeves and a midi length.

Here's what I did:

1. Removed shoulder pads.
2. Trimmed sleeves to cap length and hemmed. 
3. Moved waistline up to the natural waist (also had to remove the bottom button).
4. Hemmed dress to shorter length.
5. Tailored the dress to be a bit more fitted.
6. Removed white collar and added piping using the excess fabric from the bottom hem.
7. Added the extra button at the top.


Here it is finished!


Details


Side by side:


This dress surprisingly took a lot more time than I was expecting. Sometimes dresses just need a few fixes here and there, but this one seemed to need a bit of fixing everywhere. I do love the result though, which makes it worth it! 

Feel free to follow along on instagram or my blog for more of my refashions!

XO

Tuesday, September 22, 2015

Taupe and Polka Dots

This is the original dress. 

 It had long, puffy sleeves with a cuff at the end, pleating from the yolk (which made the dress pretty shapeless), and an awkward length just below the knee. The collar felt pretty outdated but there was something I actually loved about it, so I decided to leave it until the end to see how it looked.

1. Cut sleeves off at the shoulder seam and finished off.
2. Brought the length up a few inches to just above the knee.
3. Made a thin waist tie with the excess fabric from the bottom hem.


Here is the finished result! I absolutely loved the collar once I was finished with the rest. There was no way I was going to change it. 


Details.


 Side by side.

Follow my instagram or blog for more refashions!

Tuesday, August 11, 2015

Refashioned Shift Dress

Hi ladies!


Here is the original dress. 

  It had longer short sleeves that were baggy, a collar, shift dress fit, and it went just past the knee.


 Here is the end result!

Side-by-side.


I've posted detailed photos of the steps I took on my blog HERE.
Also, follow me on instagram for more refashions, etc. HERE.