Showing posts with label gaby. Show all posts

Sunday, September 23, 2012

Make a Modern Tee from a Tube of Fabric

I was originally going to use this tube of fabric as a skirt, but the fabric is a thin poly-rayon fabric, very flimsy and drapey.  As a maxi skirt it would be very California free spirit at the music festival style- but for my daily life it just did not cut it as a skirt.  So what to do with this fabric? I thought why not make a simple modern tee that I can wear to work?  Easy to wear, comfortable, adjustable neckline, goes with denim, and can be worn front or back!
So here's what I did in more detail...

THIS IS BEFORE  - Tube size is:  21"wide across at top - 30"wide across at bottom - 38" Length

THIS IS AFTER


THIS IS THE SHAPE TO CUT OUT

Monday, August 13, 2012

High Low Dress - Another no sew project!

Taking inspiration from The Renegade Seamstress's high-low skirt project, I decided to try it on an oversized dress that I had. I absolutely love the fabric on this dress it's 100% rayon, but feels like silk and has a beautiful drape, the dress is a jumper style and with the volume the dress was just too much for my shorty self, so I thought this would be a great update on this dress.

BEFORE: FRONT AND BACK

AFTER: FRONT AND BACK


I WANTED IT TO  HIT SLIGHTLY ABOVE THE KNEE


AFTER - SORRY ABOUT THE BLURRINESS - As you can see I was scrambling to get into position on a wobbly chair in heels before the camera timer went off -SALUD!


Sunday, August 12, 2012

From Short Dress to Crop Top

I bought this bad boy from a thrift store for $1.00, it's a mini dress from Forever 21, I love the little stuffed balls around the neckline, it's kind of a weird embellishment which is why I bought it.


BEFORE: FRONT AND BACK

As a dress it was too short for me, but the boxy silhouette of the top I thought would make a great crop top.  

AFTER: FRONT AND BACK


it has a lining that I wanted to show under the crop by cutting it a little longer


voila crop top magic! with peekaboo lining.  Although the top has been hemmed and the lining has been zig zagged to keep from fraying - it also has a cool look when left raw edge. Thanks!


Tuesday, May 01, 2012

T-Shirt Refashion: Adding Structure at Shoulders and Neck


This Refashion is kind of a quick and dirty project, in that I didn't go for clean edges or perfect stitching, I just wanted to try it.  I wanted to experiment with woven on a knit as a base for structure.  I think the shoulders and neck of a shirt creates a sharp look when fitted well, like a tailored button up shirt. T-shirts and knits in general are great because they go with the flow of a person's shape, but what I wanted to do was combine the tailoring of a woven shirt with the fluidity of a knit tee, so here goes...

For this project I used a ratty old tee and some left over non-stretch denim fabric I had.  The T-shirt happened to be a V-Neck, but this can be done on any basic neckline.... (step by step here)


Thursday, April 26, 2012

Vintage Valentino -inspired- Refashion

For this refashion, I was inspired by this Valentino Boutique late 70s  jeweled tunic, which has an embroidered Roman God motif in cashmere.  
Okay, first I do know this is an ambitious project and I didn’t have a black top to work with… but I did have this black skirt that I had no  idea what to do with, perfect! it was plain solid black and would be the blank canvas to my Valentino Refashion…


 so with glitter and glue here’s what I did…

Monday, April 16, 2012

T-Shirt Makeover #2: Adding Lace

I’m calling this the Kate Middleton Tee, because I was inspired by the lace on the shoulders and sleeves of her dress and I wanted to apply that to a T-shirt. I realize the shirt looks nothing like the dress, but here’s what I did anyway….


Kate Middleton


BEFORE


AFTER....if I had stopped here...


FINAL...taking it to another level...the result of an unplanned experiment


I'm okay with it, but I actually like it without the band better, on the positive side it was the first time I figured out I could use the bottom band of a t-shirt as bias tape for a collar, here's how...

Sunday, April 15, 2012

T-Shirt Makeover: Updating a Tee - Adding Structure

Hi there! I've wanted to do this to a T-Shirt for a while, adding shoulder pads to it. I wanted to keep the loose fit but with structure at the shoulders, so it hangs better. I also wanted to use the pads as part of the design, I mean why hide them?

BEFORE: not a bad tee, but needed an update and shoulders were too wide on me

AFTER: loose with a nice drape and structure at the shoulders - I accidentally ripped a few holes into the neckline as I was removing some ribbon trim, but it works with the deconstruction

ALTER: Adding yet another level of transparency to the construction, to take in the back, I used the old pinch and fold over method.


...and there you have it a loose tee with structured shoulders.
For more info on how to, check out my site The Style Workshop!

thanks! :)

Wednesday, March 07, 2012

Tank Top into Flare Sleeve Summer Top

Hi guys!
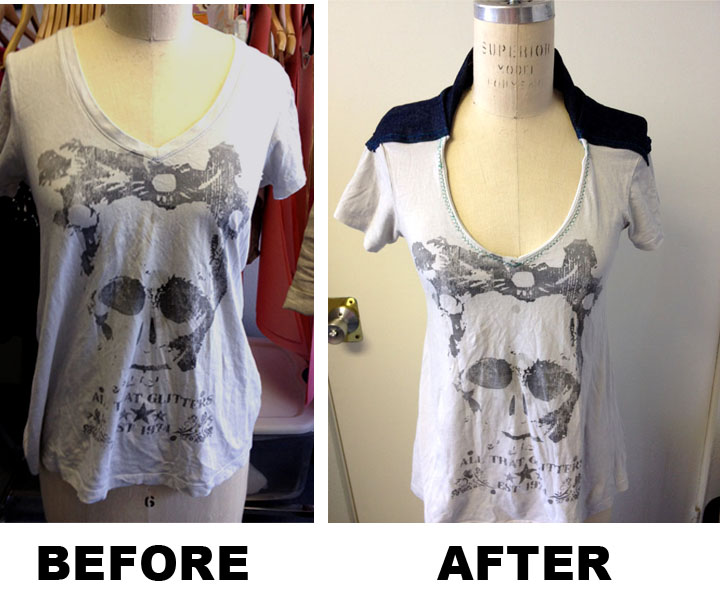
I wanted to show how I converted a regular cotton rib tank top into a hippie style top with crochet flare sleeves and fabric panel. First I don’t crochet, but I did find this cotton crochet fabric downtown for $3/yd, so I bought a yard to try it out. It has some stretch to it so it would work with the tank top. It’s kind of tricky to sew with because of the holes, and it freaks my machine out a little bit, so the zig-zag stitch was the way to go.


Tank top before


Tank top after


gather materials


For center fabric panel: fold tank, mark center, and cut


For flare sleeves: fold fabric longways, then fold again in half - then lay tank top over fabric and trace your sleeve - keep folded ends of fabric right under tank top and open ends of fabric at the opposite end


Voila! (sorry about the fuzzy pic, and yes I am standing on a chair)


for more detailed instructions on this project check it out here!
to see my other stuff go here!