Wednesday, May 02, 2012

DIY Pendant Giveaway


It's been a lovely 1 year since i joined Refashion Co-op.  Many of my lovely followers on my blog, Green Issues, came by way of this great site.  I've made two pendants by repurposing an item.  If you can guess what it is, please hop over to my blog and write in your answer in the comments section.  You just might win one of these pendants!  I'll be following up with a tutorial on this when the winner is announced on 10 May!


Thank you for your support :-)


Agy from Green Issues

Refashioning for dressups

One of my favorite refashions is making dressups so i thought I'd show you some easy ones from  a while ago.
This first one uses a adult red jacket turned into a red coat soldier or tin soldier.
I added braid and gold buttons to the front to make it look more period, as well as some braid to the shoulder. To make the sleeves fit , fold them so that you have a wide cuff that looks neat but takes up the extra length, by first folding 2/3 of the  the extra into the sleeve then 1/3 folding back out wards.  Add a  gold button to hold it in position but also makes it easy to undo for resizing.
A belt at the waist and a daggy collared ladies blouse worn underneath with a tie and away you go. I think just added elastic the cut off extra on the ladies blouse to make it fit.


 This cute clown was cut out of a very bright and ugly ladies skirt. I used a contrast leg for effect and as I didnt have enough fabric. I made the hat by making a pointed hat out of cardboard for the pattern . By using a fusible stiff lining on bright fabric the hat was able to stand up by itself.

Tuesday, May 01, 2012

A Little Sprucing Up

This tunic has always been hard to wear and yet I like it for some reason.  It's not linen but it feels like it.  I forgot to take a before picture so I just turned it inside out.  I added a black flower trim, so now it has some definition.  I'm not sure about it but it can be easily removed.
This circa 2000 skirt was one that I made originally. It was ankle-length and while that was nice for early spring when you don't quite want to bare your legs just yet, I thought the thin, drapey fabric would do better as a shorter, full skirt.  Fortunately I had saved the scraps from the original cut of fabric. I cut off the top part of the skirt to use the more full bottom part, then inserted 6 additional pieces from the long, thin leftover scraps.  I re-used the same waistband but added a piece to the end to make it more comfortable since I've gained weight since I made it.
I'm also pleased that I've learned how to turn a crew neck shirt into a scoop neck shirt while still maintaining the ribbing. On this shirt, the "ribbing" was just a piece of the shirt fabric, unlike a T-shirt.  I seam-ripped it out in the front, and drew and cut a new neckline using the French curve ruler.  Then, with the U-shaped piece that I cut out, I cut a rectangle shape to add to the end of the original ribbing, sewed the ends together to make a circle, then reattached it to the shirt.  The key is just to make sure your ribbing piece is smaller than the neckline so that it has to stretch and the end result won't look rumply.  You may be able to see the small piece I inserted on this picture:
I have tons of shirts I can now fix!  I've done it to T-shirts too - but you have to find extra fabric somewhere since you don't want to use the thick ribbing that comes on the T-shirt.  So I've shortened sleeves and used that extra fabric, or taken it in on the sides and used that too. 

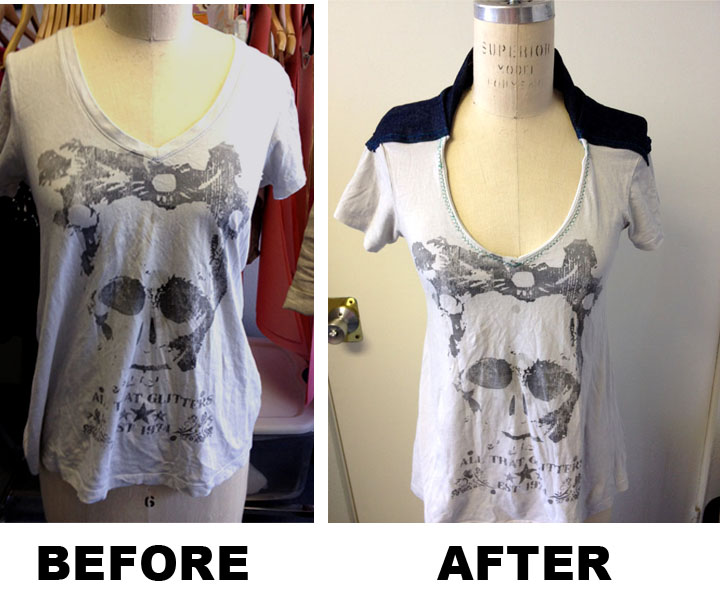
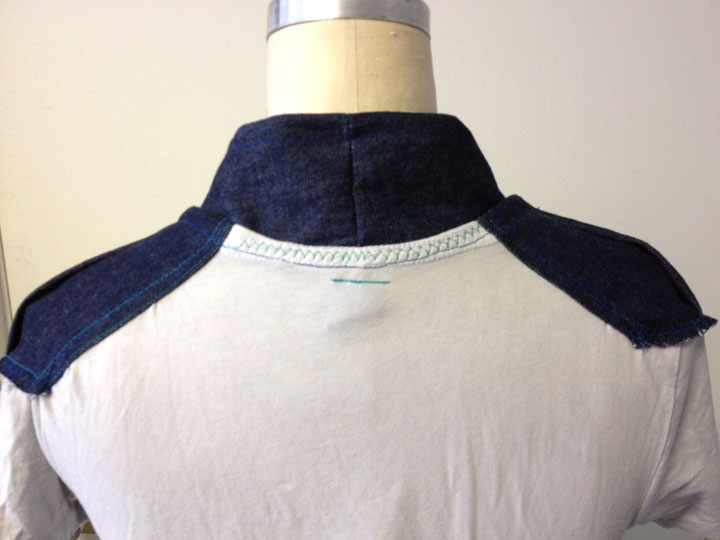
T-Shirt Refashion: Adding Structure at Shoulders and Neck


This Refashion is kind of a quick and dirty project, in that I didn't go for clean edges or perfect stitching, I just wanted to try it.  I wanted to experiment with woven on a knit as a base for structure.  I think the shoulders and neck of a shirt creates a sharp look when fitted well, like a tailored button up shirt. T-shirts and knits in general are great because they go with the flow of a person's shape, but what I wanted to do was combine the tailoring of a woven shirt with the fluidity of a knit tee, so here goes...

For this project I used a ratty old tee and some left over non-stretch denim fabric I had.  The T-shirt happened to be a V-Neck, but this can be done on any basic neckline.... (step by step here)


Say it loud. Say it proud.


Hands up who DOESN’T love Crafster?  I found this project when I was reading my emails in the First Class BA lounge at LHR Sunday. (Yikes. LAST Sunday. Where does that first week back get to?). 
Anyhow, it had only been a short time since handing in my landing card, on which I need to put my occupation. Without any hesitation these days I write in all caps: HOUSEWIFE. Sometimes I would put author, other times jewellery designer but I got my head right now. Housewife is my occupation. (To certain folk I sadly need to add: get over it). It seems only fitting that my T state my beliefs

and even more fitting that it is one of Himself’s old Ts (taken in a good few inches at either side). The bleach to water mix I used was 3:1. I slid a couple sheets of cardboard between the front and back so the bleach wouldn’t seep through and performed the procedure in a sunny back yard after testing a bit of the bleach mix to make sure it was the right strength. The templates were cut from cereal boxes and I measured with the T on me where the letters were to start and end. I’m leaving the cut edges raw. Might consult my little square orange book for some other cutting options. This shirt CLEARLY needs more attitude.

My top tip would be to make your letters a wee bit bigger than your finished design plan as the bleach did spread a bit UNDER the templates. Oh, and use a light touch when spraying the bleach. You can add more but you can’t take it back....
IWOM