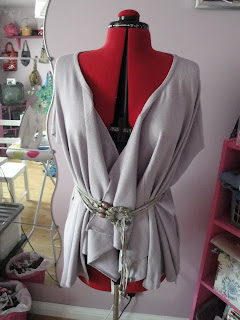
Have y'all seen Regretsy? It is so hilarious and they find the most random stuff people make to sell. Definitely makes you think twice about selling anything remotely weird (is this avant-garde, or just regretsy-bound?) but so funny to read.
Take this vest, for example. Must try to incorporate into my next sewing project.

Thursday, March 31, 2011
Two different ways to use sheets... and a question for you all about refashion for little boys
I seem to be doing things by twos lately. Purely coincidental, I swear... Anyway, last January I found some very cheap cotton sheets at Zara in the post-Christmas sales. They were each 100x150 cm (sized for a crib or toddler bed) and were only €3. That's a very good per metre price, at least in France. You can read all the details over on my blog, but in brief, here's what I did with them:
I used the first one to extend the life of a short-sleeved jumper that was too short for my daughter, though still quite comfortable in the body. We'd already let down the hem, so to make the dress longer, I carefully cut off the finished end of the sheet. (Well, that's probably not the technical term, but you know what I mean. The nice part of the sheet that has the folded-over hem and that goes at the head of your bed.) Anyway, I removed it and simply sewed onto the hem of the dress, using a contrasting purple thread and a zigzag stitch for a decorative effect. I then cut a few more strips from the dress and used these to: add ruffles to the pockets, little tiny bows to the cap sleeves and lining to the inside of the shoulders.

The other sheet became both an experiment in scalloped edges and what I like to think of as a Lily Pulitzer knockoff. (It was that kind of print.)

Now, for my question... what are you all refashioning for the little guys in your life? I am starting to feel guilty, as my daughter is getting so many cool outfits while my son is getting PJ pants and his old trousers turned into shorts. I don't know quite what to refashion for him and would love your tips and ideas.
Bangles and Tissue Holder Made from Jeans
I'm Agy and I'm making things out of my hubby's old pair of jeans.
Firstly, I made bangles from the inner seams of jeans, and then a tissue holder from the leg of the jeans.
Bangles - the inner seams are tubes already, so no sewing - yay!
Here's the jeans without the inner seams:

Firstly, I made bangles from the inner seams of jeans, and then a tissue holder from the leg of the jeans.
Bangles - the inner seams are tubes already, so no sewing - yay!
Here's the jeans without the inner seams:

 |
| Insert a wire into the inner seams |
 |
| Add lace, buttons and crystals! This is my collection. |
The second thing that I made was a tissue holder from the leg of the jeans. The holder is not the ones for boxes of tissues but for those that come in flat plastic wraps. I thought it would be good to have one hanging from the back seat of the car. You'll need a sewing machine to sew on the bias tape or other scrap material, and to sew up the jeans!
 |
| Measuring out the size of the tissue holder. |
 |
| Finished product! |
These projects are featured at my blog too. You can see my hand model the bangles too!
Blue Dress Refashion
Hello! This week, I finished off a simple dress refashion. I picked up this vintage, or possibly vintage inspired dress in my local parish op shop for $1.75. It is a homemade dress, with no labels, and not the most flattering shape:


 Also over on my blog
This could be the last of my summer dress refashions this season, for now autumnal weather begins in Melbourne.


 Also over on my blog
This could be the last of my summer dress refashions this season, for now autumnal weather begins in Melbourne.
A tale of two dresses
Between being away for work for four days last week (but a bonus was a quick visit to the Liberty store in London before catching my Eurostar home) and no internet connection at home for the past five days (finally fixed tonight), I haven't been on line much lately. However, without so much screen time to distract me, I have managed to get quite a bit of sewing done last weekend and so far this week. I'm racing through spring/summer clothes refashions for the children, as we're going to Provence in 10 days and anticipating nice warm weather. So look out for a number of posts in the next week or so. For now, here's a tale of two dresses...
The full story is over on my blog (and it's a long post), but in essence, I took two dresses that my daughter had outgrown and turned them from dresses into skirts.
Dress 1 before

Dress 2 before

And after...

What made working on these two at the same time such an interesting experience was the difference in quality. The first skirt came from a musty, old-fashioned children's clothing store that sells clothing of no brand at all, or at least no known brands. (For those of you who know Paris, I can't remember the shop's name, but it's not far from the Place des Ternes in the 8th.) The dress was very pricey, at least for me, but it was made to last (with a deep hem and heavy cotton fabric). And when I took it apart, it was clear that it had been at least partly handmade. The second dress came from Cyrillus, a middle of the range French chain. It wasn't that much less expensive than the first dress. But it was not at all of the same quality. The fabric was lighter, the finishing was less nice and the hem was the usual small one you get on most clothes these days. To me, this shows the difference between ready to wear and handmade (or at least hand finished).
Given how much I paid for each dress, I'm so glad we'll now get at least more one summer, probably two, out of them as skirts. In the end, the first dress, and quite possibly the second, will amortize over five years. Not bad for children's clothing these days, which is usually so disposable and cheaply made.
Finally, the wonderful first dress also got reused in a little present for me! I turned part of the bodice into a small zip bag. It was super simple to do and I'm so chuffed by this unexpected item. And I still have plenty of bits of fabric left from both dresses, will probably make some hairbands, rosettes or barrettes from them. Hurrah for refashioning!

Wednesday, March 30, 2011

Polka dot Love
Hello there! My latest refashion started as this sweet 50's style dress I thrifted a few years ago...I wore it and loved it but alas my chest deflated after having 2 kids and it was just not comfortable to wear anymore:
 So I decided to chop off the top and make a high waisted skirt:
 I then decided to remove the zipper pieces from the cut off top, take it in a couple inches at the back, hem and add hook & eyes to make a sweet lil top for layering:


Tuesday, March 29, 2011
Introducing Myself


 My name is Elizabeth Abernathy and I'm very excited to be a contributor to Refashion Co-op. I've missed seeing all the lovely creations posted on Wardrobe Refashion and mourned it's demise. Thank you to the editors who put this new site together.
I love refashioning and crafting with all kinds of recycled materials. Above are a few of my favorite refashions done over the past few years: 80's pull-over to drappy cardigan, dye job, scarf to tunic, and table cloth to top. You can see all my past refashions (and a few done by other people) here.
What am I looking forward to refashioning next? A pillow case to beach bag and something like this brilliant sweater skirt to sweater top.
Happy Refashioning!
Skirt to Top - The Spring Version

This refashion is just a take on the original skirt to top refashion that I did a while back. If you want to try this, read through this original post first for basic instructions.
For the spring version, I started with this thrifted floral print skirt - some sort of light-weight fabric with a lining:

This skirt was too long to just use as is, and the waist was too small to fit right at my hips, so it required a little tweaking. You can see how I did it on my blog.
Blouse Refashion
Hi Everyone! I finally grabbed some time to do a refashion! Also its allergy season here in Alabama, I am kind of stuck indoors so I will have some time to catch up on projects and do some refashioning!


Monday, March 28, 2011
Cardigan refashion


Good morning. I have a new tool in my refashioning toolbox. When a nearby department store was closing its haberdashery section I went in for a browse and found Prym pliers half price. I used them on making this sweater in to a cardigan. I bought the sweater at a nearly new sale in November but never wore it as I just found it uncomfortable.
I cut up the centre front and hand hemmed each side with a tiny rolled hem. Then I used some pearlised poppers and my new pliers. It took me quite a bit of fiddling, and muttering to myself to get them done. But I like the end result - a bit of glitter for every day!
Sweater refashions scare me….

For how I got from this huge M&S sweater
to the current version, see here then feel free to offer some advice on how to wrap it (sorry) up.
Saturday, March 26, 2011
No longer Jessica
These couple of days I have refound my love for sewing, it's not that I didn't like it, I do! But being a momma a the bread winner of my house keeps me very busy so I loose interest. However during Spring break I managed to buy a couple of things that I knew I could refashion. This dress is one of those things I bought at a thrift store for $5 bucks.


Before

After

I blog here.
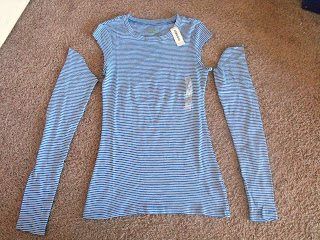
Tutorial: Long sleeve to Bow sleeve Tee
Fistly hi from a refashion co-op newbie, so excited to share on this great site, anyway enough gushing!
If you've ever checked out my blog ruby murrays musings you'll know I love to change things up, my Hand-Me-Down Horror series has been all about buying yucky or just plain boring clothes and making them into something I'd be proud to wear. Hack off those sleeves, raise that hemline and bob's your uncle a cute custom piece, for pittence.
So without further ado get your sewing needles and thread out and sharpen up those scissors, this tutorial only requires minimal sewing by hand and is so quick and easy you'll be done before you know it.

Before, a plain long sleeve Tee from Old Navy, that cost me a wopping $2.60


8. I just used a simple in and out 'running stitch' for the neckline, making sure to line up the serged piece with the neckline edge to make sure it's even.


If you've ever checked out my blog ruby murrays musings you'll know I love to change things up, my Hand-Me-Down Horror series has been all about buying yucky or just plain boring clothes and making them into something I'd be proud to wear. Hack off those sleeves, raise that hemline and bob's your uncle a cute custom piece, for pittence.
So without further ado get your sewing needles and thread out and sharpen up those scissors, this tutorial only requires minimal sewing by hand and is so quick and easy you'll be done before you know it.

Before, a plain long sleeve Tee from Old Navy, that cost me a wopping $2.60


1. Hack off those sleeves, keeping the cut line as neat as possible, then turn the sleeves inside out.

2. Next cut off the cuff again nice and straight, then cut off the stitching (serged seam) keep this as straight and neat as possible and keep everything.
This is what you'll end up with, don't throw anything out, nothing goes to waste on this project.


Next you'll be making the bows, out of the sleeves (I know, genius right!)

3. Start at the bottom cuff end of the sleeve and slowly pinch your way up, it's a very informal pleat, just basically grabbing finger fulls of the sleeve all the way up until you get to the top and have the entire sleeve pinched between index finger and thumb.


Whole sleeve pinched together

4. Next take the cut off sleeve cuff and wrap it around the middle of the bunched up sleeve, I fanned the sleeve out a little so you can see what it's starting to look like.

5. Keep wrapping the cuff edge around until it's tight and the sleeve is unlikely to fall out.

6. You've just made yourself a cute bow out of a sleeve, now to repeat the process until you have two.

There's a distinct (to me anyway) top and bottom to the bows, the top of the bow will be the rounded edge of the sleeve cap (the top part) just keep this in mind when you come to sew them on.

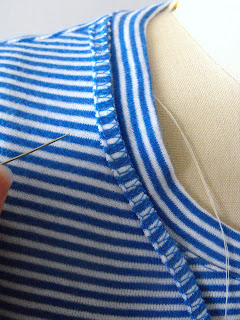
7. Next we're finishing off the neckline, and for this we're using the two long pieces you have left over from the sleeves, I only kept one so I just sewed the serged piece to the front and it looked fine but if you want to have matching front and back to the tee just continue sewing around the neck.
8. I just used a simple in and out 'running stitch' for the neckline, making sure to line up the serged piece with the neckline edge to make sure it's even.


The finished neck edge, it looks great doesn't it and to think it's just a piece of t-shirt scrap!

9. Next take the bow and making sure the top shorter edge is facing the neck edge line the middle of the bow up with the shoulder seam and simply stitch through the centre of the bow all the way through the t-shirt, I went all the way around the centre piece to make sure it was secure.


That's it, if you want to be extra fancy you could add a few stitches to the bow edges to keep it from flapping around but I've found I didn't need to do this and the bows stayed put. I also left the sleeve edge unturned, you could always turn it under and stitch, personally I liked the raw edge.
So there you are, it shouldn't take longer than an hour even for newbies to sew so even us naptime crafters can make a cute new addition to our wardrobes.