Showing posts with label Shey. Show all posts

Monday, January 30, 2012

Leather detail on denim jacket

Hi ladies! Today I wanted to show you my "new" refashioned jacket. I've had this denim jacket for a long time and although I did wear it every now and then it needed a little something. So I went to the thrift store and purchased a leather skirt and refashioned my jacket. I should have used synthetic leather (easier to wash) but I was too impatient and I didn't find any good looking synthetic leather so I used real leather instead.
Before
After
Turorial here ^-^

Friday, January 13, 2012

The blue peplum skirt

His ladies, today I wanted to show you the latest skirt I refashioned. I bought this skirt with the intention of shortening it and keeping it a full skirt but the fabric is very thick and doesn't drape well so instead I used this pattern and made it into a peplum skirt. The pattern was fairly easy to follow, I think it could have helped if I had read the instructions before and not while I was trying to cut and sew. Anyways, here is the before and after.
Before
After
Peplum
I definitely recommend the pattern, except for the waistline which, for me, was the most difficult part. Hope everyone has a great Friday!

Sunday, January 01, 2012

From Dress to Top

Hello everyone! Happy New Year! This was my last refashion of 2011, I needed something sparkly to wear to the New Year's party and this dress was the perfect pick, but not as a dress, as a top. All I did was cut the length off and hem it. Hope everyone enjoys this night!
Before
yikes! so not flattering for me
After
My fashion blog

Wednesday, December 14, 2011

Tailoring the Red Coat

I bought this coat at the thrift store for $1.75, the only thing I didn't like about it was the length so I took matters into my own hands, I shortened it and did the same for the lining. Tailoring clothes is definitely the way to go.
Before
After
Oh the difference a few inches can make. And to think it was only $1.75!
My blog

Saturday, December 10, 2011

Purrfect Pocket Skirt

Inspired by this (very expensive dress) from ModCloth I made my own Kitty pocket skirt using this thrifted skirt. At first I was going to keep the skirt a pleated skirt, however it added too much bulk on my hips so I made it into a semi-full skirt with a kitty pocket. Here are the pictures...
Before
After
Kitty pocket detail
My style blog.

Tuesday, November 29, 2011

DIY: Elongate a tight fabric belt

Hi ladies, today I have a tutorial for you, this is a vintage belt I found at the thrift store, it's so pretty but it was too tight. After much thought I finally figured out what to do to make it work, here is the tutorial.
Here is the belt, too tight even after breathing in...
First I took the belt loop off.
Then I cut a piece of canvas fabric to the width of the belt.
Next I ironed some fusible interface to the canvas fabric and sewed it.
I put the end of the vintage belt inside the extension.
I stitched it together.
I put the belt loop back on, sewed it closed.
And now I have a pretty belt that fits. ^_^
Hope you enjoyed this tutorial! My style blog here.

Wednesday, November 16, 2011

Skirt Refashion

Most of my refashions are skirts because I wear them a lot, when I saw this skirt at the thrift store I knew it had to be mine, it didn't wait long in the refashion pile, after a few days it got it's turn. It has 4 pleats on each side and it's gathered in the front and back section.
Before
After
My style blog here.

Sunday, November 06, 2011

Mushroom Skirt

I got this skirt from my friend's granny but it was too long and too tight, I loved the denim shade so I put it in my refashion pile and finally after procrastinating a lot I finally got to work on it, I love the end result.
Before
After
I made the mushroom from scraps of fabric I had around.
Here is my outfit with it.
Hope everyone has fun refashioning!

Sunday, October 16, 2011

Here comes the pumpkin!

Hello there fellow refashionistas, today I bring you this sweater dye I did last night, it was actually supposed to turn out a terracota color but it turned into a burt orange color instead, with dye you never know how the color is going to come out. This fall I want to add more color to my wardrobe.
Before
After
Hope you ladies have a great weekend! =)

Sunday, October 09, 2011

F is for Florals in the Fall

The title of this post is perfect for this skirt, can you tell I'm a Kindergarten teacher? hehehe Ok so today I have this simple refashion, the skirt was a gift along with many other things from my friend Clara. I love the floral print of the fabric. I had to make a whole new skirt from it because of the way the old skirt was cut and the fact that it had a small waistband.
Before
After
Hope I have some time this week to work on some other refashions  have in mind. Have a great week refashionistas!

Saturday, August 20, 2011

From boring to yellow

Hi ladies, this is what I have to share today, I bought this vintage top a long time ago and I had wore it many times but my closet lacks color, most of my tops are cream or white, so I decided to dye this one yellow. At first I wasn't thrilled with the outcome, I was going to fade the color a bit but then I wore it and got compliments on it so I guess I'm going to leave it as it is.
Before
After
Dyeing your clothes is definitely an easy way to update your wardrobe.

Saturday, June 25, 2011

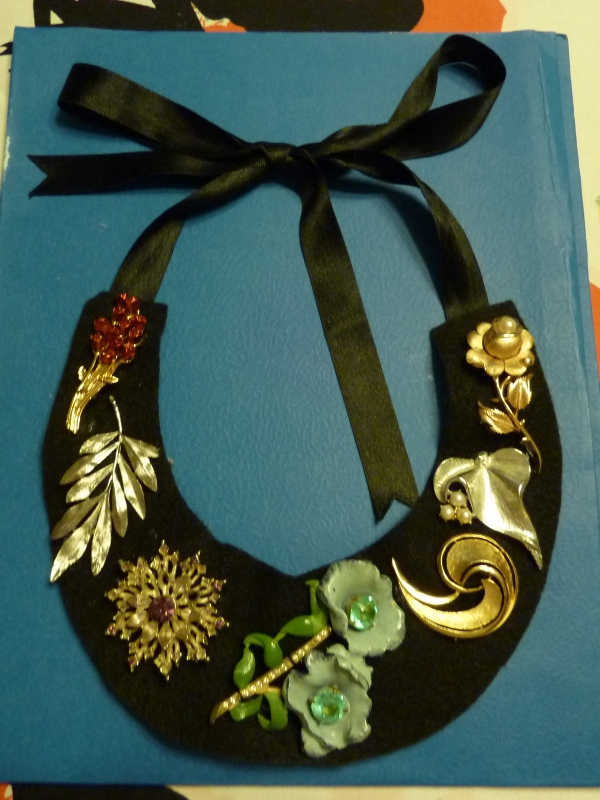
Marni Inspired Necklace tutorial by Shey

Hi ladies! Today I have a tutorial to share, I made a necklace inspired by this Marni necklace and guess what? I didn't delete the pictures before I wrote the post (yay!). Here is the Marni necklace:
Here is what you will need:
felt fabric
old brooches, earrings or buttons
glue gun
thread and needle
paper and pen
scissors

1. Start by tracing the pattern of your bib necklace on paper, make sure you try it on your neckline to see if it's the size and shape you want.
2. Once you trace it and cut it arrage the brooches over it to see how you are going to pin and glue them.
3. Trace the pattern on you fabric (twice) and cut out.
4. Sew together...
5. Pin the brooches, if more support for the fabric is needed add a piece of extra fabric where the brooch is pinned.
6. Glue brooches in place too and do a few invisible stitches where possible. This will help for stability.
7. Glue ribbon to both ends.
8. Voila! You necklace is done!
You can be as creative as you want. Hope you enjoy this tutorial! =D

Thursday, June 23, 2011

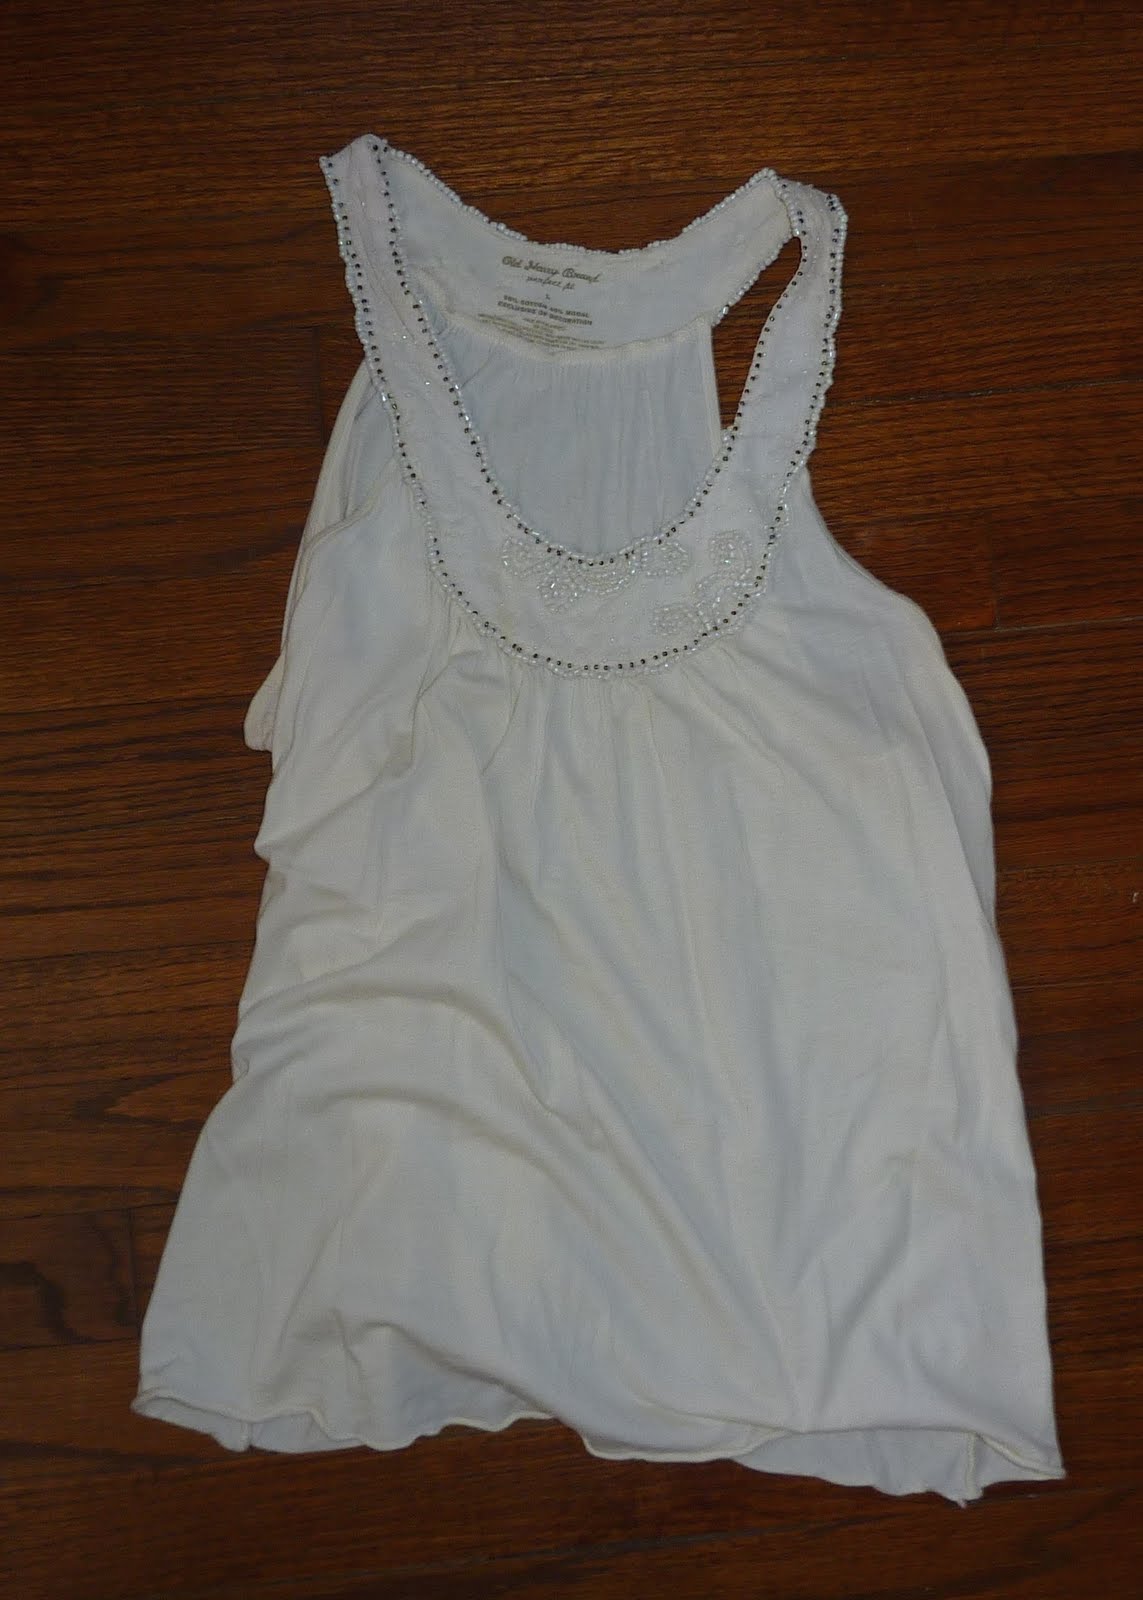
From Cream to Orange

I had this off-cream top which I've loved for many years, the only thing is the color is too blah, I own way too many cream and white tops and I'm in big need for color so I decided to dye it in orange, my favorite color. I should have done this earlier!

Before


After


I love how it brought out the beads, the only thing is that it's missing some beads, but a linen blazer over it and no one will ever know!


Hope everyone has a great weekend!

Friday, June 17, 2011

From white to blue: refashion by Shey

Hi ladies! Now that I'm on vacation I'll have more time to post refashions, yesterday I was just finishing tutorial pictures when I deleted them all by accident! Has that ever happened to you? And I didn't even had a copy of them so they are gone, finito. Anyways, this is a very simple refashion I did, the idea came from a shirt I had seen at a store a long time ago.
All I used were these two old white t-shirts.
I cut one of the t-shirts in 1 inch strips to make the rossetes and coiled them and pinned them in place.
Once I was done sewing (which turned out more time-consuming than I thought) I dyed it using royal blue Rit.
Ta-da! Here is the end result, I'm actually glad it wasn't as dark as I thought it would be.
Hope I can do more tutorials and this time I won't delete them before I post them, promise.

Sunday, May 08, 2011

Dress Refashion by Shey

Hi Ladies, long time since I last posted but I wanted to share this cute refashion I made, it took me a while because I'm barely learning how to sew, no sewing savvy here, but I do enjoy and love sewing, I wish I knew more.
I bought this dress at a thrift store, it was a couple of sizes too big but it had potential, I especially love the cotton fabric which is very soft and drapes well on the body... and most important I can wear it for Mother's Day and enter it to the challenge. =)
Before
After
More details blogger here.