 |
| Yay! At least they all coordinate! Let's see if we can get them to play nicely together in the sandbox, though. |
Here is the inspiration shirt from Anthropologie:
 |
| I like the idea, just not the colors. |
First, I played around with the samples until I found a color scheme and layout I liked. Then I started chopping the shirts up and sewing them back together in bands. I matched the fabric placement & size for the sleeves, but decided to alter that in the body of the t-shirt.
 |
| I like this grouping! |
When you're sewing the bands of fabric back together, it's a good idea to place existing seams together whenever possible, and place them at the side seams of your garment as well. Unless you're going for the Franken-random-seam look.
 |
| Match those seams up if possible! |
 |
| The one t-shirt was inches wider than the others. |
 |
| No worries, as long as you have the next band of fabric in sight - if not, you can either trim the excess first before you sew, or draw a line down the length of the seam line with a chalk marker. |
 |
| I cut another narrow band of fabric to make the neckline. I pulled the v-neck out until it was nearly horizontal and started pinning all the way around. |
 |
| Stretch the band, especially in the front. Pin where it should go onto the neckline. This will help it to lay flat when you are done. |
 |
| Do the same thing in the back of the neckline, only you do not have to stretch it quite so much. |
 |
| Where the fabric meets at the center back neckline, pin together or mark with chalk. |
 |
| Sew the seam, being careful not to catch the t-shirt in the seam. |
 |
| Open it up and flatten it out. I don't like to serge this seam, as I've found that a regular stitched seam is much less bulky during the foldover stage. |
 |
| I sewed about a 3/8 inch seam, stretching the band to fit the neckline. Be careful not to stretch the neckline at the same time. |
 |
| Sewing the v-neck area which has been stretched out almost to a straight line. If necessary, you can clip the v almost to the stay-stitch line but not into the stitches. |
 |
| Trim the seam allowances. |
 |
| Now take the neckband.... |
 |
| ...and flip it up... |
 |
| ...and then over to the inside. Make sure it overlaps the stitch line a bit. |
 |
| Pin it all into place, using more pins than you normally would. Notice that the pins are on the inside - that way, you can make sure you have overlapped that stitch line all the way around... |
 |
| But what about that v-neck? It's gone back to looking nearly round again! No worries, here's an easy fix - a sort of Cheater's Miter. |
 |
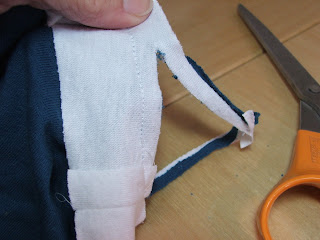
| Fold the neckline in half at the point of the v-neck. Note where your stitching line is from where you attached the neckband. |
 |
| The finished pieced t-shirt. |


3 comments:
great tute!! and i love those colours together too!! xx
LOVE your tutorial! Thanks!
Great refashion and tutorial. Thank you for posting in so much detail. I am sure this will be helpful to other readers and not just me!
Debbie
EOD
Post a Comment