Friday, October 31, 2014

Happy Halloween! Homemade Costume Fun!

My kids picked some pretty obscure costumes this year.  I don't usually make their costumes, but this year I didn't have much of a choice.  I did my best to not purchase anything to make them.  I used what fabric I had to make my daughters.  For my son, I only had to buy the fleece to make his cloak, which I luckily found for 50% off on the remnant rack at Joanns.  The rest I refashioned old clothes and used fabric I had on hand.  I will focus on the refashioned pieces on this blog, but if you would like to see how my daughters Dragonball Goku costume came out or see more details on my sons costume, feel free to visit my blog.

My son picked a very obscure character, but I give him props for creativity.  He wanted to be Gaius, a character from his favorite video game, Fire Emblem Awakening.  Gaius is a candy thief, which I thought was very fitting for Halloween.  I really worked hard on his costume.  He is super stoked on how it came out.  Here is the picture of Gaius I used to work off of:


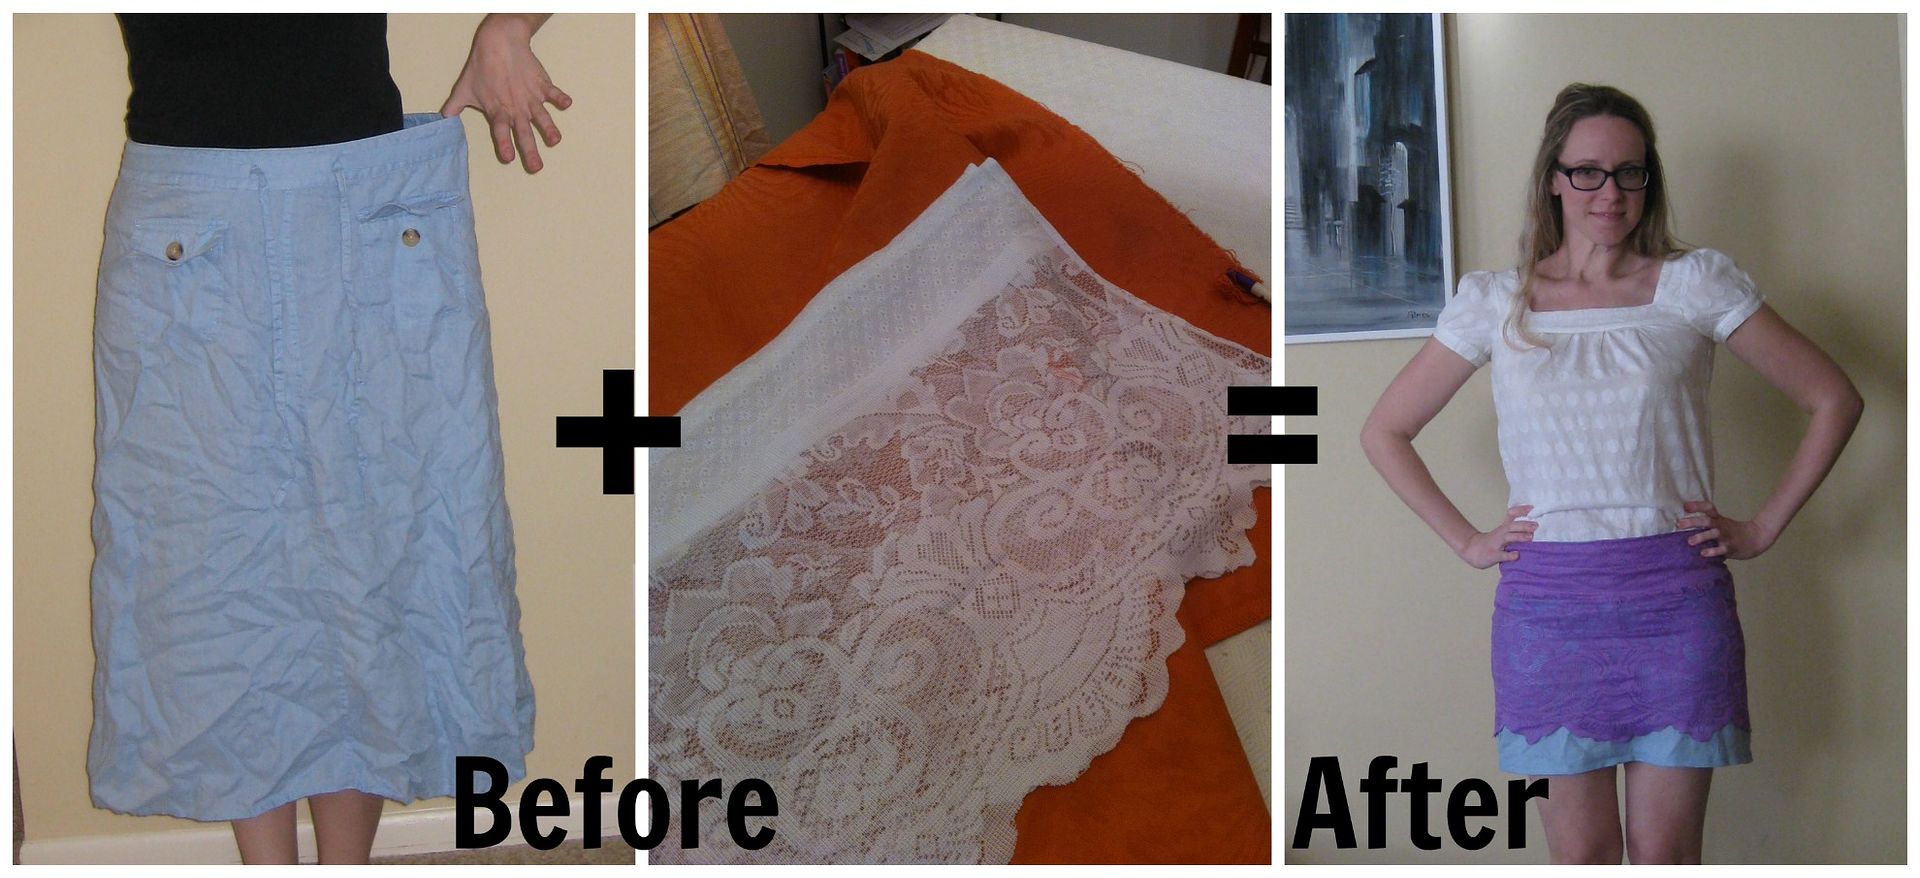
I started with a pair of my daughters old, torn, stained, too small leggings.  


I hacked them up to shape them into his arm bands.  I just cut a hole for the thumb.  I ended up sewing elastic into the top of the arm bands, so they would stay up because they were falling down a bit.


For his tank top I used two of the three shirts shown here:


I cut the sleeves off of the black shirt.  Then cut off the back of the grey and laid it over the top of the black shirt.


I sewed around it and then trimmed off the excess grey.


The back of the black shirt had some writing, which I covered with a strip of grey from the other shirt.


I also made him the vest, cloak, headband, and candy accessories.
Here are some pics of him dressed up:


He LOVES this costume!  He keeps telling me he is going to brag to all his friends about how I made it for him. 
:)  
I have received several hugs, kisses, and thank you's from the kids for these creations.  I had fun testing my pattern making abilities making these.  I am so happy they came out as well as they did.  I am looking forward to taking these kids out on the town tonight! 

If you want to see more, click here.

Happy Halloween!!!!


Upcycled Brutus Costume


Happy Halloween Everyone,

We actually went to a Halloween party last weekend so I thought I would show you the hubby's costume that went with my Olive Oyl costume.  I don't have a new blog post but I put a few more pictures on the post including my cray hairdo.  :-)

Happy Refashioning
Cindy @ Upcycled Design Lab

FLEECE FIX: Goooo Cardinals!

I've had this wonderful black fleece for about four years -- received it at work during an employees' appreciation fair or something. As soon as the weather turns brisk, I throw on the fleece except when it may be covered in cat hair. Seriously, why is cat fur attracted to black fleece? Argh!

cards2

I ran into a former co-worker who wore her fleece jacket long after she moved on from the company and she blacked out the logo with a black permanent marker. Despite the easy artistic solution, the logo and the black scribbles could be seen.

cards1

The best solution? A patch! Before I could decide between a Cinderella or Wonder Woman patch, I decided I wanted a St. Louis Cardinals patch. I easily found one for a few dollars online and simply sewed it over the logo. Easy peasy!

See you next season, Cards!

Wander over to my blog at jenniferelliott14.com.

Jennifer Elliott

Argh, me hearties!

 
With Halloween right around the corner, I wanted to share this pic of me as a pirate! The costume is cobbled together from various pieces I had in the costume closet. The eye-patch, however, was made by me.
I took one of the boob inserts out of a shirt (you guys know the concave padded thingies I'm talking about, right? Like shoulder pads for the girls!). I trimmed the pad down to size so it would cover my eye, then I attached some elastic (an old elastic hairband). And voila! A one-eyed pirate look! 
What are you guys wearing for Halloween?

Thursday, October 30, 2014

Funky dress into shirt and skirt

I started out with this dress I got for a buck at a rummage sale. I thought it might be long enough, but it wasn't even close. Plus, it just looked too "junior" on me.


It did, however, have this lovely bib detail that I planned to take full advantage of.


I started out by chopping it in half just under the bib. I pinned the skirt and its lining together to keep them at the right lengths, then gathered it and stitched it to a wide elastic band I took from another old skirt that was very snagged.


Some careful seam-ripping removed the bib from the rest of the dress. Originally, I kept the ruffle on it, but I decided it was much better without it - more clean and modern. A grabbed a spare white t-shirt and stitched the bib to it to create a sort of tuxedo t-shirt.


Here is the view from the back.


Styled with a black blazer for a graphic look.


And finally, with that elastic-waist skirt. Yay! 


Thanks for reading!   -Amy


Manic Pixie Dream Girl Dress

I had this cute white collar and black sash that I removed from another dress
That sash was sewed to the dress right under that collar like a little necktie. I sewed it onto the collar and planned to reattach them as a team to something, someday. Now, a cute collar and floppy bow are not normally something I would be drawn to. I'm afraid of looking like I'm dressing younger than I am.
Months later, I happened on this old thing in my refash pile.
I thought that this completely shapeless, boring sack could be the vehicle for that collar. It would be like a Manic Pixie Dream Girl costume that I could make just for kicks. I included a link for anyone not familiar with this term.
TL;DR version: I cut it too short, changed the black sash for a teal polka dot one, and took in the sides a bit. Then I added a few "quirky" accessories.
You should definitely check out my full post on my blog; Craft, Thrift, or Die...if you feel like it.
Thanks for looking!

Plain Velvet Jacket to Tuxedo-style jacket

This is again a very simple refashion. I thrifted this Purple Cotton jacket from my local thrift store a couple of years ago. I love the colour but it's a tad too big for me. I thought I should fiddle with it and wear it for the coming X'mas/New year.

I shortened the sleeves, re-sew a new centre back seam, added trim to the collar, changed the buttons and now it looks like this:

It doesn't look drastically different but I think it looks a bit more glam and fitted than before. You can see more photos about this project on My Blog..

Have you started sewing for the holidays yet?


Linen skirt refashion with lace

I found a too big skirt that was made of linen. I had no idea why I got linen because I actually hate linen because it gets wrinkled so fast.  I took awhile to figure out what I wanted to do with it. I disliked the buttons and pockets. I had a piece of lace that was a curtain that I figured I would cover up those pockets and hide the fact I was wearing linen.

I dyed the lace with purple iDYE. Then I attached it to the skirt, I cut off the linen skirt and made it shorter. I also took a little of the A-line out of the skirt to accommodate the lace. What I had leftover was this cute 2 color lace and linen skirt. And all those darn linen wrinkles were hidden. Success.

More information and pictures on my blog here. :)

Cheers,
Lauren

Wednesday, October 29, 2014

Doilies on a Pullover

My dearest Refashion-Coop-Readers,

it's been a while since my last refashion but today I have cute one. Whenever you have an old sweater or some doilies left, just put them together. As I did!

http://ninutschkanns.com/2014/10/29/refashion_doily-shirt/


Some weeks ago I visited my local thrift store and just found this cute velvet shirt. From an old curtain-project I had some doilies left and this was the right time to combine them.

If you want to see the whole tutorial feel free to visit my blog. I hope you like it!

I'm happy to read your comments.

Nina


NikolaLuigi Refashion

Another refashion for the boyf! I took this charity shop t-shirt (which I may have worn as a pyjama top for a few nights before deciding what to do with it) and tied and dyed it.


I think it looks pretty cool (no he's not passed out, he was just sleepy!)
You can see more of the refashion here!

A Steampunk Halloween!

I love costumes, so naturally when Halloween comes around I get pretty excited.  This year I decided on a steampunk theme for my husband and I.  I gathered various items from the thrift shops, altered some and created some fun steampunk costumes with accessories.


Goggles for both of us.


A shoulder pad for him.


And, futuristic weaponry!


For more details, and views of how we decorated the "trunk" of our van for the trunk-or-treaters, you can visit Second Chances By Susan!  Thanks!


Tuesday, October 28, 2014

Flapper Costume from an Old Curtain

I made this flapper costume from an old satin curtain. To make it, I traced a dress I had onto the curtain on the bias. I flat felled the side seams and used ribbon as straps. The gold trim from the curtain became a fancy neckline on the dress. I used the same ribbon, plus some felt feathers and elastic, to make a matching headband. Add a long, beaded necklace and you have one glamorous Halloween costume! For more projects, come visit my blog, Hoopes Park Studios


Sweater Revamp

I used sleeves from a previous refashion to replace sleeves on a old too big sweater to make myself a new top. I took it in some but I almost need to do it again.


As an added bonus, I used the sleeves to turn it into a cat sweater. The winter is coming and he gets cold easily. For a cat, I was so surprised that he loved his sweater. He was so happy.

More information on my blog here.

Cheers,
Lauren

Monday, October 27, 2014

A princess inspired dress for my own princess

I needed to make a dress inspired in Disney's Princess Sofia. This purple dress my sister gave me a while ago was just the perfect colour for what I needed. I wasn't so short about the fabric though but went with it anyway, and I really liked how it turned out after all. 

I opted for a scalloped hem which isn't perfect - it was the first time I tried to make one - and I even made a matching hairclip. Can you tell she was happy about the dress? 

see more details of this dress HERE

Little Red Dress to Apron Refashion

I found this little red sundress that I really loved. It was $2.00 at the second hand store and it was like new in condition. 

The only problem was it was really tiny. My size is a XL and this dress is a teeny tiny small. I bought it anyway because I loved it. Not knowing what I would do with it, I hung it up where I could look at it for a while. I find that works really good for me. In my sewing room I have a hanging hook that allows me to study a garment before I decide what to do with it. My idea turned to making the dress into a simple apron that I could wear around the holidays. One day I was shopping around at the kitchen store and I found an apron that looked like a dress that I really liked. It was $78.00, which I found was way out of my apron budget. It was so easy to take this dress and make it into a beautiful halter apron and the total cost was $3.00. Much better than the kitchen store apron. I cut a four inch section from the back of the dress and added a seam finish.

The next step was to add ties for around the waist. It already had a neck strap. I was amazed how easy it was to take such a small dress and make it fit me.

I love wearing aprons when I cook and craft especially when I am dressed up. There is nothing worse than ruining a good outfit from mishaps. You can see all of my refashion on my blog at www.cheriesforgetmenots.com. It took me a few minutes and the results are wonderful.


I hope you can find a little dress to refashion into a functional apron too. It was worth my time.

Cherie