Showing posts with label Sew Whatever. Show all posts

Tuesday, April 15, 2014

Refashioned Bog Coat Refashion

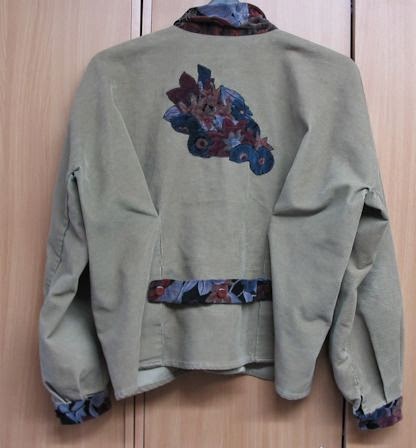
A long time ago, I used a velvet skirt to cut out flowers and make arrangements to applique to my version of a bog coat. Follow the link for one idea of how to make one.


In my version all the excess is folded in like two big tucks in the back. Also the length of the sleeves is controlled by adding a cuff. I also folded in the front edges and added a bit from the skirt for a collar and bits from the waistband to make fastenings.


That long ago!

But I never did like how short it was in the front. With a skirt it was fine, but with trousers not so happy.

Happily, bog coats have plenty of room and it still fits me. But I dislike the shortness even more.

A while back I was sorting my cupboards and found that I still had one panel of the velvet skirt.
The other day, I realised I could add some sort of band to the bottom and I would be happier.
So, I cut 2 6inch wide strips. I stitched them together folded lengthwise and started pleating them onto the bottom of the bog coat. A bit of stitching...


And now, I like it much better.

Slightly peplum-ish but not over the top.

Friday, March 21, 2014

Skateboarder Jeans to practical waistcoat

Lately through the winter I have been using a fleece gilet over all my other layers to keep warm. (I feel the cold badly and especially in my back).

Now that spring has come to England, I can begin to believe that it might get warm. So, sometimes the fleece gilet will be too warm. However, there will be times when my back still wants some protection. So, I decided to make a denim waistcoat which might serve the same purpose.

I rummaged through my box of 'reserved for refashioning' jeans and denim items. I decided on these skateboarder jeans from back in the day when a Certain Young Man was into skateboarding with his friends.
The denim is quite a heavy weight, so I thought it would help to keep the shape and not just flop about.

You may remember when I made a skirt from a few pairs of trousers and I ended up with problems where the knees had been. It gave a strange shape to the skirt.
(still trying to work out the ideal solution for that.)

Well, this time I tried to avoid that area, but because of random pockets around the knee area of the back of the leg, it wasn't going to work. So, I thought I would use the stretched out area to advantage by cutting the fronts of the waistcoat so that those areas would be in the bust area. I planned to use a side dart anyway, but then the stretched out character would cause the fabric to mould around the bust more like softer fabrics would do.
Also because I didn't intend to fasten this waistcoat anyway, and because of the amount of useful fabric due to the pockets on the jeans, I narrowed the fronts. This will still allow my blouse fabric to be the feature.

One of the feature pockets
After I stitched the waistcoat's main seams and top stitched them like a false flat fell seam, I cut out some of the features of the jeans like the pockets and put them on the front. I sewed them on in such a way that there is actually an extra pocket between the cut out pocket and the fabric of the waistcoat.

I did cut the front so there was a bit of a lapel, so I cut facings from the scraps and stitched them on. I turned under all the edges and trimmed so they wouldn't fray.

And here we are!
No photos of the back because it is plain.

Oh, by the way, what about the fading on the knees which are now in the bust area? Well, I thought of that. It wasn't too bad, but I worked into it with the colour pencils I use for some of my textile art. I blended it with water and then heat set it. It makes it just enough darker that it doesn't stand out as being exceptionally faded.

Saturday, February 15, 2014

my son's t-shirts put to good use

I haven't had a chance to refashion much lately because of some of the other things I have been doing. Then I got the reminder   this week. So it was time for jumping into a project and not second guessing myself like I usually do.

A Certain Young Man left a bag full of clothes he didn't want, but couldn't bear to throw out himself. Some of the things were mostly okay, but with the odd tear or stain.

These 2 looked like they would make a comfy skirt for just throwing on in the summer to wear round the house. or even to the shop and not be embarrassed.

So I cut them out using my gored flared skirt. I used the T-shirt hems for the skirt hems. I also cut the pattern adding extra on the sides because I wanted it a bit more flowing.

Then when I pinned the bits together, I adjusted the pinning to lay nicely so the seam didn't pucker or bag.

I tried it on and took in the different seams at the top a bit more because the t-shirt jersey is stretchy and my pattern is for woven. I could have cut it smaller to start with. But I didn't know how much stretch I would be dealing with.

Once I got it fitting nicely at the waist to hip area, but leaving room to get it on and off, I stitched it to a wide elastic. I had already cut the elastic to a length that was comfortable but would hold the skirt in place.

When I was working with it, I forgot there was a stain on the inside hem area of the piece I had cut for the back panel. You couldn't see it from the outside of the skirt, but I didn't want it to inadvertently show. So, I just added a bit of the contrast shirt in a similar way to some of what I have seen in ready to wear - often on sleeve hems.

and voila.
front

side

back

and it is comfy!

I doubt it will be worn with a pink top but that's what I had on under all my keeping warm layers.


Saturday, January 04, 2014

red and ready tee

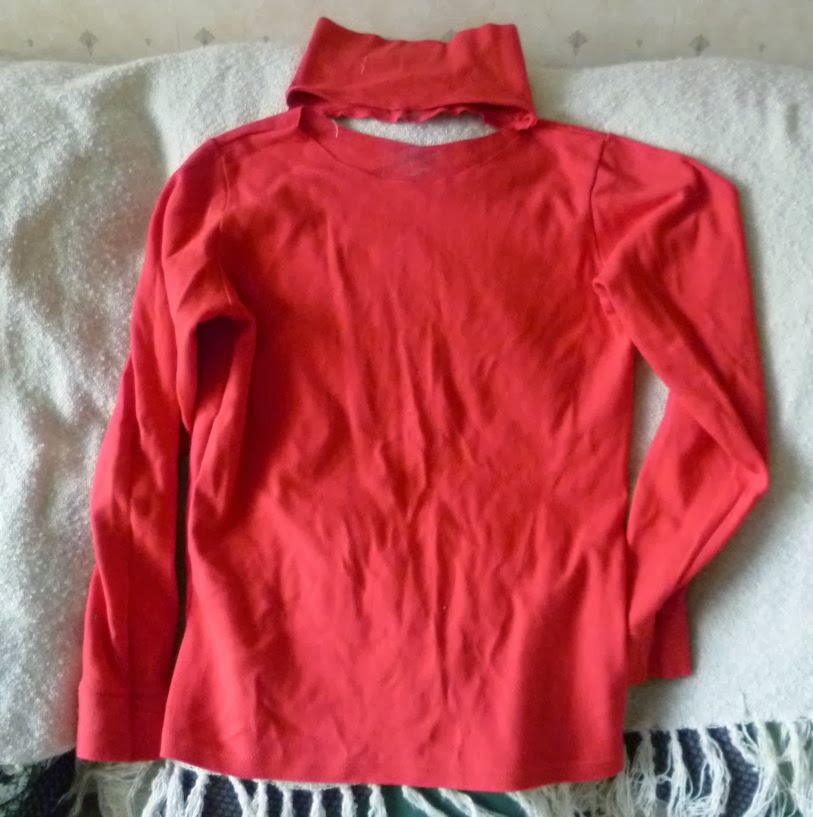
Over Christmas I thought I might refashion this turtle neck t-shirt I had. I only wore it a few times because the neck was far too tight. But as it was red, it really needed to get some use and give some holiday cheer.

So, I chopped off the neck. As you can see, before I remembered a before photo.

Then I tried it on. Okay...looked like it was more than just the neck that was tight! I will spare you the image. ;-)

So, now that the holiday is over, I decided to get on with making it work so I can have a warmer t-shirt the rest of the winter and it will be ready to go for next Christmas.

I had some scraps of a darker red t-shirt fabric given to me by a friend, so I did a bit of chopping and a bit of adding and a bit of let's see if I can make the neckline interesting. and voila!
I put the collar on in an asymmetrical way just for something different.

Another pose to show that there are also an added stripes from hem of top up and through to hem of sleeve on both sides. The cuff is added in a similar way to the collar because I chopped off the existing cuffs.

(Here's hoping a lose a bit of this Christmas' over-indulgence and it will fit even better!)

Saturday, November 30, 2013

skirts from duvet covers and dust ruffles

A friend of mine recently had to replace the boiler in her airing cupboard. When she was cleaning out the spare sheets and stuff, she discovered there had been a leak in there and a lot of the stuff was stained. She asked if I wanted to see if there was enough of it salvageable for fabric.

I guess you know what duvet covers look like! This is the end of one.

I need some basic summer skirts, so this will be a 'beige' version, even though the fabric is a quiet tan stripe.
To be honest, it was a bit too plain, so I have stitched a line of little shell sequins here and there. Three spaced lines in the front and one at centre back.
The detail shows the centre back. If you click on the photo, it should enlarge enough to show how the beads are secured with a metallic bead.

It will keep the skirt interesting, but still allow me to wear it with blouses that make their own statement. A bit like tone on tone embroidery.


For the rest of the bedding 'fabric'....
I sometimes make skirts to send to my friend who works in an orphan village in Ethiopia. The little ones get a lot of clothes sent, but the ones 10 and up need things. So I made six skirts from the duvets and dust ruffles. There were more stains on these things than I originally thought. But 6 skirts (plus 1 for me) is better than all of it getting tossed.
One from the tan stripe, one from a blue/white stripe and 4 from 2 red dust ruffles.

I cut some squares and arranged them and appliqued them on to the fronts of the skirts as they were a bit plain - or at least compared to the ones I am also sending made from some flowery fabric someone gave me. The basic shape of the skirt is like the one I did in a previous refashion.

Friday, November 01, 2013

thin cotton skirt to blouse

This skirt keeps making an appearance while I am shifting fabrics and patterns around. So I decided it was time to refashion it. I think I picked it up somewhere at some charity shop because I love the colour and print.
You can see how much longer it is than I wear by comparing with a not-yet-hemmed-skirt-from-duvet refashion in progress next to it.

The waistband was very small. Here you can see after I chopped off the waistband how much fabric was gathered into it!
and the cutting mat has the inches side upwards!

So there was plenty fabric to do something with. The fabric is very, very lightweight cotton. I am not sure just how you could wear it for a skirt without wearing a lot under it for decency and without feeling like it would tear getting in and out of cars or catching on briars on a walk.

However, it would make a lovely blouse for a very hot day. And with a cami under it would do for regular just plain hot summer days.

So I used my basic blouse pattern and had plenty of fabric to cut out the blouse, extra button stands, cap sleeves and a mandarin collar.
Scraps left piled in the front.

I was going to use the button stand from the button down front of the skirt, but the spacing didn't work with the blouse layout. I wanted different buttons, since these were a random purple colour. So, I would have had to fuss with the existing buttonholes and trying to match size/thread etc to make the right number. It was easier to create buttonholes that go with the buttons I selected from my stash.

And here is the result:
With it buttoned right up, it looks rather Asian.

And with a few buttons on the top undone.

Wow does it ever feel nice on! It has that soft worn feel that cotton can get. And for once I think I got the fit spot on.
I shall have to remember what I did!


No it isn't summer, it isn't even warm anymore. But it will be a great blouse for next summer!
I have a few other things in the refashion pile that I hoped would make blouses. And a few from-scratch blouses already cut but needing sewn.
I will definitely get on to stitching blouses now with this result!

Friday, October 11, 2013

Khaki skirt with painted flowers

In early September, I posted about a refashion of a khaki skirt I did.
One of the comments asked to see me wearing it. I took a photo around that time, but I got too busy to post it.
So, here is a photo with the skirt. It is getting a bit too big on the waist - hurrah!, so I am going to have to stitch some darts at some point.
I usually wear it with the tail out, but I wanted to show the pockets.

I am still thinking about the save for the embroidered skirt I posted about last week.

Saturday, October 05, 2013

Advice please?

With the good advice Andrea from LittleDidYouKnow had on her boots, I thought I would ask for help with a situation I have.

I made this skirt from a pair of jeans and a pair of cords.

I spent ages embroidering it.

To start it looked good.

front

back

now that I have been wearing it, it has become obvious that the front jeans sections were cut from the knee areas that got stretched out. It looks pretty dreadful to have it on with the baggy bits sticking out.

a side view

Turning it around backwards might work, but it means the larger embroidery section is in back.
Taking the seams apart and making them smaller is sort of out of the question because each seam is covered with the bias binding and then overstitched with a design on my sewing machine.
Seams and waistband when in progress - inside and out

Any suggestions on how to get rid of the baggy without embroidering the life out of this?

One thought I had was to split it down from the top on both jeans sections down to the embroidery. stitch it up like for seams, but really they would be more like darts which would take in the fullness in that area.
If I did that, would I just do plain seams?

Or would I do the bound seam edges with the machine stitching? I think I still have bit of that fabric because at one point I contemplated doing something like a jeans jacket to go with the skirt.

Or do you have another idea all together? IF so, I would be glad to consider it. The skirt isn't getting out of the wardrobe much these days. But I do love it and a lot of work went into it.

Wednesday, September 04, 2013

Khaki makeover skirt

I have a skirt on today that I refashioned some time ago. So I thought I would post it here. I am planning some similar refashions hopefully this month.

Here is the khaki jeans skirt when I was starting to change it. I forgot to take a photo before I chopped it, so I laid it out on the carpet and got a photo with the parts together.

I chopped it at the same length as the jeans makeover skirt...which is a favourite!

front
Then I made a ruffle from double width flower fabric. I folded it, ruffled the length of it and added the raw edge to the bottom. I made several small lengths of ruffle and put them in the tops of the pockets.
back

After I got those finished, I painted the spidery daisies in colours to tie in with the ruffle. The centre of each has a small green flower button. The photo shows the daisy a bit more aqua than it actually is.
detail
I really wouldn't have had to paint the flowers. But...I was on a painting flowers mode....

I also went on to update a black t-shirt to wear with this skirt.
It really didn't do anything for me. It made me look washed out. I had already cut a v in the neck, with the hopes that it would help to take away some of the black from my face. However, it didn't really work. But since it would go well with the khaki made over skirt, I decided to add a bit of ruffle from the flower print round the neckline. Then to further pull the colours together, I sewed a scattering of the tiny flower buttons below the neck and on one sleeve.
The result is quite a bit more cheerful, and doesn't make me look like I got up off my death bed!

Thursday, August 01, 2013

Skirt from failed jacket

Blue skirt - finished. I started this in January or February.

Why did I stop with only the waistband to be stitched down? It was already hemmed even! Oh, yeah, these were for Spring and we didn't have one! Or at least it was so delayed that I kept wearing the winter skirts I had just made and started on some textile art deadlines.

This skirt started out life as fabric I bought at Bombay Fabrics in Bradford ages ago. Some kind of blend I think. The selvedge says Perfect Fabrics! I tried to make a bog coat long jacket from it and failed utterly!
failed bog coat pinned together

So part of it was made into one of the skirts for girls in Ethiopia I was doing. The rest was made into this!

Front

Back

Detail of the walking slit at the back.

I used my own straight skirt pattern for cutting the skirt from the bog coat fabric.