Friday, March 31, 2023

DIY shorts with zipper fly: a step-by-step tutorial


 Are you ready to sew your own pair of stylish shorts with side pockets, a zipper fly, and a high waist? Look no further than my latest tutorial video, where I guide you through the entire process step by step.

No need to worry about finding the perfect pattern - I'll show you how to make a custom pattern based on your own measurements. And the best part? This tutorial is beginner-friendly and easy to follow along with.

So gather your materials , I recycled too big pants  and head over to the video to get started. Don't forget to share your thoughts in the comments and give the video a like if you found it helpful. And if you have any friends who love sewing, be sure to share this tutorial with them too! 


step by step tutorial with pattern 


  My blog

 and 

You Tube


Thursday, March 30, 2023

Cardigan with worn fabric turned inside out (go for visible seams!)


Hi everyone! We all have our favourite garments, right? That soft cardigan, top or comfy sweater. Items we'd wish we could wear forever. This pink cardigan is one of my personal favourites. I could wear it day in and day out. I've been washing it by hand, to preserve the colour and keep it in tip-top shape a little longer. Sadly, the fabric on the left shoulder got worn out, the result of wearing the belt of my handbag on that same shoulder. And in reality it's much worse than the photograph shows, trust me. Way beyond getting away with a trendy 'used look'. Also because the fabric on the right shoulder looks much better.  

So I decided to go for a simple creative approach: turn the cardigan inside out and go for visible seams! I've seen it so often in the last couple of years: tops, sweaters and even pants, all with visible seams. It gives the garment a bit of an edge and my 'neat' pink cardigan could use some edge!

In the proces, I faced only a few challenges. One was simple: remove the brand and washing tags...

let's show some pink visible seams!

The next step was a bit more challenging, because the shoulder seam was reinforced with WHITE seam tape. Impossible to ignore and difficult to remove since it was sewn together with the shoulder seam. Nonetheless a problem I had to solve. Fortunately, after a few days of pondering, I suddenly remembered my experiments with hand painted prints a few years ago. I still had a few bottles of textile paint and (yay!) one of them had the exact same pink colour! How about that?!

Me carefully hand painting the white seam tape...


I must say I'm quite happy with how this turned out. It's no rocket science, but hopefully it inspires you to look at your garment in a new way: inside out! 


Thanks for reading along and you are very welcome to visit vermaakster.blogspot.com for more details and a step by step explanation in Dutch and English.


Crochet Top

 Hello Refashion Co-op. I found a few crochet blankets at a swap and wanted to make them into clothes. This is the last of the blankets. I really liked the 70's colors. 

Before and after.
 
Dreamy 70's colors.
 
I cut out a basic sweater shape and got to the sewing machine immediately. I knew this would fray quickly. I came back later for the head hole.

I decided to use bias tape and put the cut edges into the bias tape to close the seams. This was a very difficult sew. The blanket was a very open knit and that made it "lumpy". My sewing machine did not like it. The thread broke a lot. I got angry. But I really love this sweater though. I am glad I made it. Thanks for reading along.


Monday, March 27, 2023

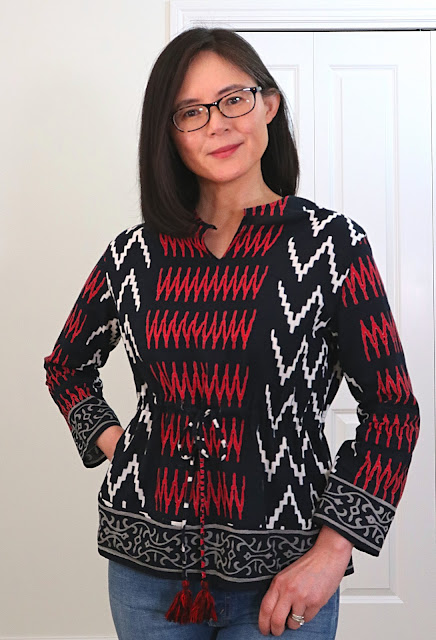
A muumuu to boho top upcycle


I picked up this muumuu at the thrift store for $4.  I'm a sucker for bold, tribal prints. The fit wasn't flattering, and there was a big tear at the bottom, but I knew I could remake it into a pretty boho top.


I used one of my favorite shirts as a pattern and cut out a new bodice and sleeves.  To save time on sewing, I kept the neckline and the belt.

Learn more about this refashion at my blog Pivot Point Patterns.


Saturday, March 25, 2023

How to Sew a Midi Skirt: Gathered Style


 Hey everyone!

I just wanted to share my latest sewing project with you all - a gathered midi skirt with zipper! This skirt is perfect for beginners as you only need three body measurements and no pattern is required. I've included a step-by-step sewing tutorial in the video, so you can follow along easily.

I'm really proud of how this skirt turned out, and I think it would be a great addition to anyone's wardrobe. So if you're looking for a new sewing project and have spared bed sheet or different fabric, be sure to check out the video on my YouTube channel!

Don't forget to give the video a like if you enjoyed it, and feel free to share your thoughts on the skirt in the comments. Happy sewing!


step by step tutorial 


  My blog

 and 

You Tube


Friday, March 24, 2023

A Quilted Skirt and Bag

 Hello Refashion Co-op. I found this amazing quilted skirt at a swap. It was so cool I took it home an thought for a while about what to do with it. 

Before and after, and after.

The skirt had zippers on both sides so if I shortened it too much I would have to remove a zipper. I liked how the zippers looked so I made the skirt as short as I could with out changing the side zippers at all.

When it came time to take the skirt in I realized I couldn't make new side seams because of those zippers. I made a new seam down the back of the skirt. I took the skirt in more at the waist and less in the hips but the new seam made it all blend in and look like it had always been that way. I used my serger because the nylon material and the batting was a fraying mess. I thought the material was really difficult to deal with. I don't think I will work with nylon again soon.

One of the reasons I kept the skirt as a skirt is because I could use the scraps to make a bag. I thought a little crossbody bag would be so fun. I made this basic rectangle shape and thought it would work out so well. (Spoiler- It did not turn out well.)

I used this belt as the strap. It was the perfect size and material and it was right here.

This bag was a mess. It seemed great when I put it together but it was a mess now. 
 
I cut it up and salvaged what I could. I made a new smaller bag. I started sewing and realized the strap was inside out. I was mad as heck at this point but that just made me more determined to make this bag.

My bag is still large enough for my phone, cards, lip balm and keys. Y'know, the really important stuff. Thanks for reading along. To see more details about this skirt or this bag go to I Can Work With That.


Wednesday, March 22, 2023

Create a Fashionable Front Knot Top with this Sewing Tutorial


Hey ! Today, I want to share with you a fun and easy sewing tutorial on how to make a wrap top that can also be worn as a front knot top. This top is perfect for beginners, and it comes with a free pattern for puff sleeves. Plus, it's sustainable because I made it from an old bed sheet!

In the video tutorial, I'll take you through the step-by-step process, and by the end, you'll have your own beautiful and unique top. The tutorial is easy to follow, and I've provided a free pattern for the puff sleeves to make the process even easier.

Not only is this top sustainable and easy to make, but it's also versatile, so you can wear it in two different ways. And it's perfect for anyone who wants to add a versatile piece to their wardrobe.

Make sure to watch the entire video tutorial to get all the details and see the step-by-step process. And if you enjoyed the video, don't forget to give it a thumbs up and share it with  Happy sewing!


step by step tutorial with free pattern


  My blog

 and 

You Tube


Wednesday, March 15, 2023

St. Patrick's Day T-Shirt

Hello Refashion Co-op. St. Patrick's Day is coming and I wanted to make a shirt for the day. I love a theme for my sewing. 

Before and after.

This is one of those freebie t-shirts that you can find everywhere. I took this from a clothes swap because it was green, I painted over the logo to hide it a little. I will hide it even more in a minute.

I cut a piece of the scarf to make a pocket. It will hide that logo completely.

I cut the shirt to a cropped length and clipped the scarf around the bottom. It is going to make a peplum/ruffle around the hem of the shirt.

My shirt was ready for the holiday. For more details go to I Can Work With That.


DIY Wrap Dress from Curtains: A Sustainable Sewing Project

Hey everyone! Today I want to share with you a sustainable sewing project that I just completed: a wrap dress made entirely from curtains! This project is perfect for those who are looking to upcycle their old curtains and turn them into something stylish and wearable.

In the first part of the video, I show how to make a pattern for the wrap dress according to your own measurements . In the second part, I guide you through the sewing process and show how to sew a fabric belt to tie at the waist.

This dress is not only sustainable but also very comfortable and versatile. It's perfect for any occasion, whether you're going to work or a night out with friends.


I encourage you to watch the whole video and share your thoughts on this sustainable sewing project. Let's all do our part to reduce waste and create something beautiful out of what we already have. Don't forget to like and subscribe to my channel for more DIY and upcycling projects like this one.


step by step sewing tutorial


  My blog

 and 

You Tube


Saturday, March 11, 2023

Upcycle Old Clothes into a Chic Dress: DIY Tutorial


Hey fellow sewists! Check out my latest DIY tutorial video on how to transform
a men's shirt and fabric leftovers into a chic and trendy button-up dress. This project is perfect for those who want to upcycle their old clothes and turn them into something new and stylish. In the video, I'll guide you through the entire process, from creating the pattern to sewing the  dress together. You'll learn how to make a front panel, puff sleeves, a round neckline with collar,  front princess seams, and side pockets. Even if you're a beginner, this project is easy to follow and produces beautiful results.

I'd love for you to watch the video, share your thoughts in the comments, and give it a thumbs up if you like it.
Upcycling old clothes not only saves money, but it also helps reduce waste and benefits the environment
. So, let's get creative and make something new out of something old!

Thanks for reading, and happy sewing!


step by step tutorial  


  My blog

 and 

You Tube


Friday, March 10, 2023

Long Sweater to Tie Front Sweater

 Hello Refashion Co-op. I have been wanting this denim shirt for months. I don't buy clothes often so I have been on the lookout for a way to make one for myself. I had this long sweater on my refashion rack and thought it might be a substitute. I wanted to make this long sweater into a cropped length sweater that tied in the front. 

Before and after.

There was a bleach mark on the back so this sweater had to be shortened and altered to get rid of this. 

I shortened the sweater and made a waistband out of the long pieces that were cut off. 

I clipped the waistband in place to see how it fit. 

I liked the new tie front sweater a lot. For more pictures and details go to I Can Work With That.


Monday, March 06, 2023

Upcycle Your Wardrobe: Turn a Men's Shirt and Skirt into a Cute Dress


 Check out my latest video where I show you how to make a cute and comfy dress with an XXL collar and side pockets!
This dress is perfect for beginners and you don't need a pattern, just your own measurements. Plus,
 I'll show you how to sew side pockets and an XXL collar!


step by step tutorial CLICK


  My blog

 and 

You Tube


Saturday, March 04, 2023

Fixing a Bleach Accident

 Hello Refashion Co-op.  I really messed up. I refashioned a shirt/jacket over a year ago and then I ruined it by washing it with bleach. Then I fixed it with dye. 

Rit dye in Kelly Green to the rescue.

Ignore my weird expression. This was the original refashion. I really liked it. I put a hoodie and a flannel shirt together. 

It got washed in hot water and bleach with a load of towels and the gray plaid washed away. It was now sad and pale.

Because it was so light, I knew it would dye well. I used this green color because I like green and because it is St. Patrick's Day this month. 

Mmm, green dye!

Happy St. Patrick's Day!! You can see more details and such on my blog, I Can Work With That.