Monday, October 24, 2011

waistcoat


Have been away from the world of refashioning this past month due to 2 new adopted greyhounds, so I've been left with very limited spare time and I think it shows!! My attempt at chopping up a winter coat in striking green kermit colour and trying to transform it into a waistcoat with a frill made from the coat lining, perhaps could've done with a bit more time. Oh well, still got lots of coat left for next project and with winter fast approaching, I think the new dogs with be needing a coat of their own......

Transforming a tie-dyed t-shirt to a tie-dyed skirt!

Along with my partner, Dan Leo, we have a business, Dyed Stitches, where we upcycle used clothings into items that I can't help but make. I live and breathe new designs. I no longer look at a shirt and see just a shirt, but instead how many pieces of clothing and/or accessories I can turn it into. I've been cutting up clothes for quite a few years now making them into something different, however, with Dan's help my stash of about-to-be-cut-up clothing is magically transformed by his tie-dyeing techniques. So when I went through my stash of tie-dyed t-shirts and found this baby sitting amongst them all, I decided to try something new.


tie-dyed t-shirt before

First of all, how could I possibly cut up the peace sign? Nuttin' doin'. Couldn't happen. So, for the first time I had to figure out a way to make this skirt to be longer than the ones I'd done previously when cutting them under the armpits and folding the top over for an elastic waistband. Somehow I had to use the whole shirt without the neckband and sleeves as part of the skirt.


shirt with sleeves and neckband extracted
I loved the bottom of the t-shirt and knew I wanted to use that as the bottom of the skirt, so there was going to be no shortening the length on this baby. I wanted it all, so I cut off the sleeves and the neckband to see what I had left to work with. One thing was for sure the yellow sleeve that I had just removed would look really great as a small waistband, and if I used 1/4" seam allowance I knew I wouldn't chop off any of the peace sign.


and off with the sides and shoulders!
 I used rotary cutting tools to help get a straight cuts on the sides and now the new waistline. Ta da! I cut the front and back together, and then was ready to strap on that waistband that I cut from the one sleeve. I used a 2" width by the length of the waistband.

front waistband pinned to the front of the skirt

What I decided to do so the 1/2" wide elastic wouldn't roll in the waistband after it was sewn was to cut it into two pieces -- one for the front and one for the back. Therefore, I had to cut a front waistband and then a back waistband. I normally don't do it this way, but thought it would be better in the long run for this fit.

I sewed the front waistband to the front of the skirt with black thread so you could see it better.
I cut out a strip 2" wide x 20 1/2" long (the length of the top of the skirt), sewed the strip right sides together with the top of the skirt. Then I folded it in half, wrong sides together and sewed it along the same seam line as the previous one. This created a waistband where I could insert the 1/2" wide elastic.

elastic with elastic pinned at seam allowance

So, what you see in the above photograph is what the waistband looks like on the front side after sewing it to the skirt and after threading the elastic through the side seam. I pin the elastic in place so that it doesn't slip through.
I sewed the back as I did the front, and then when both are done, I pinned the side seams from the waistband to 8" above the hemline. You should pin them right sides together, but as you'll notice from the photos the back of mine is wrong side out. I left it that way. Apparently, I'm not planning on selling this one!

On the inside I clipped the seam allowance near the waistband so that I could zigzag it to prevent fraying.

I sewed the side seams to 8" above the hemline and clipped the seam.
The reason for clipping the seam is so that I was then able to turn under the seam allowance below the clip all the way to the hemline. I turned in the seam 1/4" and then another 1/4" so no raw edge is showing. This gives me plenty of room to walk or sit while wearing the skirt and it's not prohibitively narrow around the knees. Sometimes a seam will break if there's no walking room in the width of the skirt.

the turned-under seam allowances above the hemline

The last thing to do was to stitch close to the turned under edge of the seam allowance, sewing across the other side below the clipped seam, cutting any long threads, and then put it on and wear it with pleasure!

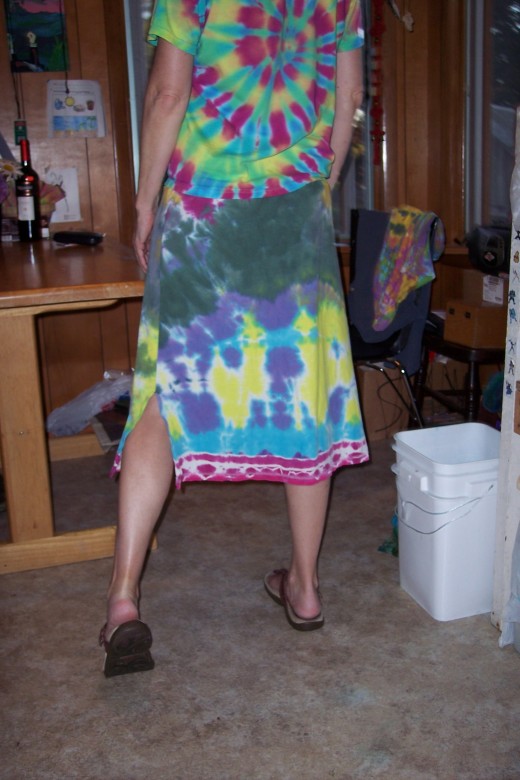
Here's the back with the slit splayed so you can see it.
Picture by R.J. Leo
and here's the front
Picture by R. J. Leo
This is the first of many of these skirts that I plan on making. I feel so very fortunate to be able to have the selection of tie-dyed t-shirts from my partner, Dan. His tie-dyes are just exceptional!
I also wore this as a dress with the "waistband" under my armpits. It made for a great swimsuit cover-up!
Also, if you're sewing on a regular sewing machine, not a serger, with these knits, I highly recommend using a ball point needle and stretching the fabric while you sew, especially the waistband. Otherwise, your stitches will pop when you stretch the skirt over your hips. Just sayin' -- been there, done that, my friends! Now, happy sewing and thanks for stopping by!

Bag out of leftovers!

This was one of the first bags I ever created.  I had an idea of how it was going to look and then gathered some preloved fabric together to see if I could make it happen!


First I took a preloved skirt and then created the outside of the bag.

Then I found an old shirt and made the handles and bag interior.  Nothing was wasted - I even added the shirt pocket to the interior as it was - a great mobile phone holder!  In addition I also taught myself how to make a bow which was made from shirt fabric too!

The top of the bag was made from the seam of a pair of jeans.  All I had to do was unpick part of the seam in order to insert the handles.

Voila!  One bag made out of leftovers (or I prefer the term preloved fabric now!)


There are more details and plenty of other refashions on my blog:
http://sewselena.blogspot.com

HELP!

I don't know how I get myself into these messes, but I have agreed to do a talk in English about re purpose and refashioning! :0 It's due some time this week( i.e whenever my teacher decides to throw me to the hyenas that are my English class) I'm supposed to do a demonstration as well as talk about Eco living and it's all to be done in under 4 minutes! Please could you give me some ideas for a quick, easy refashion that will impress my class and my teacher so I can get an A and prove to them I'm not a loser (just coz I actually read our assignments, I don't get it :P) I thought about Ed Hardy style T-shirt cutting but it would be cool if I could do something that the whole class could be involved in and try too, so they will be inspired to refashion. Any feedback would be GREATLY appreciated :P Thank you !!! :) Róisín xx


Meanwhile, here's a little lavender mouse I made from pot pourri , fabric scraps and shoe laces( for her tail) the bow is from a pair of socks. Now she keeps my tights and socks smelling sweet :)

Sunday, October 23, 2011

Sweater Refashion


I got this 80's-ish sweater from a friend. I used to really like hunter green, and I kind of still do, but it hasn't been seen in stores since 1993. However, I decided to modernize it anyway. I cut off the sleeves, took it in on the sides, reattached the original sleeve ribbing to the new armhole, cut a new neck and made ribbing from the sleeves, and also made a little bow that you can barely see- it's by the neck. It's not very creative but it turned out well, and sometimes my refashions are the opposite. I do have something more creative, but I am having a hard time using blogger- when I insert photos, they put them in any old place in the post and screw up the layout, and then I can't move anything. So I will do two separate posts after wasting 20 minutes trying to put them in one.