Tuesday, March 31, 2015

Fixing the neckline

My mom had a cable knit sweater with a stand-up collar totally uncomfortable. I volunteered to fix it for her. I don't have a before picture, but I found something similar on the internets.
What I did was to put a plate on the neckline and make a trace. Cut it and sewed a faux leather bias tape in matching color.
I had trouble in the connection, so I used textile adhesive. I find it convenient in those cases.


My mom can now wear it enjoining the new neckline.
Thanks for reading!

Spring Tunic

I found this breezy tunic at a local thrift store and loved the print. The only problem is it has an elastic waistband that isn't very flattering.


I got to work removing the elastic which I set aside for another refashion. I also took in about an inch on the sides.


All in all, this was a very easy refashion and will be fun to wear this spring!


Another Sweater Skirt

Winter might be winding down in most parts of the world, but there is still ice, snow, and cold where I live. I'll be wearing warm clothes for at least a couple more weeks. Here is a 100% wool (llbean) sweater my Mama found at the thrift store. It was a very warm and comfortable sweater, but it was a little boxy in the fitting. It's much more flattering and useful to me as a skirt.

This shot is as close to "before" as I have; I remembered I needed a before shot after I cut off the sleeves. Ooops.

Sew up the sides where the sleeves used to be, add a waist band, and put in the tag. et voilĂ !


Worn with fleeced tights, wool socks, and boots! i stayed warm on a very cold day.


Double Layered Shirt Slim Down

The Month of March has been crazy hectic for me, which is why I am posting on the very last day.. but I made it and that's what counts! Since I've haven't had a lot of time to focus on refashioning ( that's going to change this week).. I went with a simple refashion slim down where I took the layers of one shirt apart and created two new shirts from the original. You can see the first transformation here.

It was as simple as a few cuts and stitches!


Moody Blues

This was a fun one to overhaul.  It started with a dropped waist, long sleeves, an outdated collar, and a midi length. 

Exhibit A:

Steps:
1. Move up the waistline.
2. Removed collar and finished to create mandarin collar.
3. Cut and finished sleeves to cap sleeve length.
4. Used excess fabric to create a tie at the waist.

Voila!

Exhibit B:

Side by Side:


Hope you like this one! 
XOXO


Graduation Gown to Cute New Dress

After graduation, what on earth do you do with a graduation gown???

Chop off the sleeves, shorten it and make a sash and you have a new dress! Even though it is super polyester-y, it is actually really comfortable!


You can check out my step by step process here !

Happy Sewing!
XOXOX
Katie


Monday, March 30, 2015

The Crafty Disaster: Dress to Apron

 I found this cute pink and white striped dress at Goodwill. I just loved the fabric but the style and size of the dress weren't cutting it. So I decided to turn it into an apron. 

Before

After

Dress to Apron


For more photos and a quick how-to, hop on over to my blog: The Crafty Disaster

-Lindsay


Upcycled Blankets by Missy Bonkers

Upcycled wool blankets by Missy Bonkers

Hi my name is Tina and I established Missy Bonkers in 2009. “My background initially was in theatre costume design and directing. I then re-trained as an interior designer and colour therapist and went on to work within the design industry and the retail sector. While working there I became aware of the sheer quantity of waste, in particular domestic and commercial textiles.”

As a reaction to textile disposal I began to collect and reuse the fabric in many different forms from soft sculpture to restyled vintage clothing to wall mounted appliquĂ© and hand-embroidered images creating functional designed pieces from toys, clothing and accessories, to patchwork quilts, and soft furnishings. 

Over the years the idea had blossomed and eventually Missy Bonkers was born. Since May 2009 I has been actively restyling clothing in particular, creating an awareness of slow fashion that is both individual and unique, while also encouraging awareness of how clothing can be restyled to prolonging the lifespan of a garment, rather that disposing of it. 


I am register member of the Crafts Council of Ireland and a member of the Education Panel of the Crafts Council of Ireland.

My work and blog are available online at www.missybonkers.com

One of my latest upcycling projects is Blanket Coats & Shawls, upcycling vintage Irish wool 
blankets.


Taking a wool blanket and turning it into a sleeveless coat with some specifically placed cuts and bias binding.


Blouse and Skirt Refashions

I recently participated in a thrifty clothing swap with some other bloggers, and my partner, knowing I love to refashion, sent me a couple of pieces that could use some alterations.

Thrift Style Thursday: Swap!

The blouse was easy. It was quite nice, but just too tight in the neck for me. To remedy this, I simply cut a new neckline and used some polka dot bias tape leftover from another refashion to finish the edge.

Navy Blouse - After

Navy Blouse - Before & After

Then it was time to tackle that frumpy, floral skirt. I removed about a foot of fabric off the bottom of the skirt and used it to create the new bodice.

Blue & Tan Floral Dress - After

Blue & Tan Floral Dress - Before & After

As always, you can find more details and photos at CarissaKnits!

Sunday, March 29, 2015

SKIRT REFASHION: another simple skirt

A few nights ago while looking through Pinterest, I found a "quick" guide on how to refashion a shirt into a skirt with POCKETS! I couldn't find the full tutorial anywhere, so I just depended on the four-step graphic. Yup. Four-step graphic. The graphic also boasted the refashion could be completed in 30 seconds. SECONDS?!? SECONDS?!?


404.RED9


If I know what I'm doing and I'm having a good day, I could probably complete a simple elastic waistband skirt in less than an hour -- maybe 30 minutes. A skirt in 30 seconds. Nope. No way. Cannot happen. Because I'm for all things easy, lazy, and quick, I decided to try this four-step method of turning a shirt into a skirt.

For more details and pictures, click here.

Friday, March 27, 2015

Skirt to Pants!


We started with a skirt, of course!  Are you seeing a trend here?  I don't have a before photo, but you can just about imagine it.  I'd made it when I was a teenager!
I just laid my pattern piece out on the existing skirt and cut out around it, keeping the original waistband and pockets...bonus!  Then I sewed up the crotch seam and the inseam, hemmed it and I was done!
To see the other pajama pants I made, head on over to Skirt Fixation!

T-shirt and skirt to dress

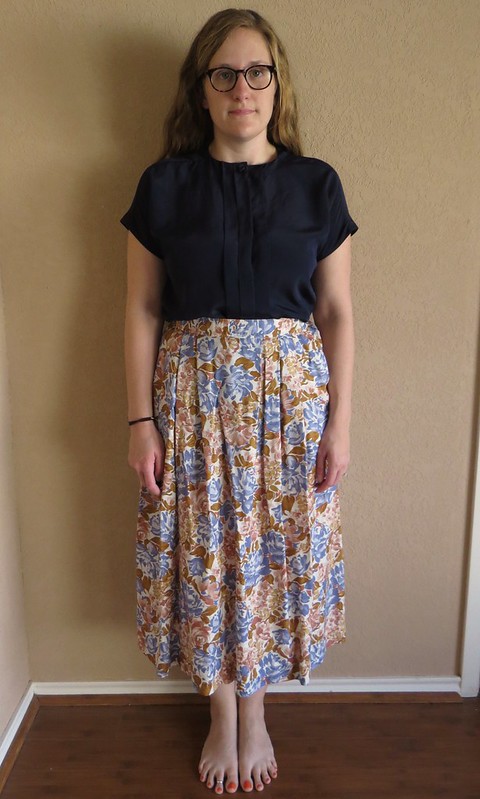
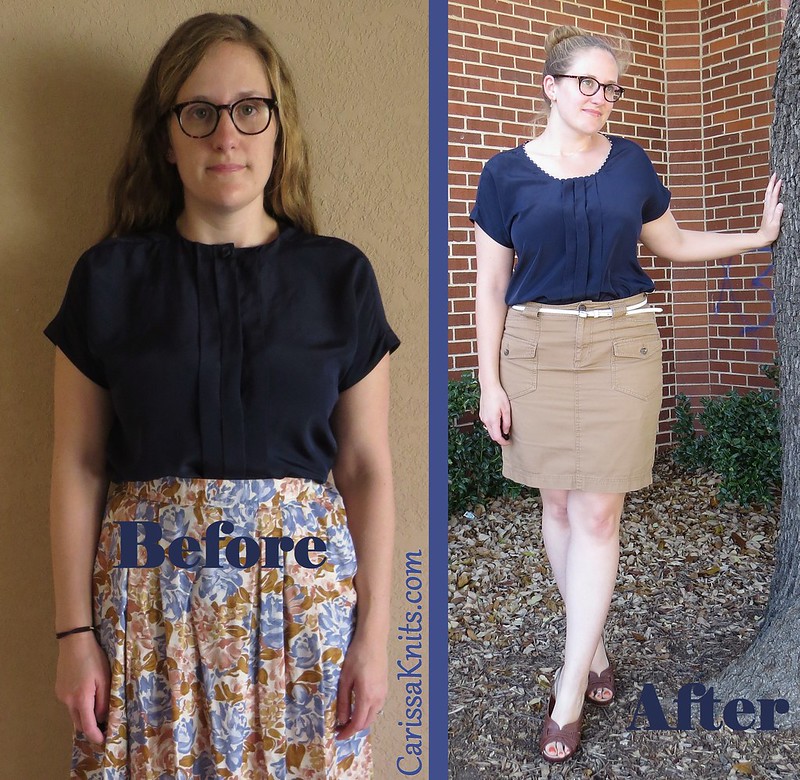
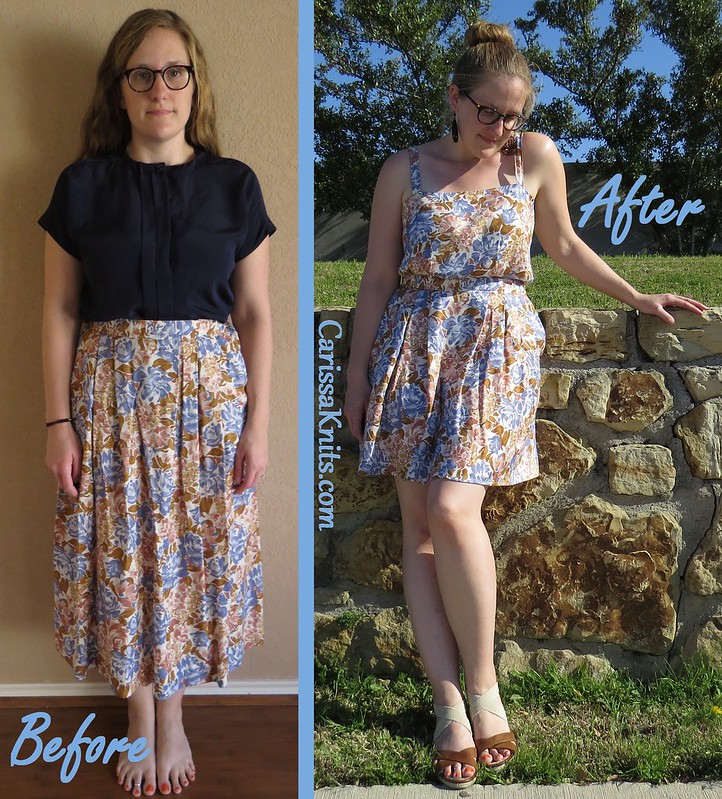
Finally I gave it a go at this refashion classic.
 
A dress that had become too tight in the chest area, and a fitted white T-shirt (I forgot a before picture, but you know how they look).

I cut of the bottom of the T-shirt, and the top of the dress, and sewed them together.
 
Picture tutorial of the proces HERE.

I have tried this type of refashion a few years ago (actually I think it was one of my first tries in refashion), but didn't think it look good, because the two different types of fabric didn't play well together.
So this time i added a fabric belt (I had made the dress myself and had a remant of the fabric in my stash), and it makes all the difference.


The finished dress......or so I thought. The original dress had gathers at the front, and when I put on my refashioned dress, I remembered (first then) that it made me look very pregnant.
Sucking my belly in like crazy
Second try: I cut the pieces apart, turned the skirt around to make the back the front, since the back didn't have gathers, and sewed the pieces back together.
I became a little short, but no more mommy-tummy showing.

This was such an easy an quick refashion (not counting my minor mishap in). I am definitely doing this again, and recommending it to beginner refashioners.

My blog: http://www.sagaifarver.dk

3 Frumpy Sweaters to Work-Ready Clothes

Hello! This is my first blog with Refashion Co-op and I'm exited to FINALLY be getting started after almost four long months of procrastinating. I started the year out with a goal of doing at least one refashion a week, in hopes of cutting my overflowing tubs of old clothes and fabric down to a respectable size, but as you can see (ahem... *checks calendar* its March 26th)... I've been slow getting started.

I have, on the other hand, actually been refashioning a bit, just not posting anything. But better late than never, right?So without further ado... here are a few quick sweater alterations I did to turn thrift store finds into something a little more stylish and fitting for work.

Open front teal cardigan

This was a quick change, just snipped out the weird sewn in tank part, and took in the arms and torso.


Batwing-ish Sweater:


I found this black open-weave sweater at Goodwill "by the pound" outlet, and it only took a few minutes to bring the sides in to create a much more figure-flattering shirt


Maxi Skirt

I snipped the waist of this odd-length sweater dress and added an elastic waist to make a quick, comfy skirt to wear to work. The top half will be waiting in my stash until I find something to do with it... any ideas?


Thanks for reading, and I promise I'll be more prompt with my posts :) I'm starting my New Years resolution in March (well pretty much April), but I'm sticking to it! 52-weeks of refashions, here we go!

Lace Tablecloth to Lace Dress

Another quick and simple refashion here! I thrifted this white lace tablecloth from my local thrift store last year. Since spring is coming soon (I think as I look at the snow on the sidewalk outside my window), I thought I would like to turn it into a simple pull-on lace dress for me.

So from this:

To this in 2 hours:

You can see my refashioning journey for this dress on my Blog.


Thursday, March 26, 2015

Back to front top

Simple satintop. Lovely colour, but the top didn't work for me. It made my bust look bigger and my neck look shorter.

I turned it around so the back became the front. I cut out a cresent to make a fitting neckline.
The top had a button closure and I kept the lower three buttons.

The top is a lot more "me" now.

Wednesday, March 25, 2015

DIY TUTORIAL PATCHWORK DENIM TOTE BAG

Here's little tutorial for 50 shades od jeans KLIK
all  you need is ... jeans from old skirts, trousers, robs, dressess ect. 

the final look


Love,