Thursday, November 29, 2012

Mr Brown Goes To Town Jacket

Often we spend our lives waiting for the right man to come along. Finally Mr Brown came into my life and all my dreams came true.


So before I met Mr Brown I was destined to wear this plain boring jacket.

Then Mr Brown came into my life and with his help, I am now wearing this.

To see the full transformation and read about Mr Brown's important role.....please visit me at my blog

Just Sew: Sweatshirt Blazer

Two very different looks created from the same sweatshirt:

After removing cuffs, neck, and bottom band, it takes about thirty minutes to add lapels and finish the edges to make a ruffly, feminine version of the grey sweatshirt.
Taking it a step further, you can dye the sweatshirt and add jersey "piping" to give it a more formal look that is still as comfy as an old sweatshirt.
Step one is blogged about here and step two can be found here.

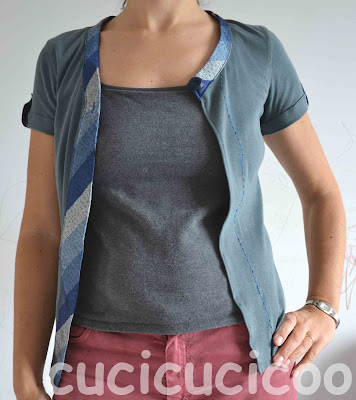
t(ie)-shirt cardigan


how happy was i to receive a vintage tie and button with my copy of confessions of a refashionista: life on the zig zag! i love the necktie shirts in the book, so i put my own twist on them by pairing up my vintage goodies with a too-tight long sleeved t-shirt. behold... the t(ie)-shirt cardigan!


the main differences from the tutorial in the book is that i made an off-center cut down the front of my shirt before sewing the tie on...


...added buttonhole, button and very basic embroidery...


...and to deal with too-short long sleeves and an ugly stain on one sleeve, i shortened the sleeves and used my remaining tie pieces to make those tab things (whatever they're called) on them.


i prefer it buttoned, but you can also wear it open. while i wait for summer to roll around again so i can actually wear it, i'll be using the chopped sleeves to make legwarmers and doing many more projects from this fantastic book! (actually, i think i'll be making another one of these from a sweater so i can use it now!)

for full details, see my post here!


Refashion: Khaki Trousers into Long Skirt w/Ruffled Side

Hello Refashionistas! I was SO very busy last week and I didn't have anything prewritten or scheduled ahead of time (so unlike me) that I didn't post, but I'm back!! I hope you all had a lovely Thanksgiving! I got to do LOTS of baking and cooking -one of my favorite things to do and blog about!- so I had a blast!!

Multi-Fabric Ruffled Skirt


On to today's refashion: this is more of a show and tell since I really couldn't write a tutorial for this skirt at the time I made it (which was in August). Now that I've done so much more in the sewing world I probably could figure out a way to write an easy-to-follow tutorial, but back then this was a huge under taking for a girl who had not sewn much other than basic long denim skirts!

The original goal of this refashion: to take a pair of khaki trousers I found at a thrift store for $2.50 and turn it into a long skirt for church and other such related events.

(photo via Pieces of You)
The interruption which led to a new goal: I was inspired by searching Pinterest and stumbling upon Pieces of You and her beautiful skirt designs! I just loved the 'cut out' look and knew I wanted to try my hand at it. I also knew this would be a huge task for me (at that time) and that it wouldn't be easy, but I wanted to try, so I did.

The new goal: To make a long khaki skirt with ruffles down the side that had a wave to it in the front and back (aka not a straight line where they were sewn in, but curved lines instead). And I wanted to make this skirt in only TWO days because I knew if I didn't set a time limit for myself I may not ever finish it (because at that time, and still on occasion now, I would get into a project and usually not finish it).

The Skirt In Detail
Since I had created several long skirts before I knew the basics required to sewing a skirt like I wanted, what I didn't know is how the ruffles would work out and how I would line them up and how they would look when it was all finished.


The first thing I had to do was pick out fabrics from my too-small-to-make-anything-but-enough-to-use-for-something stash to make ruffles for the side. This part took me about 30 minutes since I already knew I wanted to use the fabrics I had with a more 'vintage' feel to them. Then I lined them up in the order I wanted them to appear on the skirt once they were finished.

The ruffles were made the same as the ones on the skirt I showed off here on Refashion Co-op in October. The tutorial for the ruffles can be found on the post from my blog: Denim Skirt w/Ruffles between steps 6-10. Here are the measurements for each of the ruffles I had on this skirt since each fabric has a different set of numbers: The top floral fabric is 5x22 (five inches by twenty-two inches); the blue floral fabric is 6x24; the yellow floral fabric is 6 1/2x26; the pink floral fabric is 8x28; and finally the bottom floral fabric is 6 1/2x32.
The End Result
I had a complete skirt in less than 15 hours!! YAY me! And it was SO much better than I ever expected. At that point I was encouraged and had a lot more confidence in my sewing skills to being trying new things I had been 'afraid' to try before because of how hard they had looked and I hadn't really been willing to risk the clothing article being ruined in a failed refashion. I think this skirt is one of the biggest steps that moved me from beginner to intermediate sewer.

Here are a few photo's for you to look at of the skirt, or you could visit the original post about this skirt on my blog My Designs | Multi-Fabric Ruffled Skirt. I have more photos of the skirt, larger photos of the ones below too actually, on my blog. So if you're interested in seeing more detail you'll have to hop over there...I didn't want to take up too much space by posting all of them on here since there's like 10 photos on the original post total lol.


Until next time,
Helen @ Blue Eyed Beauty Blog

Also Find Me: Facebook, Pinterest, Bloglovin, Tumblr.

Wednesday, November 28, 2012

I found this gorgeous ruffled girls shirt at a thrift store.   
It was shaped funny, so I took in the sides a little bit and then added part of a pillowcase to the bottom to make it into a dress for next summer.  I kinda wish it was in my size.
IMG_3139
2012-11-05 001 2012-11-05 002
I kinda wish it was in my size!
Love,
Amy Jo @ The Little Moments

Simple dress refashion


Searching through my wardrobe I came across this maxi dress


It was quite shapeless, so I took it in a bit at the sides to give it more shape and lopped the bottom off.  
From the excess fabric, I cut two eye-shaped pieces and sewed them into the armholes to form floaty sleeves


Refashioned thrift store outfit...

Hi everyone! Thought I'd share my latest refashions. I picked up the  frumpy silk shirt and frumpy jeans from a charity shop. I wanted to show how dramatically different and up to date they could be with some simple tweaks....

I go into a little more detail on my blog, but I'm sure you can work out what I did here anyway! Oh, and I finally got round to posting the tutorial on adding quick and easy cuffs to sleeves there too :)
Happy refashioning!

The Rug Rat Backpack

What does every munchkin need to tote around their Christmas goodies?

A fancy schmancy personalized backpack of course!
 
Here's how to create one for the tot on your list with bits you’re guaranteed to already have in your stash: a jeans leg & leftover length of fabric
 

Toy from recycle styrofoam

Look here for how I made these out of left overs from various refashion efforts, as well other bits and pieces in the stash.

Tuesday, November 27, 2012

Hybrid Dress

I got this gray sweater-jumper at a clothing swap.  Besides being too big, I also didn't like the straps.
So I bought a purple sweater at the Goodwill and just combined the two.  I also took the dress in a little on the sides. The ring on the waist strap came off another shirt.  Then I used the jumper straps to make a tie for the gray sweater on the mannequin, which I turned into a cardigan. I'm still searching for a use for the rest of the purple sweater but I know it will come to me.  The dress is really comfortable to wear to work. I love sweater dressing!

Pillowcase Apron


Supplies Needed:

1 thrifted pillowcase & 1 thrifted sheet

See the full tutorial on my blog.

Curtain to apron re-fashion

If you're anything like me you will fall in love with a pair of floral vintage-feel curtains in a charity shop at the drop of a hat...

So you bring them home until you can decide what to do with them, right?

Yep.  I thought so.

It just so happened that I wanted something like a money belt to wear at a Christmas Fair. 

So I put two and two together and came up with a vintage inspired apron. 

As you can see I also added some polka dot detailing, a large pocket (well, you might not be able to see that - it blends in!) and some pre-loved lace taken from a  top:


I was happy with how it turned out and it felt 'right'.

For more details of this and other refashions, you are welcome to pop over to my blog at


Happy refashioning!!

Seeing Spots

This dress was another last-minute grab at the clothes swap I attended last month. It's an XL, is missing its belt, and has a big rip up the back seam. But I love the sheer polka-dotted fabric!

Polka Dot Top - BeforePolka Dot Top - In Progress

I chopped off the top and flipped it upside down. I repaired the torn seam and made new armholes. I pleated the new collar to bring in the excess fabric. And finally, I trimmed the underdress to be just a cami. And now to put it back together...

Polka Dot Top - After

Click on over to CarissaKnits for more details!

Monday, November 26, 2012

Tee + sweater = new cardigan


IMG_0645
One of my friends gave me a cut up white tee shirt.  Her son had a bloody nose and wiped it all over her shoulder.  She cut the yucky part off and saved the rest for me. 
 I love that embellished little flower thing! 
100_3239
Someone else gave me this cream turtle neck sweater.   I HATE turtle neck sweaters!  I feel claustrophobic in them, plus it’s not a good style for my body.   I cut that baby right up the center and hand sewed the beautiful embellished flower on one side.  
100_3240
I sewed along the edges so they looked more finished than the raggedy scissor cut.  I think it’s called a “lettuce” edge, because it curls up a little into a wave.

IMG_0662

Looks just like lettuce, right?  Winking smile
IMG_0646
Thanks for looking!
Love,
Amy Jo at The Little Moments

Sunday, November 25, 2012

Refashion: Long Sleeve T-shirt into Sleeveless Ruffled Top


Before: Long-sleeves t-shirt
After: Sleeveless ruffled top
I found this refashion tutorial on Made by Lex and decided to make one myself.
It was really easy,quick and fun to make.It turned out really nice and I totally love it!
 

Fleece upfashioned

So, I had this black fleece with a hood. It was a pullover. The only reason I got it was because I had to have an MRI and needed something without metal on it. and as the appointment was at 7:00am, I knew I would need something warm. All Sainsbury had was this in black. (yeah, I shop upmarket if I have to buy something rather than make it! LOL)

Here is what it looked like on.
Flattering - not!

So, keeping in mind I may need another MRI at some point, I decided to make it so I could actually use it this winter, but keep metal off of it.

I had some lovely tartan blue/green/purple fleece, so I cut a strip from it. Then I cut the fleece open to make it more like a cardigan, I removed the edging from the neck and hood part...just cut it off. Then covered the edge with the tartan fleece. It had a kangaroo pocket, but I had chopped right through it, so putting the edge on, closed it up on both sides.

Then tried it on. Okay, long arms. But, it was mostly because the shoulder was too big. So I pinned where my shoulder was, took it off and added about 2cm more to that for shoulder length. Then I cut it up from the point where you would generally find the front notch, but through both layers. you can see that it has removed a wedge.

Then I cut the wedge off, and inserted a folded strip - like flat piping. Here is the strip pinned in,

and the result of it stitched into the shoulder.

I had a bit more strip left, so I put it on the edges of the pocket.

The arms were still slightly long, so I chopped off the hem that was there, and bound the edge with more of the the tartan fleece.

And here I am! Much happier. It is warm and with the trim the black doesn't make me look like death warmed up.

I cut a few scraps into squares and stitched them on the front for decoration.

Saturday, November 24, 2012

Refashioned Miniskirt to Bag by RickRack Upcycled

I found this miniskirt that reminded me so much of my teenaged wardrobe. I'm no longer a miniskirt wearer, but I wanted to do something with this. I started with the skirt, a belt and some scrap from a knit shirt.
 

It needed something more and so I printed it with a linoleum  block that I had previously cut and added circles cut from my scrap piece as applique. It needed a bit more color which I supplied with a new ribbon for the lacing. Then it was just a matter of turning it inside out and cutting the shape to where I liked it. A bit of stitching and I had my bag. I eventually lined it as well to make a nicer finish. And very cool, 4 outside pockets!


Happy inventing, Suzanne

Botanicals on a tote just in time for Winter!

I trust you all had a great Thanksgiving! Today's refashion is super easy, but fun and stylish at the same time!
I started out with this:

It's a tote I got at one of our teaching conferences last year! But as you can see even though the quote "Igniting your Awesome!" is awesome and motivational, the print itself is not!
So I worked my magic (more details here) and ended up with this:

Don't forget to stop by BeingZhenya.com for more refashions!
Have an awesome weekend,
Zhenya