Wednesday, August 31, 2016

Old Curtain to Mermaid Costume

I have a habit of picking up cheap linens at thrift stores. They're a fantastic way to get fabric on the cheap! A while back I picked up a hot pink satin curtain at Goodwill. After turning part of the bottom of the curtain into a pillow case for my daughter, the remainder languished in my fabric stash for months.

But I recently had an idea that allowed me to use nearly all of the remaining curtain fabric!

Fancy sequined top of the curtain.
For Christmas a couple years ago, my daughter got a rocking lobster. My idea was to turn the curtain into a mermaid tail so I could take a photo of my daughter riding her lobster as a mermaid. :D

Rock(ing) lobster
I spent a Saturday evening watching Stargate: Atlantis and cutting out pieces and removing extra sequins.

Fins!

Ready to pin & sew

My daughter is super excited to wear her new mermaid tail!


From 6 tiers to 5

My name really is: Cari Frock
and I love to sew.

This is the 100% cotton 6-tiered dress.

I cut off the bottom tier leaving a 1/2" to turn and hem.

That is the length of the 6th tier that was removed

Because of a back zipper, the tiers were back seamed. So I opened all the seamed, hemmed and restitched it all.

A little trim was added to the last sheer tier.

The dress came with an added extra, a threaded snap for the bra strap. Nice!

A close up on the sheer layer that is now without a liner (cuz I hemmed it short)

And the final 5-tiered dress ready to be worn with leggings.

Til next time...happy stitching!!

End of Summer Dress

I do this every year. All the sudden I find myself getting ready to go back to school and do the autumn thing (love fall clothes) and I go, "Wait! I've got summer clothes to share! Nautical stuff, which by law cannot be worn past Labor Day."
I have a thing for this boat stuff.
I guess I didn't feel like trying it on. It's a rather unremarkable dress, but I somehow stumbled upon the same one on Etsy while researching items by Lanz Originals. So, it was made by a cool vintage dress company, fancy that. Got iy last winter and put it away until July when I decided to do something with it.
I pulled this slightly cheesy little costume from the dusty old Goodwill bins only to read the label and learn that it should never be washed/dry cleaned/or sprayed with Lysol under any circumstances. I rescued the anchor applique for this project.
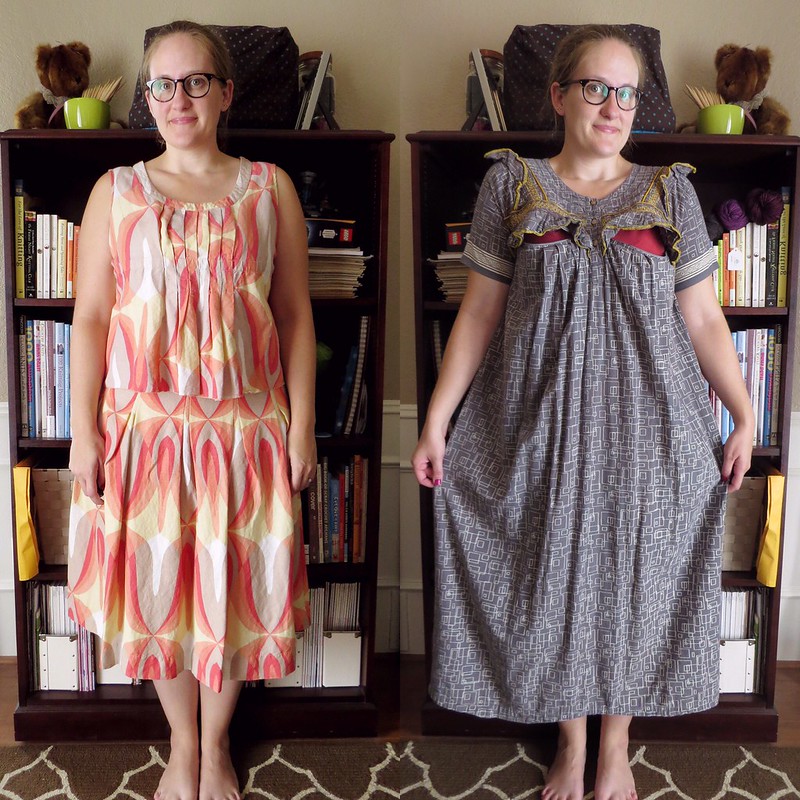
I did some things. Let's just look at it.
Took off the little sleeves, sexified the neckline, made sash from hem, added anchor. Come sail away, come sail away, come sail away with me.
There's lots more to see in the full post on my blog Craft, Thrift, or Die!


Tuesday, August 30, 2016

A Jeanius Dress For My Sister

So, I've made a third item for The Refashioners 2016. With the amount of old jeans I have more jeanius refashions were definitely an order. So I put my thinking cap on and decided my sister needed something made out of old jeans.


I began with 3 pairs of jeans, two medium colored pair and one darker pair, and Simplicity 1133. First things first, I modified the pattern, turning it into panels that would fit on the jeans legs. Then I cut into my jeans.


I sewed the panels together, bound the edges, added one of the original jean pockets, embroidered a large flower using the satin stitch on my sewing machine, and called it a dress!


My sister loves it! She's worn in 4 times already and I just finished it less than a week ago. Check out my blog post for the full story of the making of this dress, and lots more pictures!


Alyssa,


Transformation de tee-shirts

Comme toutes les fins de mois je participe à l'Opération déstockage de ma copinaute Mathilde alias Ta'thilde  et cette fois j'ai décidé de transformer  4 tee-shirts assez colorés et fleuris en un vêtement pour la nuit.


Pour réaliser cette cousette je me suis servie du patron gratuit "Valéry" du site Makerist. Un patron facile à faire. 

Et voilà le résultat :


et pour une fois une photo en situation au saut du lit , lol  : 


A très bientôt pour de nouveaux recyclages ..............et si vous souhaitez en savoir plus c'est par Ici 

Bisous, Elisa Elisa 


Refashion Runway Sewalong: Week 4: TUNICS !!!

Hey folks,

So this week of Refashion Runway was very exciting for me because I got to make a TUNIC !  I just LOOOOOVE tunics.  They are so flattering, feminine and can be as funky or as straight-laced  as you wish.

So this week, I started with some funky chiffon-like skirts and blouse with a flowy fabric.


I chose to make a Lagenlook style tunic, which really means "layered", with exposed serging, applique-style.

Here is the result:

It has longer sides


As you can see, the front and the back are very different and the tunic can be worn reversibly: front to back.

I really like this one and it is ALL ME.  My own pattern, or lack thereof...

If you want to learn more about the process, please stop by on my blog: Sewliltime.

Thanks for reading :)

Peace !

Claudia

Monday, August 29, 2016

DIY TUTORIAL LEATHER CORSET BELT (PATTERN)

In my opinion there is nothing better for the waist than belt. Belts  underline and adorn waist in best possible way. 
I have many belts and I love them all , but thanks to Witcher 3 I discovered corset belts! .
It's just a game but I'm really impressed how someone created those characters : Triss , Yen , Ciri they all look so graceful.  After I sewed this corset belt I decided to have fun and made little cosplay as you can see on photos. I can confidently say that this corset is super comfortable and I could fight  with monsters without any problems.

For my corset belt I used:
old leather jacket , I love recycling :-)


After few moves:
ready Ciri's corset belt 


Little cosplay :-)

and here is how corset belt looks on me in normal clothes


Recycling of old leather jacket/ coat in progress, as for now I made a big leather tote and a corset belt.


Love,

Sunday, August 28, 2016

Refashion Runway: Tunic

For the next Refashion Runway challenge - Tunic - I used this linen blend skirt and top set and a cotton muumuu (with nursing zippers!) to make a reversible tunic.

Refashion Runway: Tunic

I removed the belt loops, hook and eye, zipper, and waistband from the skirt, then picked out all the box pleats and pressed out the wrinkles. I also removed the yoke from the muumuu, salvaging the sleeves, buttons, zippers, and upper back panel as I went. I cut open a paper bag and drafted a tunic pattern, complete with bust darts and a slight flare to accommodate my hips, and used it to cut out my front and back panels from each of the fabrics. The muumuu sleeves were trimmed down and the coral printed sleeves were cut from the front panel of the original top. Once I assembled all the coral pieces and all the grey pieces, I joined the two separate tunics into one along the neck edge. Lastly, I folded in and top-stitched the sleeve hems and the bottom hem.

Refashion Runway: Tunic

Refashion Runway: Tunic

I love the reversibility and the little peak of the other fabric that you get from the slightly longer back flap on the bottom. And I love that I can make a statement with the bright, boldly patterned side or keep it neutral with the grey instead.

Refashion Runway: Tunic

Refashion Runway: Tunic

For more details on my project, you can visit me at CarissaKnits. Or go check out the other competitors' refashioned tunics at The Renegade Seamstress and cast your vote!

Refashion Runway: Tunic

Saturday, August 27, 2016

Refashion Runway: The Tunic Challenge!

This week, on Refashion Runway the theme is tunic.  I actually made two tunics this week.  The first one started with a XL men's dress shirt.  After passing it by because of the price, I was fortunate to go back a week later and pick it up for half price.  I love a good deal! 


The tunic is versatile.  It can be worn with a slim skirt (made from a men's polo shirt)...


...or, by adding a flowy vest (made from a knit skirt)...


...or, worn casually with skinny jeans.


Either way, its definitely comfortable!


The second tunic was made from a men's t-shirt and a pillowcase.


It was super simple, taking less than an hour to complete!


If you would like to see the complete process for all four pieces, you can visit my blog,
Second Chances by Susan!

Thank's for following along.  And, thanks again to Beth for hosting this fun competition!

Be sure to check out the rest of the creative ladies participating in Refashion Runway and to vote for your favorite!