Sunday, July 31, 2011

Finally, an actual new reconstruction!

I'm taking a break from the shoes. I had a free afternoon yesterday, so I decided to play around with this too-big, kind of frilly dress I found at the thrift store.

I liked the main color, but I knew I'd never wear this as a dress. And I wasn't really seeing this as a skirt or top....


....so I turned it into some much-needed sleepwear. Much frillier than I usually wear, but it turned out pretty comfortable. And it was fun to play around with something that I'd not wear in public!  More details on how I did it at my blog.

Jumper from Socks from House of Pinheiro.

Once upon a time 6 pairs of socks ....


turned into one warm jumper...

The Facts:Fabric: 3 pairs of socks – size 4/7 each jumper- note to self (use bigger socks)
Patterns: None
Notions: NA- used parts of the socks
Time to complete: 30 mins each – ohhh bliss
First worn: May 2011- London Jumper
Wear again? Sure, during winter only.
Total Cost: ~£4 for the socks(london Jumper) + thread


More photos of the socks :


See inspiration and more info on my blog. http://houseofpinheiro.blogspot.com/2011/05/designer-profile-martin-margiela.html

Bloomin' Fun


 I came across some orphan vintage quilt blocks recently. I thought they looked like flowers so I appliqued them onto an apron inspired skirt that I'd just finished.


It's a fun way to enjoy these blocks without having to commit to making an entire quilt.


Saturday, July 30, 2011

How NOT to Advertise Your Sewing Skills

I'm swamped with work!  Which, while it is a fabulously good thing, leaves very little time for me to do any refashioning at the moment.  I should have a break in about a week, but in the meantime, here's a photo someone took of me in the band room:

A perfect example of days when I can't see straight.
We were prepping for marching band uniform fittings, and that morning I grabbed this t-shirt because I knew the students wouldn't be there.  I just didn't know the photographer would.  Argh.  And now it's up on the band web-site, so EVERYONE can see how crookedy this refashion is.

Aww.....it's my very first one.  I don't have a tutorial on it - I didn't take photos of it because I was too worried it wouldn't come out right, LOL!  I just loved the t-shirt and wanted to get rid of some bleach stains that had appeared out of nowhere, right across the front.  I found the knit fabric in my local fabric store's dollar bin, so the refashion only cost about 25 cents total.  So I figured even if it didn't come out right, I hadn't lost anything (except a fave t-shirt) in the process.   

If no one holds a level up to my chest, I should be good.

DIY Dip Bleach Shorts

Another mini project I got up to making recently while my computer decided to give up on me was restyling these blue shorts that had been long abandoned to the back of my closet. Armed with a bottle of basic bathroom bleach and a good scrubber, I got to work!

I filled the bathroom sink with one part bleach and two parts water and dunked the shorts in (but not fully!) and left them to soak before scrubbing them and leaving them to dry. Hey presto, dip bleached shorts!

Full blog post over here on my wordpress bloggie, have a peek! Comments over there welcomed too :) XO

Handmade Elephant Dress // Project Restyle

Hello again fellow re-fashionistas!
It's been a while since I was last on here forgive me, my laptop has decided to break down and the only ways I have to blog are through my iphone (not very practical) or on my boyfriends computer.
So that's what I'm doing now!

Handmade Elephant Dress

A few weeks ago during my dressmaking obsession I made a little shift dress with sleeves out of this rather large bohemian maxi type of dress. *points up!* It didn't fit as the crochet top half was tiny so I used the fabric to make a different kind of dress. I basically cut the crochet top half off and unstitched the fabric I was about to use and folded it out to its full size, then drew out my basic dress pattern and made sure it was twice the size I wanted.

I don't use patterns, I just roughly draw out the shape I need, only bigger and work from there. Cutting out the shape, pinning it together and taking it in as I stitch along. Simples :) This fabric was really nice to use, it stretched slightly so I wasn't worried about making it too small, in the end it fit nice and hung slightly loose. Perfect for those humid days and hot summery nights!

Here's the finished dress, I always get really stuck into my projects and constantly forget to include during the process step by step pictures.. But this pattern was pretty much the same for the raspberry crush dress in my previous post, only I added sleeves which aren't too hard to make.
Sorry for lack of in-between pictures! >_<

XOXO


Intro

Hi everyone!  I'm Jackie, owner of Dirty Betty Vintage and I'm very excited to be a part of Refashion Co-op.  This blog is actually what inspired me to start sewing again!  My great grandmother taught me to sew when I was very young and have loved it since, but lately I've done more pattern collecting than I have sewing.  After following this blog and seeing all of the beautiful stuff everyone was doing--I decided to get back at it.  I have over a 100 patterns I'm determined to go through in the next year using only vintage fabric or thrift store garments I can recycle or refashion.  I've just completed my first project.  I used some vintage fabric I found and some vintage lace I had. 
You can check out my blog here.


Friday, July 29, 2011

Viva Las Vegas Dress

I needed a dress for a lovely friend’s Las Vegas themed birthday party. I chose this one for its sparkletude.


Check it out..It still had its original tags!


After a good bit of cutting, slicing, and taking-inning(?), I think my new dress is Sin City worthy, don’t you? :)


You can read more about this refashion at my blog, ReFashionista. I'm one month into my 365 day project! :)

Refashion for Usefullness

While not a clothes refashion, it is something super useful that I made out of something I had no use for.  Technically I did this on June 30, but that is practically July, and for some reason I forgot to share.  My mother saves sheets and clothes she is getting rid of for me to sort through and see if I want to take anything for my stash.  She had a fitted sheet with a pretty leaf pattern that I figured I could do something with.  Fitted sheets can be a pain to use, but I was up for the challenge.
She also had a real goodie for me.  A laundry tower.  Dunno what it is actually called, but it is a plastic frame, on wheels no less, from which hang three fabric laundry baskets.  More like fabric slings with sides.  Anyway, it was free, she wasn't going to use it anymore, and I could use the space in my bedroom.  I had a motley collection of laundry baskets at that point.  Only one problem.  She still had only one of the original fabric baskets.

The design was simple enough, so I took it with thanks and decided to just make two more.  The original design had the channels along the sides of the basked (where it hangs on the frame) sewn shut, so to get the basket off you have to take the frame apart.  I put that one on the bottom.  When I made the two new ones I left the channels unfinished so I could add some sort of fastening so I could take them down if I needed to.  Right now the fastening is safety pins.

Random fitted sheet and a need for fabric laundry baskets = perfect timing.  Obviously this sheet had a destiny.  Too bad it didn't realize that.  I started by seam-ripping the corner seams so the fabric would lay flatter.  I measured the existing basket as it hung to get dimensions for my new ones.  Then I laid out the sheet on the floor to cut out the pieces.  The fabric was a pain to work with.  I don't know how they applied that pretty design to the fabric, but it made it very difficult to pin through.  I stopped counting how many times I stabbed myself because I needed to put more force behind the pins and I ended up pushing through quite suddenly.  Below is a pic in progress.
The sewing was annoying too.  The bottom of the curve was the worst part, both pinning and sewing, but I got through it.  I was determined to have my laundry baskets.  All told it took a couple of hours between measuring, cutting, pinning, and sewing.  Very gratifying to have it finally done.  Since I left the original basket they don't all match.  But I'm fine with that.  Here is the finished product in my kindof messy room.

Can you tell which was the original?  Hehe.  And it was free!  I still have some of the sheet left, but like they say about childbirth, I think I will wait until I can't remember how painful it was to work with before using it for any more projects.  Also on my blog here

Man's shirt redo

I found this shirt at a yard sale, loved the print, but it was too big. I put in a bag for Goodwill, then changed my mind.
I took it apart, redid the sleeves, reversed it, took off the collar, added the leftover strip to one leg of some ready made shorts....
and love the results. I get loads of compliments whenever I wear it.

Ode to Project Runway

Well, my ultimate favorite time of year is finally here (wow that rhymes) and that is a brand spanking NEW season of Project Runway....EEEK!!  Tim, Heidi, hopeful designers...how I've missed you.  Let me count the ways: 
1.  Michael Kors' disgusted catwalk face
2.  Heidi's dominatrix "Who will be the winner, and who will OUT" line
3.  Everything that is Tim Gunn
4.  And of course...the multiple emotional breakdowns that are bound to happen when you put 12 aspiring designers in one room and criticize their very being and soul through design. 
Hand me the popcorn...please.  All joking aside when I saw this little ditty, I was reminded of Season 3 contestant Uli Herzner.  She didn't win but all of her stuff was super cute and chic.  I was of course rooting for Michael Knight as I have a habit for rooting for the underdog.
The almost wearable animal print maxi dress and my partner in crime in his camo PJs.
The finished product with new racerback and handsome little buddy boy.

More info on how I achieved this look and a new doggie collar for my pooch

Stay Fierce everyone,
lori

summer fashion show


Enjoy the show :-)

Come Sail Away

Before:

After 


More photos and process here

Thursday, July 28, 2011

Two Friendly Reminders Later ...

I broke the rules!
I'm not much of a rule breaker really, in fact, I quite like being told what to do.

I got a reminder from the lovely Eddie to see if I was able to post a refashion, and somehow, between grief, work, raising a family, life, you know ... I didn't have one. Well, I did, but I never got around to posting it until today when I got a second gentle reminder (and felt very much like a naughty school girl) from Portia.

So here, as promised, and somewhat late, is my little Cardigan Salvage Refashion.

Take one lovely little cardigan:


Stain the shoulder in an Acrylic Paint and Prosecco related incident (painting corks, and drinking; blogged about here):


Buy a copy of Mollie Makes, Issue 2 ... BRILLIANT British craft magazine, also available overseas!
Make the cover kit, a beautiful felt flower:


Then use said flower to cover the stain, corsage style:


Not rocket science. Not brain surgery either. But it served to give purpose to the magazine cover kit, and saved my cute cardi from certain death. Teamed with my turquoise killer heeled slingbacks, it looks F A B. Shame I don't have a pic of that for you.

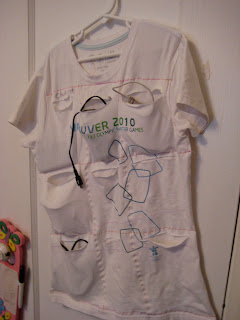
T-Shirt Gadget Holder

I found this helpful little project in Generation T: Beyond Fashion book. It's been in good use, as I have many wires and chargers that normally clutter up my desk!
These also make handy gifts!


Girl's dress recycle project

I recently made this little dress for my daughter, using an old tee-shirt, a piece of leftover fabric for the skirt, and leftover scraps and notions for the embellishment. She loves wearing it and tells everyone "Mommy made this!" 
Tutorial: Embellishments

time to throw in the towel?

All right, refashionistas, I need some advice!

Still working on those shoes I showed in my last post. I finally got the denim all over one of them, and decided to play around with finishing the edges before I move on to the second shoe.

Frankly, it looks awful so far. The ribbon's not laying down evenly, there's all sorts of weird sharp edges where the ribbon goes over the curves, and despite my efforts to be careful, the glue keeps showing on the fabric.


Not to mention the dual problems of getting the ends to not skew to the side/how to deal with the back strap.

I'm thinking this idea would have worked much, much better with a less strappy shoe--or at least one where the underside doesn't show as part of the design. So I'm wondering if it's time to admit that maybe these shoes can't be saved? Or if there's a better solution to finishing these off? Honestly, if this is an indication of how they're going to end up looking, I'd rather go back to deconstructing a shirt or something, and have finished things to share again!

Any thoughts/advice would be much appreciated.

Yellow Cardigan

A 1980's yellow cardigan picked up for $5 from my local op shop (thrift shop). Whilst this yellow cardigan has potential, with the best shoulder bows, gold buttons, and made from 100% wool, it didn't fit so well..


With a little chopping and resizing, it fits much better now..


Shoulder bows!

A step by step guide on my blog