Monday, July 31, 2023

Upcycle 2 tops and celebrate mistakes


Not all refashions are an instant succes. I often start a project without knowing how it will turn out, and sometimes the result is just not what I had in mind. This time, I struggled with 2 tops. I wanted to try a new technique on a top without knowing if and how it would work (and to be honest, I'm still not sure if it's a succes) and I had some dye issues with another top. So this is not a succes story, but I wanted to share my ideas with you anyway and bring an interesting book on visible mending to your attention. 


Top 1


I bought this top in France a few years ago, I fell for the embroidered flowers. The top was originally off-white and I've given it a lavender dye bath last year. Unfortunately, the paint hadn't dissolved quite right and had left some spots on the top. 

Inspired by the book 'Mend' by Kate Sekules I came up with the idea to emphasize the spots with embroidered knots. I decided to add more embroidery, with the idea of creating a shower of french knots, in a gradient from dark purple to light pink. As mentioned before, I'm not quite sure if it's a succes, but I liked trying out the technique. 


If you're interested in visible mending, I can really recommend the book 'Mend' to you. It offers a lot of creative solutions for tears, holes and spots. What I like about the book that it's about making your repairs visual and obvious, instead of 'hiding' them. 

The book is about saving your beloved piece of clothing and  contains a lot of tips and tutorials on how to do that, including a useful overview on types of fabric and the best way to mend.


Top 2
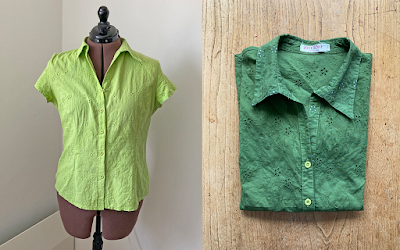
I found this blouse at the thrift store. I really liked the broderie anglaise but not the colour, it makes me look pale (or even sick). Luckily, the fabric was 100% cotton, so I bought it with the intention to give it a dye bath. 


I had a kind of blueish green in my mind, so I mixed green with aqua in a dye bath. Unfortunately the original yellowish lime colour was too strong and the result was not what I wanted. I wasn't even sure if I was going to wear the blouse, such a shame! One week after, my good friend J. came by and when I showed her the blouse she immediately liked the blouse AND the colour! So I'm glad the blouse ended up in perfect hands after all!

The tops may not have been an instant succes but I got to try out a new technique and made my friend J. happy! So mistakes are rarely only mistakes, don't you agree? Feel free to share your own 'mistakes' in the comments!


If you're interested in more details and/or the origin of broderie anglaise, please visit Vermaakster.blogspot.com. Until next time!


Thursday, July 27, 2023

🌟 DIY Paper Bag Shorts | Step-by-Step Tutorial + Free Pattern! 🩳✨


 πŸŒŸ Are you ready to transform an ordinary bed sheet into a stunning pair of Ruffle Hem Shorts with an Elastic Waist? πŸ›️✂️ Let's dive into this exciting sewing project together and turn something old into something extraordinary! 🧡🌸
In this step-by-step tutorial, I'll show you how to repurpose that forgotten bed sheet into a fashion-forward and oh-so-comfortable pair of paper bag shorts! πŸ©³πŸŒ… Embrace your creativity and join the sustainable sewing movement as we breathe new life into fabrics that deserve a second chance. πŸ’šπŸŒΏ
With our detailed video guidance, even if you're a beginner, you'll be amazed at how quickly you can whip up these stylish and flowy shorts. And the best part? I'm providing FREE printable PDF patterns for these shorts in 5 sizes, ensuring a perfect fit for everyone! πŸ“πŸŽ‰
Let's make a sustainable fashion statement while staying on-trend this summer. Upcycling has never been so chic! 😍🌞
Share your sewing journey with us in the comments below and stay tuned for the upcoming video where we'll complete the look by sewing an equally fabulous top! πŸŽ€πŸ’–
Happy sewing, dear refashion lovers! Let's turn bed sheets into fashion statements! πŸŒΊπŸ›️πŸ’ƒ

step by step tutorial plus free PDF pattern 


My blog

 and 

You Tube


Saturday, July 22, 2023

Upcycled Fashion: DIY Wrap Skirt with Ruffle Hem from Fabric Leftovers


Hello ! Today, I'm thrilled to share a fabulous DIY project that combines style, sustainability, and creativity. Get ready to transform fabric leftovers into a stunning DIY Wrap Skirt with Ruffle Hem!

In the spirit of upcycling and reducing fabric waste, I've taken leftover fabric pieces and repurposed them into a fashionable and trendy wrap skirt. Not only does this project allow us to make the most of our resources, but it also gives us the opportunity to create something truly unique and eco-friendly.

The beauty of this tutorial is that you can embrace your creativity and customize the design to match your personal style. With a few simple steps, I'll guide you through the process of creating a wrap skirt with a delightful ruffle hem. You'll be amazed at how a handful of fabric remnants can be transformed into a fashion-forward garment.

Whether you're an experienced sewist or just starting out, this tutorial is designed to be accessible to all skill levels. I'll provide detailed instructions, tips, and tricks to ensure your success. Together, we'll make a statement with our sustainable fashion choices and inspire others to follow suit.

Stay tuned for more exciting projects on our blog, where we'll continue to explore innovative ways to repurpose and breathe new life into pre-loved fabrics. Together, we'll redefine fashion and contribute to a more sustainable world.

Happy sewing and upcycling!

  tutorial with free PDF pattern


My blog

 and 

You Tube


Tuesday, July 18, 2023

Upcycled Chic: Sewing an Every Season Midi Dress from a Bed Sheet!


Hey there! Today, I'm excited to share a fantastic project that not only celebrates our love for creating beautiful garments but also highlights the magic of upcycling. Join me as we dive into sewing an every season midi dress using... wait for it... a big bed sheet!

This project is all about transforming something old into something fabulous. By repurposing a large bed sheet, we not only minimize waste but also unleash our creativity to design a stunning midi dress that's perfect for every season.

In this step-by-step tutorial, I'll guide you through the process of cutting, sewing, and bringing life to this gorgeous dress. We'll explore how to create a square neckline, add elegant tulip sleeves, and incorporate convenient side pockets. Plus, I'll share tips on how to adjust the pattern to achieve the perfect fit for your body.

What makes this project even more exciting is that I've prepared a free PDF pattern for the dress itself, as well as separate patterns for the tulip sleeves and pockets. This way, you can easily follow along and customize your dress to reflect your personal style.

So, grab that old bed sheet you've been holding onto, dust off your sewing machine, and let's get creative! Together, we'll turn a simple bed sheet into a chic and versatile midi dress that will make heads turn.

Happy upcycling and sewing, my friends!

Tutorial with free PDF patterns


My blog

 and 

You Tube


Friday, July 14, 2023

Adding Coverage to a Bathing Suit

 Hello Refashion Co-op. I have been trying to stay cool in this summer heat and that means going to the pool when I can. I found a great swim top on clearance and brought it home. I loved the wide shoulder straps. I didn't love the deep V-neck. It was too low for me.

I had this copper colored bralette and decided to use that to fill in that deep V. I put them both on my dress form and marked the size.

I turned the bralette upside down so the opaque part would be at the bottom and cut out a V-ish shape. That is going into the center of my top.

The top already had stitching along the edge so I used that as a guide and stitched right on top of it.
 
This was a small change but it made me a lot more comfortable. 
 
I hope you are having a fun summer. For more pictures and details go to I Can Work With That.


Saturday, July 08, 2023

🌸 Sustainable Sewing: Create a Stunning Ruffle Hem Maxi Skirt with Fabric Scraps!


Hello ! Today, I'm excited to share a delightful project that not only allows you to express your unique style but also promotes sustainability in fashion. Join me in creating a stunning DIY Ruffle Hem Maxi Skirt using fabric scraps!

We all know the joy of sewing, and what better way to extend the life of our fabric scraps than by transforming them into a fabulous and flowy maxi skirt? Not only will you create a fashionable piece for your wardrobe, but you'll also contribute to reducing textile waste and embracing eco-friendly sewing practices.

In this step-by-step tutorial, I'll guide you through the process of measuring, cutting, and sewing your fabric scraps to create a ruffle hem maxi skirt that's both trendy and sustainable. You'll be amazed at how these small remnants can be transformed into a stylish garment that you'll love to wear.

I understand that as sewing enthusiasts, we often accumulate a collection of fabric scraps from previous projects. Instead of letting them gather dust, let's put them to good use and give them a second life as a stunning maxi skirt. It's a wonderful opportunity to showcase your creativity while minimizing waste.

During the tutorial, I'll also share tips and tricks on working with fabric scraps, ensuring that you achieve a professional-looking result. Together, we'll explore different ways to combine colors, patterns, and textures, allowing you to create a truly unique and eye-catching ruffle hem maxi skirt.

By embracing sustainable sewing practices and using what we already have, we contribute to a more environmentally conscious fashion industry. So, gather your fabric scraps, dust off your sewing machine, and let's dive into this exciting sewing project together!

Stay tuned for more sustainable sewing projects, tips, and ideas. Join our vibrant sewing community and be part of the movement towards a greener, more conscious fashion world.

Happy sewing and creating, my lovely makers! πŸ’•✂️

step by step detailed tutorial


My blog

 and 

You Tube


Friday, July 07, 2023

Flowy Lace Jacket

 Hello Refashion Co-op. I have been wanting a really light weight lace jacket and I found one when I was out thrifting. It was long and I wanted a shorter version. I'm sure you can guess what I did. 

Before and after. And after.

I wanted to make this jacket waist length. 

I cut the jacket in half and I used my serger on the hem of my new shorter jacket. I knew my sewing machine would destroy that lace.

I matched the thread and the new hem blended in really well. 

I turned the leftover material on it's side and made an elastic waistband. It's a skirt extender.

I turned it on its side so that this edging from the front would be the hem of the skirt extender. That scalloped edge was so pretty. 
 
I wanted that scalloped lace peeking out from a dress. Thanks for reading along, for more pictures and details go to I Can Work With That.


Thursday, July 06, 2023

DIY Tie Back Top with Ruffle Shoulders🌼🌼


Hello! Today, I'm thrilled to shine the spotlight on a fantastic sewing project that will take your summer wardrobe to new heights. Introducing the DIY Tie Back Top with Ruffle Shoulders! 🌸✂️

In this project, we're diving into the world of creativity, style, and self-expression. The DIY Tie Back Top is a stunning garment that combines the playfulness of a tie back feature with the feminine charm of ruffle shoulders. It's a perfect blend of trendy fashion and comfort, making it an ideal addition to your summer wardrobe.

Whether you're a beginner or an experienced sewist, this tutorial is for you. The step-by-step instructions will guide you through the process of customizing the pattern to suit your individual style and size. We'll explore different fabric choices, color combinations, and design options to make your top truly unique.

Once you have your customized pattern, we'll embark on the sewing adventure together. With detailed explanations, helpful tips, and visual demonstrations, you'll be amazed at how easy it is to bring this beautiful top to life. The ruffle shoulder details and the tie back closure will elevate your sewing skills and leave you with a garment that's sure to turn heads.

So, are you ready to unleash your creativity? Join me in creating the DIY Tie Back Top with Ruffle Shoulders. Click the link in the bio to watch the full tutorial and let the sewing magic begin!

Happy stitching! 🧡❤️

step by step tutorial 


My blog

 and 

You Tube