Saturday, March 31, 2012

White Blazer Refashion

I had this old blazer for so long and I haven't wear it at all. So I've decided to change it a little bit. I made it very short, just under the bust line, changed the button with a big white one and added some black lace trim on the sleeves. The lace trim was mainly to cover coffee stain :))
And this is the result.
From the bottom part I removed the pockets and with a bit of white lace and a belt buckle I made belt purse.


I hope you liked the idea!
See you soon!
Nina Mia
http://nina-mia.blogspot.co.uk/

"Darling have you seen my Tie" Long T.


Introducing Penelope Coat-Hanger. She features heavily in my 

Leopards Lay in Wai-T(ee)


blogpost and I have just realised that I have not formally introduced her. So here is Penelope Coat-Hanger's story. 


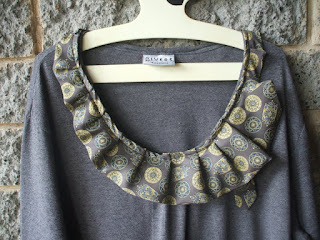
Poor Penelope in her plain grey long tee. Having purchased this tee from a thrift store some 3 years ago, Penelope loved to wear it with jeans on a dull winters day. 


Acquiring her husband's tie, Penelope knew that she could turn plain into peachy. So she pinned Brad's vintage tie to her plain tee.


Brad is now tie-less and if he asks you.....no you have not seen his tie.


Penelope's tee is no longer plain and winter is dull no more.

Red cord pants become cute hat

Hey folks,

I am in the process of making my fashion show clothes (April 19-20) and I have a reddish tie skirt. So I thought of making a cute newsboy cap out of them. I don't have a pattern but I deconstructed a used one. So here is what happened:


+ =

More details on my blog: Sewliltime.

Claudia

Leopards Lay in Wai-T(ee)


To help Brad get over his missing vintage tie(see http://recycledrepurposedrenewed.blogspot.com.au/2012/03/darling-have-you-seen-my-tie-long-t.html ) Penelope suggested that they spend some quality time together on African Safari. The plan was to get up close and personal with the Leopards of the Sahara.

"Sssshhhhh....don't look now Penelope, but you are a lot more up close and personal with the leopards than you think. Ummm if I was you I would stand perfectly still and I am sure that they will just go away!"
.......................................

Oh dear....Poor Penelope is in such peril. This is a plain grey toddler tee-size 3(see pic below) was purchased at a thrift store for $2.99. Plain and grey it needed an exciting adventure.....so off on African Safari with Penelope and Brad it went.

The leopards are cut out with pinking shears from left over furnishing fabric. Using pinking shears results in the leopards having realistic strands of fur.

See the sneaky leopards laying in wait in the grass? The grass is excess material from a 1970's dress that was cut down.


Pic of boring grey toddler tee before it went on African Safari with Penelope and Brad.

kid's bathrobe from old towels

here is something else I made recently, to stop the three year old running around the house naked after his bath.

I made it from 2 old towels, which were a bit too small for most of us to use. I just cut out the fronts and back using the full width of the towel for the height, making sure to avoid the strip at the end, but using the finished edge for the bottom, then cut out the sleeves and hood. I made the sleeve a bit big, but that doesnt matter as they will be rolled up anyway.

I cut off the pattern bit on the end of the towel to make the binding for the front of the robe, and added a toggle, I didn't think we would be able to catch him long enough for a tie.
To be fancy i added a monogram. I used my overlocker/serger to sew it together, but you could use a straight/zigzag combination.
For the pattern I used another bathrobe, but anything that gives you the shoulder and neck shape would work. When making a hood, trace another one as a guide, then make the bottom edge of your hood the same as the neck opening. I used the finished edge of the towel on the hood as well.

Friday, March 30, 2012

DIY shirt refashion


If you're looking for an easy refashion project this weekend, this might be just the thing. A new summer shirt made from a thrift store, men's button down. Worn backwards with the buttons in the back. You can find the full tutorial here.

The Tie-Shirt.....From Casual to Corporate


This introspective young man is planning his long day ahead in the corporate world.
From casual to corporate.....he is boardroom ready in his Tie-Shirt. A pocket handkerchief on a jaunty angle completes this sartorial look.


Boring green t-shirt found for at a local thrift store.


Amazing 1970's tie that I have been hanging onto for a short time waiting for the perfect project to come along.

TUTORIAL
This t -shirt transformation is as easy as it looks.
Find one boring small boys t-shirt with an equally small pocket.

Find the craziest zaniest vintage tie you can. Thrift stores are my shop of choice for retro ties.

Measure the skinny part of the tie from the ribbed neck of the t-shirt to two thirds of the way down.
Cut the tie to fit and pin to the t-shirt to hold in place-next step is to sew into its tie formation.

The jaunty handkerchief in the pocket is obtained from the wide end of the tie. Cut a small length and you may need to fold the sides slightly so it fits into the pocket. Pin the triangle point and then sew in place.

From boring to quirky....this t-shirt will gather many admiring

Mezzy @

http://recycledrepurposedrenewed.blogspot.com.au

“Golden Girls” T-shirt Gets Glammed Up

love the pattern on the fabric
the fit - not so much

I picked this Golden Girls style t-shirt up at a garage sale for – you guessed it – $1! I figured that if I couldn’t turn it into a wearable top that it would make a great skirt. The fabric is super soft but very thick so perfect for a skirt. Once I tried it on though I really liked how it looked with my skin tone so I was determined to turn it into a top. I played around with it quite a bit and even considered making it into a halter but the fabric was so thick that when the weather was hot enough for a halter top I would be sweating it out in this top. Back to the drawing board – or in my case – the dress form.
And here's the end result:
To see how I did it and a little more details of the end result I've posted a tute at T-Shirt Gets Glammed Up.

Thursday, March 29, 2012

Jeans into tote bag

Jeans to tote bag

Hello there; here is my first contribution to refashioned co op!
The inspiration for this one was my friend handing down her young son's absolute favorite pairs of denim shorts, because she couldn't bare to throw them out! I turned them into a tote bag, since she loves shopping! I used a normal reusable shopping bag as a guide

Steps: 1.
Using the top of the pants, cut along side seam across leg to separate front from back and make two square or rectangular pieces to be the front and back of your bag . ( approx 36cm x 32 cm) You may have to play with it to fill in crutch etc, or in this case add two pairs together to get a suitable size but you will keep all the detail such as the fly and pockets
These are the front and back of your bag.

2. Add sides and bottom using either the leg of the pants cut and opened up or contrasting denim ( used another pair of jeans for the little boys one)

4. Add a shoulder strap ( 100 cm) or two ( 80cm) and loop using other leg for fabric and / or contrasting fabric

5. Decorate as required! ( go the old Janome 9000). this allows to cover grease marks etc from the chain, holes etc.


I liked it so much I made one for myself from my eldest son's favorite bmx riding pants.

You can clearly see the little insert to fill in the crutch area. Otherwise being a larger side they required very little work, and all the pockets etc of the jeans are retained, meaning you have convenient pockets.

Now as I'm only learning if you have any comments or constructive advice on this tutorial let me know!
Marianne

Hello :)

Hello, this is my first post for "Refashion Co-op" and I'm quite excited! Thanks for the invitation, I'm happy to be part of this big adventure!
So I prepared this short DIY tutorial about refashioning an old sweater.
Step 1 is to cut half of the sleeves and sew along the sides of the sweater.
Step 2 : fold the sleeves and sew them together in front.
Step 3 : Add a little detail to cover the stitches.
And Voila! The old sweater is now a skirt.
From the pieces of the sleeves I made leg warmers.


I hope you'll like it!
See you soon! :)


Nina Mia
http://nina-mia.blogspot.co.uk/

The Cheeky Charlotte


Thanks to Anthropologie for creating a gorgeous lace cardigan. A big thanks also must go to Jennifer Brasher of http://mytwobutterflies.blogspot.com.au who inspired me with her amazing version of the Anthropologie brushed lace cardigan. Below is my version.


Gorgeous moss green cardigan but overall quite dull. Pretty pretty vintage petticoat. Let's combine the two and see what can be created.


The Cheeky Charlotte can lift the plainest of jeans and can make casual look chic. The Cheeky Charlotte is also classic and would look sweet and demure with a vintage pencil skirt.

Mezzy @

Fisherman Hat

Spring is here! Spring is here! Time to have fun in the sun yeah? For the times when the sun gets too hot for the little one, I made him a fisherman hat:


Materials: Old toddler flannel shirt, hubby's old cotton twill pants, thrifted pellon interfacing and threads from stash. I also used 2 thrifted novelty buttons for decoration :)

Pattern: from the book called Sewing for Boys: 24 Projects to Create a Handmade Wardrobe


Have fun in the sun,

Shirt to Skirt, stripes


You know how Mena has her "Mena test" for clothes, when she determines whether she actually needs to put a zipper in?  I think I have a "Seeks test" for refashions: If a top can fit over my hips and stay put, it is fair game for a skirt. In fact, it is almost automatically going to be made into a skirt.  See the first example here or here.


I picked up this Old Navy shirt at a Goodwill by my parents months ago. Loving the stripes, but not wanting to just wear it the same as usual way, I tucked it away in my far too big stack for refashions and stewed on it. But the refashion itself is quite simple: Cut off sleeves, Sew a skirt-appropriate silhouette, Wear.


Super comfortable, soft and a little more fun than the standard stripy shirt. :) Blog post here.

Wednesday, March 28, 2012

How to add a drawstring waist to a too big top - a no sew project


This project started out with this thrift store Ann Taylor jersey top. It was a little big and baggy (and unflattering) at the bottom - probably a size larger than I would normally wear. To remedy the fit, I grabbed my scissors and some rope and added a drawstring waistband.

Here it is now:


To add a drawstring waistband to an existing top, simply cut a small slit through one layer of the hem at the side seam, like this:


Cut a length of rope or ribbon long enough to go around your waist and tie. Pin a safety pin to one end of the rope and thread it into the opening that you created - it will go into the casing made from the hem. Thread it all the way around and out the other side. And that's it - no sewing involved!
Note: This works best with fabrics that don't fray, like jersey, since you are not finishing off the slit.

www. mytwobutterflies.blogspot.com

Bob Marley Outfit

Hey everyone! I haven't posted here in a couple weeks because I've been working on this!!


I entered this into a contest. Didn't win, but I love what I did anyways :)

I know it's not exactly a refashion, per say, but I did you 100% recycled materials from my stash of scraps and such.


Couple more photos at my blog HERE

Tutorial: How to Resize Dress Form

Well, this is not exactly a garment refashion, but pretty much still related :-)I have just finished adjusting/resizing a model-size 32-25-32 dress form to my 36-29-37 curvy self.

Here's the before and after.


I post the tutorial on my blog. So, for those who are  interested, you may head over to
Made by Evyline :-)

Napkin dresses

My girls were invited to a “tea party” birthday party and I wanted them to have something new to wear.  I rummaged through my stash and found 6 dinner napkins.   I got them at a thrift store :  $1 for 6 dark purple satin-y napkins.  I’m not really into that sort of thing at the dinner table, but I knew it would be a good addition to “THE STASH” especially since the edges were finished.
IMG_0175
I grabbed some white t-shirts from the girls wardrobes and added the napkins in two different ways.  The girls pick out flowers for the top, and they went to town digging through my flower stash.  They are glued on with fabric glue and have held up great in the wash.
IMG_0270
I like this style of dress the best; two napkins were joined together, then folded in half, gathered and sewn on the top of the shirt.  Almost like a “balloon” skirt.  

For the other dress, the napkins were left at full length (12" by 12"), gathered and then sewn underneath the shirt.

Unique
Free
Fun
Napkin Dresses

Amy Jo @ The Little Moments

Shorts to Pants

I started with these:
old yoga shorts
I extended them into capris (pants...bloomers...pantaloons...?) by adding some sheer black fabric from my stash:
flat-felled seams
and tucks as a decorative element

I thought they would be fun to wear under a long tunic top, skirt, or dress in nice weather. 

You can see me wearing 'em at Project Minima on my Clothes Collage page!