Sunday, September 30, 2012

Two Inches Too Short


This is one of my all time favorite blouses.  I sewed it from scratch last year  It fits really well in all dimensions except for one. It  needs to be 2 inches longer. 

Project
Ways  to add to the length with a simple, attractive detail at the hem.


Inspriration
While searching for possibilities I noted Zappos is offering this simple white cotton blouse by Kate Spade.


Solution   
 A  2 inch self ruffle, gathered at a 1.25 to 1 ratio.

Refashioned nautical top

I've been extremely lazy with refashioning this whole month (or has it been 2?), but I managed to  refashion my already once refashioned nautical top. If you remember the science classes, it looked like a chromatograph - the solvent from the glue was running down the t-shirt due to the glue I had used for the embellishments (never use glue!!). So, I decided to cut out the embellishments and added ruffles.  I think I'll turn the rope embellishments into a necklace :-) More on the how-to at my blog 


Pyjama Refashion

Hi, Pam here from Threading My Way...

pyjama_refashion
A t-shirt, hair band and a set of pyjamas for a doll were all made from this outgrown and well worn pair of pyjamas.

Daddy's Little Cupcake was appliquéd to the t-shirt.
appliqued_tshirt
The elastic wasitband from the pyjamas was the perfect fit for a headband. 
headband

The life of those well worn pyjamas has been extended. More details over at Threading My Way.

If you are into Refashioning With Denim, you might like to check out...

... Pam

WOOL HAT FOR WINTER


A new wool hat from a wool jersey.
If do you want to know more about it visit my blog


Baggy shirt to tie front


My mum gave me this sheer blouse, but it was way to baggy for me. So I sliced up the front and hemmed the slit to make a much more flattering tie front top.


More of my creations over on my blog

Saturday, September 29, 2012

Penelope's Tweed Indeed Tee

I have a confession to make. This refashion is almost too easy and basic. I debated with myself whether to include it at Refashion Co-op. What I do value in this ultra simple refashion is how one small piece of bright vintage ric rac can transform the plainest of tees. So.....I am going to throw it out to the Refashion Co-Op community and let you be the judge.


Not another plain grey tee Penelope.

Nice vintage green tweed ric rak.

Visit my blog for Penelope's latest refashion.


Art Nouveau Inspired T Shirt Refashion

The designs of the Art Nouveau period.
Love them!
So lovely!
Needless to say, when I saw this fabric in the thrift store, I immediately threw it in my basket.


It inspired my favorite t shirt refashion ever!
I started with this thrift store t shirt:


Cut off the neckline, resized it and started pleating away.
I ended up with this:


This was so much fun to do! 
The entire pleating tutorial is at The Renegade Seamstress.

Happy Saturday!
Beth


House Dress to Maxi Skirt

I picked up this house dress for 3USD at the thrift store last weekend to complete my Hawaiian vacation wardrobe. I just love the little fishies and the teal color too, but not the fact that half its buttons were missing.

Fishy Dress-to-Skirt Refashion - Before

I chopped off the top just below the armholes/neckline and reused the straps as belt loops. Then I supplemented the original five buttons with four more from my own collection. Paired with a wide white belt, and I'm ready for the beach!

Fishy Dress-to-Skirt Refashion - After

More details and progress pics on my blog - CarissaKnits

Friday, September 28, 2012

Turning a Bra into a Bikini Top

After finding a sensational sewing tutorial on pinterest by Tasha Delrae; how to turn a old bra into a bathing top, my excitement and curiosity got the better of me.

Following Tasha's picture tutorial, here is my version:


I had the perfect bra to choose for this project; an unworn bra that's been sitting in my drawer for about three years, in the hope that one day I'd find its missing strap.

In action


Complete


As with Tasha's bikini top, I also chose to go with a halter strap around my neck too.  It is not absolutely necessary, but I do find suits me better than strapless.

Also featured on my blog.

Thursday, September 27, 2012

Presentation and new top


Hi
My name is Lina. I am 39 years old. I'm from Portugal and I live in a small village, Muge, around Santarém.
Already follow this blog and your work for some time now and decided to also participate.
Here goes:
Before:

After:

Hope you enjoy!
You can see this and other work on my blog:
http://opincel.blogspot.pt/

Brown ruffles and strips of fabric

BEFORE:  maternity like sweater


IMG_0394
From the front it was “ok”, but not so much from the side.  See? It’s exactly where I’d want the waist line to fall if I wanted to show off a cute baby belly. But I’m trying to CAMOUFLAUGE that area, not highlight it. 

I cut off 6 inches from the length of the sweater right under the bust, keeping the original hem line.   Then I randomly sewed strips of fabric across the front.   Now the hem of the sweater falls at my hips which is more flattering.   The ruffles and strips both add texture and interest.  

AFTER:  ruffles and stuff sweater
IMG_3073

Love,
Amy Jo at The Little Moments

1 + 1 = cool

Two never-worn blasé necklaces


 combined with a touch of refashionista magic equals a couple of brilliant bijou stunners:

a super sized egg-y nest...
 
& a mellifluous blue beauty
 

Three T Refashion


I made this dress last spring but only wore it a couple of times over the summer.  It is a little too skimpy for me but it looks on the dress form and it was fun to design.   :-) 

Cindy @ Upcycled Design Lab

Christmas Onesie

Firstly, hi.  My name is Danya.  Pleased to meet you!

I live in Sydney, Australia.  I am mum to two lovely little girls - my sweet 2 year, 4 month old "JJ", and brand new almost 2 week old "Bee". I blog at Danya Banya, and would love to see you over there some time.

As a young girl I used to love to sew and craft, but these interests had been abandoned to drunken debauchery and other hedonistic pursuits that I loosely refer to as "my twenties". Now that I am older, (but not necessarily wiser), I've found my love for the craftier & prettier side of life has returned. I bought my sewing machine about a year ago, and am doing my best to re-learn all the tricks I used to know, and learn a ton of new ones along the way.

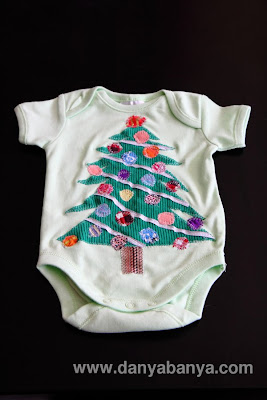
Anyway, on to today's refashion - a Christmas onesie for your new baby or perhaps as a gift for someone you know who is expecting.

Here's the front:

Front: before and after


 And here's the back:

Back: before and after


Using an existing plain onesie, I added the Christmas tree and holly designs on the front and back, using fabric and ribbon from my upcycle / scrap fabric collection. Essentially I cut out the shapes, pinned and then sewed using a wide zigzag stitch in a pale green cotton similar to the colour of the onesie, or white cotton on the white ribbon "tinsel". I didn't use any iron-on adhesive in this instance, but you could also use that if you didn't want to pin. (Although, I'm not sure that I like the idea of the glue on newborn clothing...)

I liked how it turned out so much that I made another one! Now I have one for my friend's newborn and one for my own. Come Christmas time, they can couple dress. :)

Second version: front

Second version: back

For more info, check out my original post here.

xx
Danya

Hubby's Sweater :)

Hey there! I've been wearing my hubby's sweater a lot lately, because it got so cold and rainy here and I needed something cozy to keep me warm. Well he finally gave it up and now it's officially mine! :)
And of course I refashioned it a bit... (it was way too big)


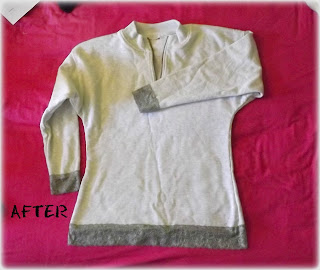
I took the sides a bit to make it smaller and stitched some grey lace around the edges and there you go:


Now all I need is large cup of coffee! :)
I hope you liked it!
http://nina-mia.blogspot.co.uk/ 

Best Ant Award

Before: scraps from this refashion
After:


Hello Fellow Refashionistas!


Hi readers! My name is Helen and I blog over at Blue Eyed Beauty Blog! I was just invited to contribute to this amazing blog yesterday! Let me tell you a little about myself and my blog!

My blogging & refashioning experience: I'm fairly new to blogging, but in the last few months I've found myself addicted to it...and to finding new blogs to read (which is how I stumbled upon Refashion Co-op!). I LOVE to refashion clothes! In fact, I'm always digging through any of the clothes my sisters/mom give away to see if there is even a scrap of the fabric I might use for something else. I generally try to refashion a minimum of three things a month (a guideline to be a member of Cotton & Curls: Refashion Nation). So far I have written 13 posts on my blog of things I've refashioned. (I've done a few more than that, but didn't have the photo's to write a post for them, but now I know better and take pictures of EVERY project! lol).

What I Refashion: I mostly tend to refashion/sew skirts because I wear them all the time. Lately I've been broadening my experience and have moved into working on cardigans/shirts/etc. Everything I refashion is something I owned previously and wanted to give the garment new life, I found at a thrift store and saw beauty in the ugliness, or the piece of clothing was given to me by my sisters/mom or a friend who knows how much I love to refashion clothes! I literally have three big boxes of clothes sitting and waiting their turn to be picked for a refashion!

Me & my blog: Other than refashioning and style, my blog focuses on my faith (I'm Apostolic Pentecostal skirt girl and proud of it!); the many new recipes I am constantly creating and posting throughout each week; my thrift finds via yard sales or thrift stores; tutorials for sewing and crafting plus SO much more! I am also a HUGE Pinterest addict! (P.S. my pinterest account is being re-organized by me so it's kind of a mess right now, but I did try to put all the boards I'm keeping at the top of the page!) I have boards where I save my inspirational photos and links for both refashioning and creating new recipes!

Goals: I plan to post all my previous refashions until I get caught up to the point where I will share a new refashion on my blog and then hop on over here and share it will all of you lovely readers as well! And don't worry, they will be spread out and not posted all at once!

Today's Refashion: Turning Denim Jeans into a Knee-length Skirt w/Ruffle.

BEFORE

This skirt started out as a pair of jeans...which I used to wear a lot...about three years ago... When I started only wearing skirts these jeans ended up in a pile and somehow managed to stay in my possession.


AFTER

With a fair amount of work earlier this year (in May) I was able to create a perfect length skirt which was a wonderful thing to have in my closet this summer! I would wear the skirt two or three days, wash it and then wear it another two or three days. I rarely wore anything else because it was so comfortable! And even now with the fall weather approaching I am finding all sorts of outfit combinations with tights, leggings, boots, etc. so the skirt is multi-seasonal which is the best part!

I did write a short tutorial with a few pictures in it on my blog. View this post if you would like to see the details involved in making one of these skirts yourself!

Introduction & Hawaiian Shirt-to-Dress Refashion

Hey there! I'm new around here. My name's Carissa, and I live in Dallas, TX, USA. I've been crafting for as long as I can remember, but refashioning is a fairly recent obsession. I've been working really hard to lose weight this year (60 pounds so far!), and have been having a blast converting my fat clothes to cute skinny clothes, supplemented, of course, with thrift store scores. This piece is one of the latter.

My husband and I are planning a trip to Hawaii in a couple months to celebrate our tenth wedding anniversary. So I roamed around my local thrift shop searching for florals and the like to create an island wardrobe. This men's Hawaiian shirt struck my fancy with its adorable little flamingos and palm trees.

Flamingo Shirt-to-Dress Refashion - Before

A few snips here, and some stitches there, throw in a couple new buttonholes for good measure, and voila! A new dress perfect for strolling along the beach!

Flamingo Shirt-to-Dress Refashion - After

More details (though sadly, I forgot to take progress photos) can be found on my blog, CarissaKnits.

Thanks for letting my join the party. I've already learned and been inspired so much by lurking around this place, so I hope I can do the same for some of you.

Got Elastic? Easy Dress to Skirt DIY

We all have that dress, the one tucked all the way in the back of the closet, the one we don't wear anymore, because well let's all say it - it's embarrassing!
Well, my dress made me look like I was 5! Seriously! Here is proof!

It's not that bad lying flat on the floor though :) But those sleeves are simply killing me! I can't believe I bought this back in the day, and more over, wore it to my senior thesis presentation in college :/ What was I thinking?!
But when I was going through my closet this past weekend, I decided it was time to do something about this dress! And yes, when you look at it, it makes perfect sense to turn it into a skirt!


I also added little ribbon loops on the sides to run my skinny belt through:

And ta-da (well not really, I still need an elastic to run through the top) But I was so excited to share this post with you, because I think this is by far one of the best "saves" that I did!

I just can't get over this pattern! Never will! Have an awesome day everyone!
xo,
Z
PS. Don't hesitate to check out my blog - http://beingzhenya.wordpress.com/