Monday, February 29, 2016

A Silky Solution!

I found this 100% silk dress at a thrift shop. Silk is challenging to work with for me but I love the fabric so much that it's worth it. It's far too big and too long but thats perfect- I need the extra material to not mess up this refashion! Here is the dress in all it's dowdiness:

A little 90's, a little err.... something!

This dress was a lot of work to refashion. I love the results though! I took it in and made it shorter. Then I used the extra fabric to create layers on top of the skirt, and a belt. There are a ton of pictures from the process on my blog post about this dress. Please stop by there to see all the images. I also go into complete detail on how I did everything too!

Here is my after picture of the completed dress:

Front! I tie the belt at the side.


Leap Day Oops Jacket

Does anyone else buy something they LOVE and then get complete Refashioner's Block??? That's what happened with me on this hot numba.

I've had this thing for years and I was just recently inspired to finish it :)

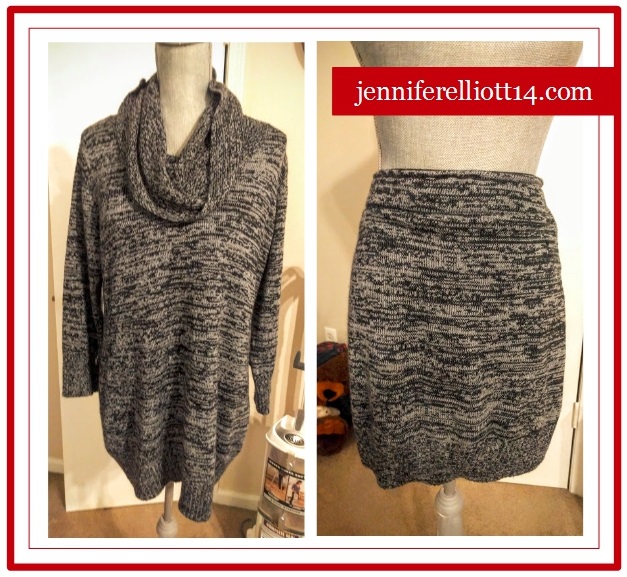
Cut skirt from bodice. This is always a good place to start.
When I took a look at the back of the top piece, I fell in love with the button closure. It hit me; a jacket! :)

I cut the ribbed binding at the waist and did a rolled hem on the left over raw edge.


A new favorite is born.


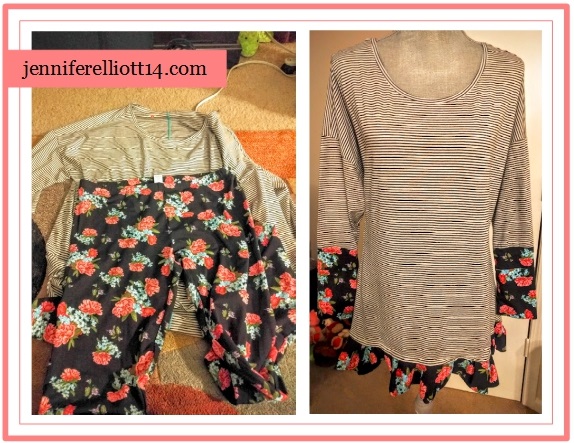
Would you believe I had this dress in my stash for SO long, I actually deleted my before pics... Oops! Luckily, I was able to find them in my "Recycle Bin" *whew


I guess the moral of the story is not to give up: Take a step back (days, weeks, years, whatever...) and revisit later to overcome Refashioner's Block :)


Happy Leap Day! Make your extra day count :)


Short and Long

I paired this loud short skirt and this quiet long one.


I layered the short one under the long one and cuts slits to let the color shine through.


You can come see the whole thing on my blog!


Juice pouch, weed barrier cloth, zip tie corset

What do you get when you combine juice pouches, weed barrier cloth, and zip ties?? A recycled corset, of course!

I cut the juice pouches open and cut them into two pieces, which made them more pliable. Then I sewed them together into sheets so that I could cut the pattern pieces out.


The lining is made with weed barrier cloth, and I used zip ties for boning.
If you would like to see more photos, and read a little more about it, hop over here.

Sunday, February 28, 2016

Cowgirl Up! And a Bonus!

Hello buttercups!

Sorry I've been so absent. I've had a ton of other things taking up my time and I also haven't been feeling well, so my sewing fell by the wayside. Tonight though, I dusted off my sewing area (literally. Ew.) and finished a project that has been sitting with Addie for some time!

Got this AMAZING Western shirt at Goodwill for just a few bucks!

Look at the details!

So in love. And it's a snap shirt too, no pesky buttons. But coolest of all?

Yee-haw!

But, here was the downside. Not a pretty sight.

I have been DYING to try adding lace inserts to a top and this lil' lady seemed like the perfect candidate. So I popped open the side seams.

I finally found some acceptably cheap lace at Goodwill, so we were ready to hitch this project up and it move it out!

After some finicky pinning...

Lookin' mighty fine

Sewed it all in and serged (cannot get over how much I love my serger. Having nice, professional looking seams makes me giddy)

And here we are!

NO GAPS!

Side. The other side is not perfectly symmetrical, but who's gonna notice? The cattle? The chickens?

Now she's all ready for ride in the surrey with the fringe on top!* But before we head out a-drivin', here's one more little mini-refashion... To make up for being gone so long LOL

LOVE this t-shirt (I am a Geologist in disguise... So says my Bachelor's, anyway) but it's just too dang tight.

Slash the sleeves...

Slash the back, and now it's stretched out enough to be comfortable and looks oh-so edgy. 

 *I apologize for the terrible, terrible puns that went with my Stetson top refashion

That's all folks! I'm actually part of a '365 day art challenge' group on FB that my sister-in-law put together, where she is challenging us to do something creative for at least 5 minutes each day, all year. Since sewing is my major creative outlet, I'm going to put some serious dedication into working on something each day, even if it's only for a little bit! Now, back to coughing my lungs out and trying to figure out what brand makes the best cough syrup.

Hugs!

~Illy


Saturday, February 27, 2016

Print with striped edge! and an almost failed refashion?

When I get an idea into my head I just have to go with it and get it sewn! I found this dress, and saved this t-shirt from my daughter's clearing out.


 I wanted to make a cardigan with a rib edging.


So I did, however there really wasn't enough fabric, but I was determined, and I joined pieces together to make the sleeves but as you can see in the photo the fabric was too thick and bulky to make the matched seams disappear!! Failed and disappointed!


However several weeks later, I spotted another dress. So with the sleeves recut, The cardigan is ready for wearing. For the full saga have a look here.

REFASHION: flowers and stripes

Yay! My confidence level just took a step up with my latest refashion! I recently bought this normal black-and-white striped shirt on clearance. The shirt fits fine and looks nice. However, during a recent shopping trip with my sisters, I leisurely combed through the clearance racks and found a lovely pair of floral leggings.

215.pinkbee

Anyway, I bought the cute floral leggings with absolutely no intention of wearing them. I immediately knew it would make my new striped shirt even better -- turning the original 3/4 sleeves into full length sleeves and lengthening the shirt hem with the floral fabric.

215.pink

For more details and pictures, click here.

Until next time -- Jennifer Elliott

What I did with offcuts from a duvet dress

Hello, HoffiCoffi here!


After I had completed my princess duvet dress I made in January I had some leftover fabric that was proving a bit tricky to use, because of a silly cutting mistake on my part.  If you recall...


I have made some quilt blocks with some of the leftover fabric.  Quilt blocks are great because you can fussy cut the fabric and the original design doesn't have to show up unless you want it to.  I also wanted to try something a little different though and I came up with the idea of making a bird brooch.


It is a mixture of applique using pieces of the leftover fabric together with some hand embroidery for the facial features and feet.  


Here is a picture of the finished dress.  


Here you can hopefully see what pieces I used from the duvet pattern for the bird - remember, I didn't cut up the dress to make the brooch!  I used the fabric I had leftover after making the dress.  It was fun and I definitely ended up with a unique bird brooch!

Friday, February 26, 2016

REFASHION: a sweater skirt to finally love

I was in the process of trying to save the grey cowl sweater by turning it into a better sweater, but I made some minor errors. Oops. When I removed the cowl from the sweater, I didn't like the new neckline and couldn't figure out how to save it. Instead of putting a little more effort into the save, I decided to turn the sweater into a sweater skirt.

220.RED

For more details, click here.

Until next time -- Jennifer Elliott

Batik on a bed sheet

Bed sheets have got to be one of my favorite sources of fabric. Especially older ones because of the softness they have.

I started with a plain flat sheet, and I used a glue method of batik on it to create little visual interest. 

For the collar, I used a bunch of scraps and fabric pieces (there were also juice pouch scraps and cloth weed barrier too) along with some water soluble fabric, and stitched it up.
Hope on over here to find out more!

The Vintage Evening Gown Refashion Tutorial

I spied this vintage evening gown in the charity shop window and was ecstatic when they sold it to me for only €1!


This gorgeously coloured piece of historic glam was gathered and draped at every seam, fit awkwardly and had a gross rubbery lining in the sleeves however it also had a fabulous sequin sash detail that I completely adored.

It took awhile to figure out exactly what I wanted to do and I was a bit nervous about working with that delicate sheer fabric to make the new sleeves but it all came together beautifully:


Here's how I did it...

Feelin' Groovy!

My husband and I recently attended a 60's themed dance.  I had such a fun time decorating for the dance and coming up with our costumes.  I used a thrifted bed sheet and Simplicity pattern 1197 to make a retro coat to wear for the evening.  My dress was also thrifted with just an adjustment in size and some added trim at the hemline.  If you would like to see a detailed post of all the decorations, including my turning the church foyer into a retro living room, you can visit my blog, Second Chances by Susan.


A little peek at the retro living room...


Thanks!