Friday, June 30, 2023

From scarf to cardigan (beach) blouse


If you're going on a holiday anytime soon and you're short on time, this super easy transformation might be interesting for you. All you need is 2 hours and a scarf that will go with your bikini and/or summer tops. The result is a cardigan blouse you can quickly throw on when you're going for ice cream on the beach or when your shoulders get sunburned on the terras.

The fabric of this scarf is a light and airy viscose and I really love the different colours and tassels. Perfect for summer! It went with a white jacket I used to have and has been hanging on the coat rack ever since. On a very hot day (too hot to do anything outside and a cooling fan by my side), I planned to transform the scarf into a top. But, as these things go... it ended up as a cardigan blouse! 

First, I cut the scarf in half lengthwise and draped it on the tailor's dummy to determine the desired length. I took the excess fabric in from the shoulder and sewed the shoulder seam.


Then I pinned the side seams and the centre front and back so I would get an idea of what the top would look like. But I didn't like it. It wasn't flattering at all! So that's when I decided to change plans and make a cardigan blouse.


I left the front pieces open and finished the edges with a double hem. Then I closed the centre back and the side seams at 22 cm from the shoulder to create armholes. 


Because of all the colours the cardigan blouse will be easy to match with different tops. And it also works well with my bathing suit (left on the photo). The tassels definitely add to the beach spirit, don't you think? It also conveniently covers up unwanted love handles... I'm not 20 anymore, you know:).
On the right you can see what the back looks like.


Happy summer everyone!


Please visit Vermaakster.blogspot.com for more details and a step by step explanation in Dutch and English. Until next time!


Sewing a Ruched Bust Top with Puff Sleeve


Hello! Today, I have an exciting project to share with you all—a tutorial on sewing a stunning ruched bust top with a charming puff sleeve. Not only is this a stylish addition to your wardrobe, but it's also an excellent opportunity to repurpose fabric scraps and give them a new life.

In this step-by-step tutorial, I'll guide you through the process of creating this beautiful top from start to finish. We'll explore how to sew the ruched bust, attach the puff sleeve with a cuff, and add a side zipper for a better fit. This project is perfect for those who love to upcycle and transform fabric leftovers into something fabulous.

To make your sewing journey even easier, I've prepared a free printable PDF pattern for the ruched bust top and the puff sleeve with cuff. Simply download and print the patterns to have the precise templates needed for a professional-looking result. It's an excellent way to save time and ensure accurate measurements.

Not only will you learn valuable sewing techniques throughout this tutorial, but you'll also discover the joy of sustainable sewing. By utilizing fabric scraps and giving them a new purpose, you'll contribute to reducing waste and creating unique and eco-friendly fashion pieces.

So, grab your fabric remnants, download the free patterns, and join me in sewing this fabulous ruched bust top with a puff sleeve.

Happy sewing!

step by step tutorial plus PDF 


  My blog

 and 

You Tube


Tuesday, June 27, 2023

Transforming a Bed Sheet into a Stylish Bustier Dress plus free PDF


Hello! Today, I am thrilled to share with you a remarkable sewing project that will inspire you to think outside the box when it comes to refashioning. I've recently sewn a stunning bustier dress using a humble bed sheet as my primary fabric. Yes, you read that right—a bed sheet!

In our quest to create unique and sustainable fashion, it's essential to explore unconventional materials and repurpose items we already have. This bed sheet bustier dress is a perfect example of how creativity knows no bounds. By giving new life to an unused bed sheet, we can make a statement piece that is both fashionable and eco-friendly.

To make this dress accessible to everyone, I've included a free printable PDF pattern for the bustier with cups. It ensures a perfect fit and allows you to cut and sew with confidence. The midi-length skirt of the dress features pleats, adding an elegant and tailored touch. With my step-by-step instructions, you'll find it easy to follow along and create your own masterpiece.

One of the highlights of this dress is the shirred back, which eliminates the need for a zipper. Not only does this make the dress comfortable to wear, but it also simplifies the sewing process. I've also incorporated bubble sleeves into the design, providing a playful and unique twist. By offering a free printable PDF pattern for the sleeves in five different sizes, you can choose the perfect fit for your dress.

As part of our commitment to sustainability, I encourage you to explore your own closets and repurpose items you no longer use. Bed sheets, in particular, offer a versatile and readily available fabric option for various sewing projects. By giving them a second life, we reduce waste and contribute to a more sustainable fashion industry.

Join me in the refashion revolution and let's inspire one another with our creative sewing projects. Share your own refashioned bustier dress using the hashtag #RefashionedBeauty and let the sewing community marvel at your talent and innovation. Together, we can make a difference, one stitch at a time.

Remember, the possibilities are endless when it comes to refashioning. Let your imagination run wild and embrace the joy of creating something unique and sustainable. Stay tuned for the tutorial on my channel, where I'll guide you through the entire process, from transforming a bed sheet into a fabulous bustier dress to adding those delightful bubble sleeves.

step by step tutorial with all free PDF patterns


Happy sewing and happy refashioning!


  My blog

 and 

You Tube


Sunday, June 25, 2023

The never-ending and the near-instant refashion

Two refashions at either ends of the time taken scale.  


This first one I thought about for a looooong time as it involved cutting into a hand-knitted jumper.  I probably should have thought some more.

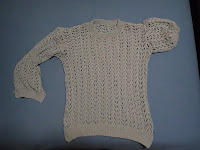
As is all too typical I jumped in without getting all the photos, but it was a bit like this - a long sleeve lace knit jumper in very soft lambswool.  Over time it had stretched out and the sleeves were now really long and the ribbing didn't hold them in place.  Super annoying to wear as the sleeves drooped over my hands.


I took in the sides and tried out a few different ideas for the sleeves.  I was somewhat inspired by a similar top I owned in a not so nice acrylic.


I took in the sides.  Luckily it was so oversize to start with, as the first experiment with the overlocker did not go well.  I could not adjust the differential feed enough to stop it going really wavy.  A very wide and loose zigzag on the sewing machine worked better.  I needed to go over it a more than once to catch the loose yarn.  Don't ask my why I unpicked the neck, but it seemed look a good idea,  I knitted it over with remnant wool and it now looks exactly the same.


 Tried out a few different sleeve variations and settled on short.

 Got them both sewed on and hated the puffiness when I tried it on.
Success!  I finally ended up taking the sleeves off altogether and knitting a rib edge to make a sleeveless vest.  Which I really like and will get much more wear out of when it's too hot for a full jumper but too cold for a long sleeve t-shirt on its own.  The remaining wobbliness in the sides drops out when worn.  The whole refashion and refashion again took 2-3 years in total.  Yup, 2-3 years.  I will think more than twice before cutting a lacy knit jumper again (probably).
By contrast this second refashion, for which I took no before pictures, took a day from the thrifting to  the finishing.  These are chef uniform pants I picked up because I wanted loose, light cotton pants for weekend summer wear.  I removed the last of the hook and loop tape on the back pockets, reinforced some broken seams and rolled up the hems.  They looked too chefy, so I threw them in a navy dye pot, which came out as a pale blue-grey colour due to the poly-cotton fabric, and done!


Happy refashioning!

Mimi


Wednesday, June 21, 2023

Make a colorful summer bedsheet dress by cloning your clothes


You don't have to buy expensive fabrics or patterns to make a summer dress.  In my step-by-step tutorial,  I'll show you how to make a pattern by copying a ready-to-wear camisole and modifying it into a dress pattern.  

Watch the video below or check out my blog at www.pivotpointpatterns.com


Sunday, June 18, 2023

Travel Refashions

 Hello Refashion Co-op. I have been on vacation the past 2 weeks. I made refashioned vacation wear for the trip and tried to coordinate the colors so it could all mix and match. I will show you some before and after pictures and you can see more details on my blog. 

  
This hat was missing it's hat band so I used ribbon to dress it up and make it cuter.
 
This tight dress made a great tank top using the Luna Pattern. It was great alone and as a layer to stay warm.
 
This dress had a bleach spot and it also made a great Luna tank as well.


This dress was fun and more useful as a 2 piece set. 


This shirt and sweater vest were really fun separates and i loaned the shirt to my daughter later in the trip. 

This jumpsuit was just a little too long. It was great for walking around and it still looked good after a long day.

This shirt went from suburban dad at a BBQ to fun and feminine. 

I gave this dress a big cut in length and it became the MVP of the trip. It was a dress or a tunic or a jacket. Whatever I needed this dress was it.

This shirt became a tunic and I was going to use it as a beach cover up. The linen fabric was great for the heat.

This jacket was great with the cropped length. I could wear it with everything I packed for the trip.
Thanks for reading along, for more details and pictures go to my blog , I Can Work With That to see more.


Thursday, June 15, 2023

🌟 Transform Your Old Vest into a Stylish Fanny Pack: Upcycling Tutorial! 🧥✂️


I am thrilled to share an exciting sewing project with you all today: transforming an old vest into a trendy and functional fanny pack. Get ready to turn your unused coat into a stylish accessory that will make heads turn.

In this step-by-step tutorial, I'll guide you through the process of repurposing an old vest into a fabulous fanny pack. Not only will you breathe new life into your coat, but you'll also create a fashionable accessory that's perfect for any occasion.

To make the process even easier, I'm providing a free printable PDF pattern exclusively for our community members. With this pattern, you'll be able to seamlessly transform your coat into a fanny pack with a lined interior, keychain detail, zipper closure, detachable strap, and even a coin purse. It's a complete package!

The best part? By using an old vest, you're not only being sustainable but also giving a unique touch to your creation. Imagine the compliments you'll receive when you proudly wear your upcycled fanny pack.

This project is suitable for all skill levels, whether you're a beginner or an experienced seamstress. I'll share some valuable sewing tips and tricks along the way to ensure your success.


Join me in this fun and rewarding project. Watch the full video tutorial and give your old vest a new lease on life as a stylish fanny pack. Together, we can make a fashion statement while reducing waste.

Happy sewing and refashioning! 🌈🧵✂️


step by step tutorial plus PDF 


  My blog

 and 

You Tube


Friday, June 09, 2023

Sewing Tutorial: Refashioned Open Front Tie Top with Lining - A Sustainable Styling Solution


Hey there! Are you ready to embark on a creative and eco-friendly sewing journey? In today's tutorial, we're diving into the art of refashioning and creating a stunning open front tie top with a lining.

What makes this project even more exciting is that we're utilizing fabric leftovers to bring this fashionable piece to life. By repurposing and upcycling materials, we can reduce waste and contribute to a more sustainable fashion industry.

In our step-by-step video tutorial, I'll guide you through the process of modifying a basic pattern to achieve the desired open front design. I'll also show you how to add a lining, elevating both the comfort and overall look of the top.

The beauty of refashioning lies in its limitless possibilities. You can unleash your creativity by experimenting with different fabric combinations, colors, and patterns. With each unique creation, you'll be making a positive impact on the environment.

To make things even more accessible, I'm offering a free printable PDF pattern for this refashioned top. Whether you're a beginner or an experienced sewer, this tutorial is suitable for all skill levels. I've included detailed instructions and handy sewing tips to ensure your success.

So, let's gather those fabric scraps, unleash our creativity, and breathe new life into our wardrobes.

step by step tutorial and PDF pattern


  My blog

 and 

You Tube


Thursday, June 01, 2023

Create Your Own Stylish Babydoll Blouse: Easy Sewing Tutorial plus PDF


Hello!😊 Today, we'll be diving into the world of sewing a beautiful babydoll blouse with elbow-length puff sleeves, a round neckline, and a delicate ruffle detail. This beginner-friendly tutorial will guide you through the process step by step, ensuring a successful and enjoyable sewing experience.
To make things even easier, I have included a free printable PDF pattern for this gorgeous babydoll blouse. With this pattern in hand, you'll be well on your way to creating your very own stylish blouse. The materials : fabric scraps/ bed sheet required for this project are simple and easily accessible, allowing you to bring your vision to life without any hassle.
In my detailed video tutorial, I'll demonstrate every step of the sewing process, making it a breeze for beginners and experienced sewists alike. I'll cover everything from gathering the bust to adding a side zipper, ensuring that you have a thorough understanding of each technique involved. Additionally, I'll provide a handy tutorial on the easiest way to insert a zipper, saving you time and effort
Happy sewing, and stay tuned for more exciting projects and tutorials in our sewing community. Let's continue to inspire and support each other on our sewing journey!💖💖


step by step tutorial with PDF pattern


  My blog

 and 

You Tube