Friday, June 29, 2018

T-shirt Mania 2; The Tunic

Hello Refashion Co-op. I had a l-o-n-g t-shirt on my hands here. It fit well but it was extra long for some reason. I decided to use that length and make a tunic style t-shirt.


 I started by cutting off all the edges and hems. I saved them to use later.


I cut the sleeves at an angle. I didn't want all that sleeve fabric under the arms.


I made 2 little holes at edge shoulder. I used the strips of fabric I had cut off the sleeves as string and tied up the sleeves.


Tying up the sleeves made nice ruffled cap sleeves. 


The long strip of fabric from the bottom of the shirt became a tie around the waist.


The shirt was a lot more fun to wear after, but just as comfy.


Thanks for reading, for more pictures and details go to I Can Work With That.

Wednesday, June 27, 2018

T-shirt Mania Part 1; Using a Freebie

Hello Refashion Co-op. I decided to focus on t-shirts for a little while. It is summer and t-shirts seemed great to wear when outside in the heat and playing with my 3 year old.


Here is a great tank top. I love the embroidery on the front but the racer back didn't really work for me. I don't own this style bra, until I do I want more coverage on my back.


It was easy to connect the front of the blue shirt and the back of the white shirt. I kept the blue cording around the neck and attached it to the white shirt too. 
I covered the logo on the sleeve with a little piece of blue fabric that I made into a pocket.


Thanks for reading this post, for more pictures and details go to I Can Work With That.

Saturday, June 23, 2018

A Tale of Two Tabards - Child's Heraldic Tunic DIY

child heraldic tabard by karen vallerius

Looking to enlarge my costumery portfolio and try a historical era about which I knew absolutely zero, I was interested to be asked if I could help with children's costumes for a local historical venue.

My first thought was I don't have any suitable fabric (is this even possible?) but I soon found an old curtain and an unused pillowcase which I could use to stitch the tabards.  The shield motifs were made from felt and fabric offcuts.

child heraldic tabard by karen vallerius

I have put together a tutorial on how to make the felt applique shield on my blog.


Friday, June 22, 2018

Shortening Sleeves

Hello Refashion Co-op. I liked this sweater and it fit perfect in the body but it didn't fit me in the sleeves.


I mean it didn't fit me in the sleeves at all. Does this happen to anyone else? My arms are so stubby and short, bell sleeves do not work for me. I can't even roll or push the sleeves up and try to pretend they aren't too long. They are too loose to push up.


I decided to cut the sleeves off. It was easy to cut around the shoulder seam. I left the seam intact because I didn't want the arm hole to stretch and get out of shape.


I cut the top of the sleeves off and tried to copy the shoulder shape as much as I could. I didn't want to shorten the sleeves at the wrist because that was where the pretty chevron stripes were.


 This was the important part that has changed. I can use my hands and do everyday things like drive a car safely.


I was happy the sweater looked just like it did before. Now it has 3/4 length sleeves instead of long bell sleeves. It was easier to put the sleeves back on than I thought it would be. The knit was easy to manipulate even though I have never done it before.


Thanks for reading, for more details and pictures go to I Can Work With That.

Wednesday, June 20, 2018

In The Pink 4

Hello Refashion Co-op. I made it to the end off my pile of pink clothes waiting to be refashioned. These two shirts were full of a happy coral pink. I liked the color more than the shirts themselves.


This little shirt was so extremely little. It is very cropped and also very low cut. I don't like either of those things on me, so this shirt was pretty worthless. But that coral pink was calling my name. I decided to cut the shoulders off, flip it upside down, and make it into a tube top to wear under other shirts.


I flipped it upside down so that the finished hem is at the top. Some shirts will stay up on their own like this. Or some thin elastic can be threaded through a hole cut on the inside of the hem. I pushed the elastic all the way around the hem and tied a knot. That's it. 


I decided I liked the fit and color of this plaid shirt but the front always came open between the buttons. That drives me crazy! I rarely wear button down shirts because they don't lay flat. I made some quick stitches right on top of the stitches already there. Now the shirt will lay flat and stay smoothly closed.


Here is a picture of me pointing to the changes in these shirts.
 It is a little bit of an awkward pose.


Monday, June 18, 2018

Misaligned button on shirt dress

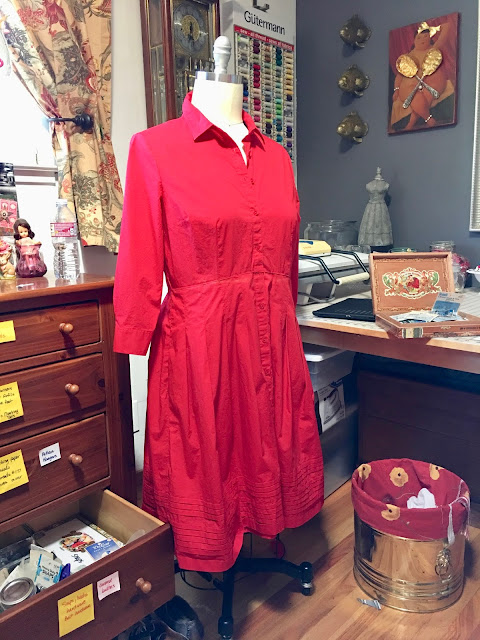
I found this ill-fitting but cute Talbot's brand cotton shirt-dress at a thrift store. I am a sucker for a shirt dress. I took it home.


The waistline was in the wrong place so I separated the top and bottom and repositioned them.


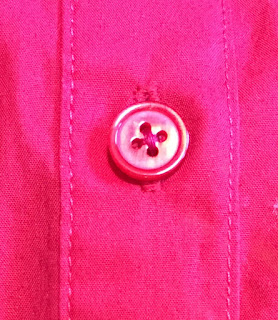
It worked, but I found that some of the buttons were misaligned with the button holes.  


I've run across this problem before when upcycling - here is the technique I use to fix the problem:


1) Align the packets exactly how you want them to be in the finished garment.
2) Use a pin to pierce the center of the buttonhole and into the placket underneath.

3) Very carefully peel back the top layer and see where the pin is inserted.   


4) The pin should be about the same distance from each placket edge as the existing button.  If not, the pin may have been angled when it was put in.  In the picture it seems to be skewed to the right a bit. 


5) Now you know exactly where to move the button!
Happy upcycling!  Michelle

Sunday, June 17, 2018

scarf refashion

Hello

this time, I work with scarfs.

Before :


After


And a second one

Before


After


For more, visit my blog.

Friday, June 15, 2018

In The Pink 3

Hello Refashion Co-op. I am still working on the pink clothes in my refashion pile. (There is a rack and a pile. I collect things from clothes swaps, wash them, and pile them up until I can get to them.)  The gray dress below needed a shirt under it because it was so low in front. I liked the dress but wearing 2 shirts in the heat is an awful idea. 
But I had a plan.
 

 I had the scraps from this pink tunic left over. I was going to use the hem and the triangle pieces from the sides.


I closed up the triangle with my machine and turned it finished side out. 


I pinned it to the gray dress and hand sewed it in place. I couldn't machine sew around the metal beading, I had to do it by hand.


I used my machine to attach the pink hem to the bottom of the gray dress. It added a bit of length and it also added a little weight so the skirt wouldn't be as likely to blow around in the breeze.


My dress was finished. It will be faster to get dressed in the morning since I don't have to find a second shirt to go with it. It will also be a little cooler without an extra layer too.


Thanks for reading this post, for more pictures and details go to I Can Work With That.

Wednesday, June 13, 2018

In The Pink 2

Hello Refashion Co-op. I am in the middle of a refashion binge of pink clothes. I had these 2 shirts that didn't work as shirts for me. I loved the patterned shirt so much, there is always a way to make things wearable right?


Here is why this shirt is not wearable. What is up with these flaps of fabric? Do they fly around when I walk around? Yes, yes they do. I can't live my life like this y'all.


 I connected all the panels of flying fabric and then cut the top off the shirt. That gave me the blue knit lining and the pretty patterned outer layer.


I attached the layers to an elastic waistband and turned it in to cover the elastic.
 (I think Saga showed this kind of waistband many months ago?)


This pink shirt is very long, and VERY full. It is too full cut and if I bend over or lean down is can drag on the ground. If you are wrestling with a toddler to get him into the doctor's office it can get pused up and reveal way too much. It just doesn't work for me.
I cut off the entire hem and made it into a straight shaped shirt.


Together these 2 shirts made a simple and comfortable outfit I was happy with.


Thanks for reading this post, for more pictures and details go to I Can Work With That.

Tuesday, June 12, 2018

The Topsy Turvy Polka Dot Dress

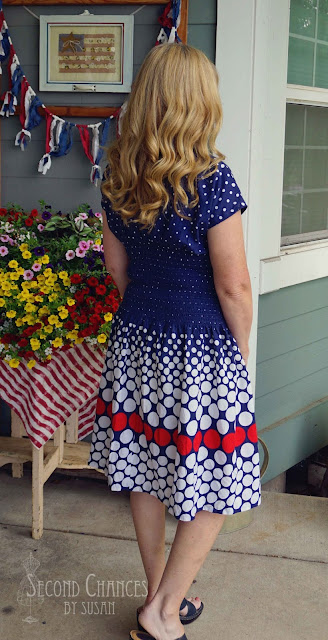
I really like a good red, white, and blue combination, so when I saw this shirred, strapless dress, I knew I had to pick it up!  Plus, it's polka dots...bonus!!  However, strapless was not going to work for me.  My first thought was to make it into a skirt.  It would be a simple transformation, but also a waste of some of those lovely polka dots.  After some thought, I came up with a different solution.


This version is much more wearable now! 


For photos and details on how this was accomplished, please visit my blog,
Thanks!


 photo signature.png