Showing posts with label fabrichoarder. Show all posts

Wednesday, January 10, 2018

Stash Busting

I was given a bag of clothes by a friend - some I hung up ready to wear, others went on top the overflowing mess, known as the Refashioning Heap.
I like the shape and colour of this long-sleeved T, but didn't really want the words emblazoned across my chest.


Using a piece of fabric from my stash (a gorgeous knit from Cali Fabrics), I just cut a panel big enough to cover the writing, and pinnned it over. I unpicked the neckline and front band, so I could overlock, sandwiching the new piece into the seams, but the vertical sides were just zigzagged on.

Will use the same technique again whenever I thrift a shirt with a message that's not really me. 
Quick and easy!

Wednesday, May 24, 2017

A new shirt for Sheila

I'd had these two Goodwill bargains hanging around for quite a while, and thought it might be fun to combine them.


I cut most of the blue sweatshirt off (another piece for the fabric stash), and cut the XXL men's shirt across at the armpits. I switched the shirt to button down the back. It was wide enough to make pleats - one inverted at CF, and one either side of the button band on the back.
I stitched the chopped off garments together, and overlocked the edges.
Well.....not the most imaginative of refashions, but it'll help to hide the belly until I wrangle my appetite under control!
Later that same week................
Hmm, had left Sheila standing quietly in the corner for a couple of days, wearing this and thought it looked quite cute. Then, I put it on and had my husband take photos  - it looked terrible!!


I will use the idea of the chopped off T with a shirt bottom, but I guess Sheila can have this one - not that she gets out much, usually just hangs around the house naked!
Full post HERE

Wednesday, April 19, 2017

Chopping and Pinning

BAG SORTING.....REFASHION 2 - the Asymmetric Sweater

The second Goodwill garment I pulled out of the bag was a Cynthia Vincent lightweight sweater. I think it was labelled L, but was definitely not "L" enough for me! It's a pretty sweater, but made for a slender girl (who doesn't feel the cold on one arm, and doesn't need to raise the other one very high).

The band at the hem was really tight, so that was a no-brainer to chop off.
Also, I am not wearing anything one-shouldered (and therefore braless), so that would definitely have to be changed.

After chopping off the band, I cut off some of the batwing - it was a pretty long sleeve. I figured I could use that fabric to make some kind of shoulder strap. I really liked the draped pocket on one side, so wanted to keep that.

This was one of those refashions I kept messing about with, not sure how it was going to turn out. I kept trying it on, and pinning scraps of fabric over my shoulder. In the end, I used some of the hem band, and chopped off sleeve fabric to make a wide shoulder strap.

I need to try this on with a lot of things to find the best look, but it's something different for me for the princely sum of $3 again! 
Full post here

Friday, April 14, 2017

Shorter and Wider

WP_20170409_13_44_24_Pro (2)


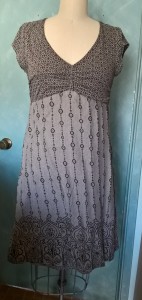
I pulled a really cute grey dress out of the refashioning bag - it was too tight around the bust area, and a little too short for me.
I liked the neckline shape, and the print combo, but this wasn't going to work without some changes.
First, I cut out the plain grey lining, and shortened it to be a top - that bit was easy.

Next, I needed to make it wide enough - not so easy......inspiring music, a strong coffee, and some thinking.

I decided to cut down the centre back, and use the grey lining fabric to make button and buttonhole bands adding an inch or so around the body. Well, that inch wasn't really enough, so what now?
GOT IT - grabbed a piece of black sweatshirt fabric from the stash, and added a panel down the back. I didn't bother with buttonholes, just stitched buttons through.
On the blog.

A__C445A__2597

Tuesday, April 04, 2017

A Quick Refashion

I picked up a knit dress on clearance a year or so ago - it was fairly long, and more clingy than I'd hoped.
I cut it to knee length, thinking it would be more flattering, and it sat in my closet, until it got buried in the bottom of a Garments-Waiting-to-be-Refashioned Bag.

I pulled it out today, and decided to have another go at making it wearable for me.
I cut it way shorter, and dropped the front and back necklines, using the original folded hem to make a neckband.
I then joined strips of the cut off skirt to make a soft pleated frill.
Not a very exciting design, but I'll definitely wear it now!


Monday, April 03, 2017

Not Ready to Retire

I decided to organize my giant bags of potential refashion victims.
In BAG #1, I found a Python (I think) Print T-shirt with a loose fit - looked like it could be an everyday top.....but
....when I was a student, I loved wearing animal prints. Now, many years (and lbs on) I fear me, clad in printed animal skins, may give off more of a Golden Girls/Florida Retirement Home vibe!
Well, nothing ventured, nothing gained - it was a $3 Goodwill bargain.
BEFORE
I pinned the shirt together at shoulder seams, so CB and CF were on a fold, and cut a slightly deeper neck at the front, and a square one on the back.
I decided to add a contrast neckband, hoping it would look a bit more sporty. I used a striped scrap from the stash, and stitched on 2 straps in a V for extra detail.
Not bad, hopefully it will look OK with faded jeans, or denim skirts. More detail here.


Saturday, March 25, 2017

A bit more on my jeans refashion

A couple people asked about the jeans refashion I posted.
First, I cut the jeans down the side seams, and cropped them in length (orange lines).
Then I pinned the fronts together and cut a random shape off (green line).
I used that cut off piece as a template for my contrast denim (grey shape), adding a couple of inches along the straight side to upsize the jeans. I also added a couple inches on the top edge to fold over at the waist.
When I stitched the contrast pieces on, I completely messed up at hip level.
After a bit of swearing and a coffee, I chopped off the narrow straight bit from hip to waist, and stitched on separate pieces. I was on the verge of giving up as I now had two sloppy looking joins, so I used the cut off pieces from the leg length to fudge together a couple of half pockets to disguise the mess. I topstitched a lot (not perfectly, sadly).

Hope that makes it a little clearer. Thank you for the kind comments, my fellow refashioners - you all inspire me!


Thursday, March 23, 2017

Sharing the same jeans (genes)

Youngest son cleared out his closet before leaving for college, and put a lightly worn pair of jeans in the thrift store pile.


I like dark denim and need some more pants (I prefer skirts, but need pants for walking to work).
Youngest son and I may share the same genes, but I could not wear his jeans without some major "up-sizing"!
I just decided to chop away/add in some contrast fabric/do a lot of pinning and trying on and cross my fingers...........in other words, wing it. I used a really muted tartan from Cali Fabrics.

I ended up doing a bit of patching together, due to my complete lack of planning, so had to add some pockets to cover unwanted seams. Luckily, I had cut quite a bit off the leg length, so had some scraps to work with.


Well, now I can get them on, and do up the buttons (grrr...darn button fly, prefer zips).
Not bad for a Sunday afternoon's work and a little fabric from the stash - thanks, son!

Tuesday, January 17, 2017

Testing out my Toaster

I joined the Project Sew My Style sew along. Each month, we will all sew the same pattern, and post pics on social media.
The first pattern is the Toaster Sweater #2 from Sew House Seven. I bought fabric for this, but wanted to make a quick toile to check the fit. So, I picked up a very large man's shirt at Goodwill ($3).

I knew I wouldn't be able to get long sleeves out of this shirt, but figured it would give me an idea of the body size anyway.
First issue was the button front. I couldn't cut around it, so switched it around to be on the back and just left one button on.

I was able to cut the back and front from the shirt pieces and made the sleeves as long as I could using the existing sleeve pieces.

The pattern is a pretty quick make. I think it's going to be more flattering in my softer black and white fabric, and with the long sleeves, but I'll wear this top - for an investment of $3, and a couple of hours, it will be a useful T-shirt alternative.
Full post here.

Monday, November 21, 2016

Swapping body parts

It all started when I visited a local eco fair and saw some cool shirts for sale. Basic T-shirt shapes are not flattering on me, but I loved the unique prints, so I snapped one up in the largest size they had - I knew I would end up refashioning it in some way, so wanted as much fabric as possible.
The weather finally started to cool down a bit, and I realized I don't really have any long sleeved T-shirts (I'm rarely cold enough for sweaters).
I dug out the T-shirt, and pondered. After a bit more rifling through the refashioning bags, I found a $3 thrifted bargain - a huge, soft man's shirt, new, with tags.


I chopped off the sleeves off both shirts, and trimmed the grey ones to flatten the sleevehead more like the ones from the blue T. I overlocked them on, and did a topstitch around the seam.
Then I cut away the neck, and used the hem of the man's shirt to make a contrast edge, again overlocking on and topstitching.
It's still a sloppy shape, but will be a cosy winter top that I can throw on with jeans! More on the blog.


Saturday, September 24, 2016

Back to school: 1+1+1+1=1

Since it's back to school season again (already?), I thought I'd post a previous refashion with a school-themed title...
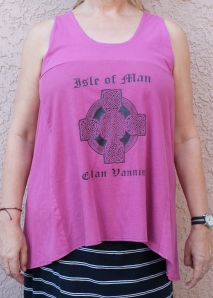
Just got a freebie tank passed on from my friend, and I really like the flared shape and slight racerback cut, so decided to make a version using old T-shirts. My teenage son went through all his clothes and filled a large bag for Goodwill. Of course, the bag didn't make it from the house to the car, without me taking a quick peek.
I pulled out a grey T-shirt with a Celtic motif, and three unworn white Hanes shirts (I think he kept wearing the same 3 from a 6-pack).
I found a bottle of liquid Rit on the shelf and decided to go for it. Well, the deep Cabernet color I was expecting turned out to be cerise (a surprise, but still OK).
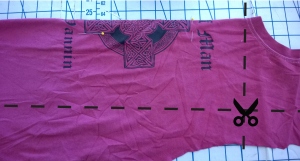
I did a rough trace of the tank, and made front and back patterns. Then I started cutting into the shirts. I only managed to get narrow front and back panels from the Celtic print shirt (if only my son was built more like a chunky middle-aged woman, I wouldn't have to do so much piecing together!!)
Celtic
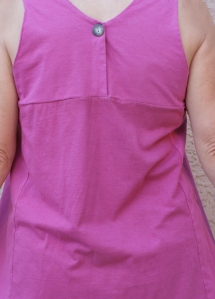
I cut the side panels on the fold (no need for side seams), and two sets of front and back yokes from the Hanes shirts, so that I could just sew them double and not worry about finishing the neckline and armholes. I couldn't get the back yokes in one piece, so decided to do a button detail.

I wish the motif placement had allowed me to get a better seam position (not really flattering), and it would probably be a little better in a lightweight jersey, but I'll wear it.
Full post here
SONY DSC

SONY DSC

Tuesday, September 06, 2016

In the pile behind the sewing machine


So, I was moving fabric around on my sewing table, and I uncovered a skirt I'd forgotten about.
 I do a lot of Goodwill shopping, and sometimes grab things when I've had a refashioning idea, but have a bad habit of abandoning some projects. One weekend, I wanted to try embroidering on suiting type plaid, so I'd snapped up this skirt.


 After adding some trim to the hem, and embroidering a flower, I decided I didn't like myself in it, and it got buried in a pile.
A few months on, I had inspiration......so...out with the shears.
 I got rid of the side zipper, took in the side seams a little and cut down the front.
Using some plain brown fabric from my stash, I interfaced 2 wide strips, and added a contrast button front and placed the opening off center.
To tie things together, I added a teeny patch pocket in the same brown.


  Much better! Full post on my blog.


Sunday, August 21, 2016

That's never going to work!

For my second attempt at a jeans refashion for Portia's challenge -  the refashioners2016 , I grabbed 2 pairs from my $1 a pair Goodwill haul.
One pair were medium weight, with a little stretch. I really liked the other pair (Banana Republic) - lighter weight, with a texture that almost looked like a faint tartan to a pair of old eyes. They were wide leg, so even though they were smaller than I wear, the extra fabric seemed to offer up more possibilities.

I don't know quite what I was thinking, but I started pondering KILTS.....a totally inappropriate garment to make out of a limited amount of fabric that's already cut into shapes and stitched together!!
OK, back on planet earth.... unless I drop about 10 sizes overnight, I"d never be able to cut a kilt out of 2 pairs of jeans. So, my skirt kind of evolved - I cut front and back panels from the heavier jeans, using the outside leg seams as my CF and CB.
I saved the zip and sewed it into the back seam. I then cut 4 hip panels, shaping by eye and adjusting on my body.
I thought the wide leg jeans would give me a decent amount for side pleated sections, but found they had a sneaky bias seam. I used them anyway, even though those seams caused some bulk and twisting. I unpicked the the two back pockets, stitched them together, and added them to one side. I cut fabric from the deep hem allowance to make straps for the other side, and added a couple of rings from my stash.

 Well, it's not exactly a kilt, but it's definitely more useful than 2 pairs of jeans not in my size!! The finished skirt is a little twisted and stretched in places but wearable, and will definitely get a lot of use - certainly worth the whopping $2 outlay!

More pics HERE


Monday, August 15, 2016

"In my former life...I was a pair of jeans!"

So happy to be taking part in Portia’s  the refashioners2016. The challenge is to refashion jeans into other clothing/accessories.
For my first try, I grabbed a pair of my son’s jeans, rescuing them from his Goodwill donation bag. I often sneak jeans from his giveaways, and stash them away for a project. I generally prefer skirts to pants, and like the casual look of denim skirts, great to wear with flat sneakers and T-shirts ( I don’t lead a very “dressed-up” life).

As I spread the jeans out, it struck me that the inside leg curve could be flipped upside down to form a side seam flare. I wanted to try something different from adding a triangle at centre front and centre back to add flare.

Two legs joined together were not going to be enough to wrap around my hips, so I kept cutting pieces, and pinning them together on myself until it fit. The only extra piece of fabric I added was a scrap from my stash to make the button strip on the left front.
When cutting the outside seams open, I saved the seam allowances, thinking they might come in handy as a trim. Sure enough, I ended up using them down the front.
The skirt was a little shorter than I like so I didn’t want to turn it up, and I didn’t have enough scraps to make a border, so I just stitched a couple of lines, washed it, and frayed the hem.
Full details on the blog here


Wednesday, August 03, 2016

Finding a Dress in the Men's Department!

So, I found myself with 3 Old Navy, XXL long-sleeved men’s T-shirts to play with – two rust, and one striped. I didn't take before pics, but they were basic T's.
I cut up one of the solid ones and made a simple tank for exercising, but still had lots of fabric to play with.
I decided to go with a dress. I used a tank I already have that I like the fit of, and made a bodice, cutting it off just below the bust – to accentuate the narrowest part, which is definitely not my waist. I lined it with contrast – one of my son’s old grey T-shirts, and added ties into the V neck on the back.
For the skirt, I just had to be creative with the fabric I had. I cut the rust T-shirt across at the armpit, and down the side seams to become rectangular front and back skirt panels. I cut open the sleeves, and used them “upside down” to create triangles on the sides (no side seams), adding flare to the skirt. The dress needed more length, so I added two hem borders – one using the striped shirt, just piecing it together.
I'm pretty happy with the result.


Monday, July 25, 2016

Getting legless - pants to skirt!

Snagged a brand new pair of Chico's trousers at the Goodwill $3 sale a few months ago. They were too big and long, but nice fabric, so they went onto the "think about it for a while" shelf.
Finally, I decided to convert them to a skirt - my preferred garment.
First step was to cut the bottom of the legs off to above knee-length. I sewed straight down from the bottom of the fly and the bottom of the "bottom", then cut off the excess. I wanted to keep the zip pockets, so to size the skirt down, I cut through either side of centre front and centre back.. After pinning to fit, I sewed the panels together, and topstitched.


To add length, and some contrast, I used the bottom of a previous skirt re-fashion
Added a couple of buttons from the stash....done! Full post here