Showing posts with label skirt refashion. Show all posts

Friday, August 13, 2021

Skirt lining - two ways

Since the virus I've been doing more mending, repairs and minor updates to my existing wardrobe than large-scale refashions. Partly because I haven't been thrifting / op-shopping in forever, and partly because I find it soothing to think less. 

Most of which is not that interesting to post about, but today I'm sharing some.  I keep my clothes for a long time because I like them and I worry about the environmental impact of clothing.  So parts of them wear out over time - like the linings.  

Today - one replacement and one repair.

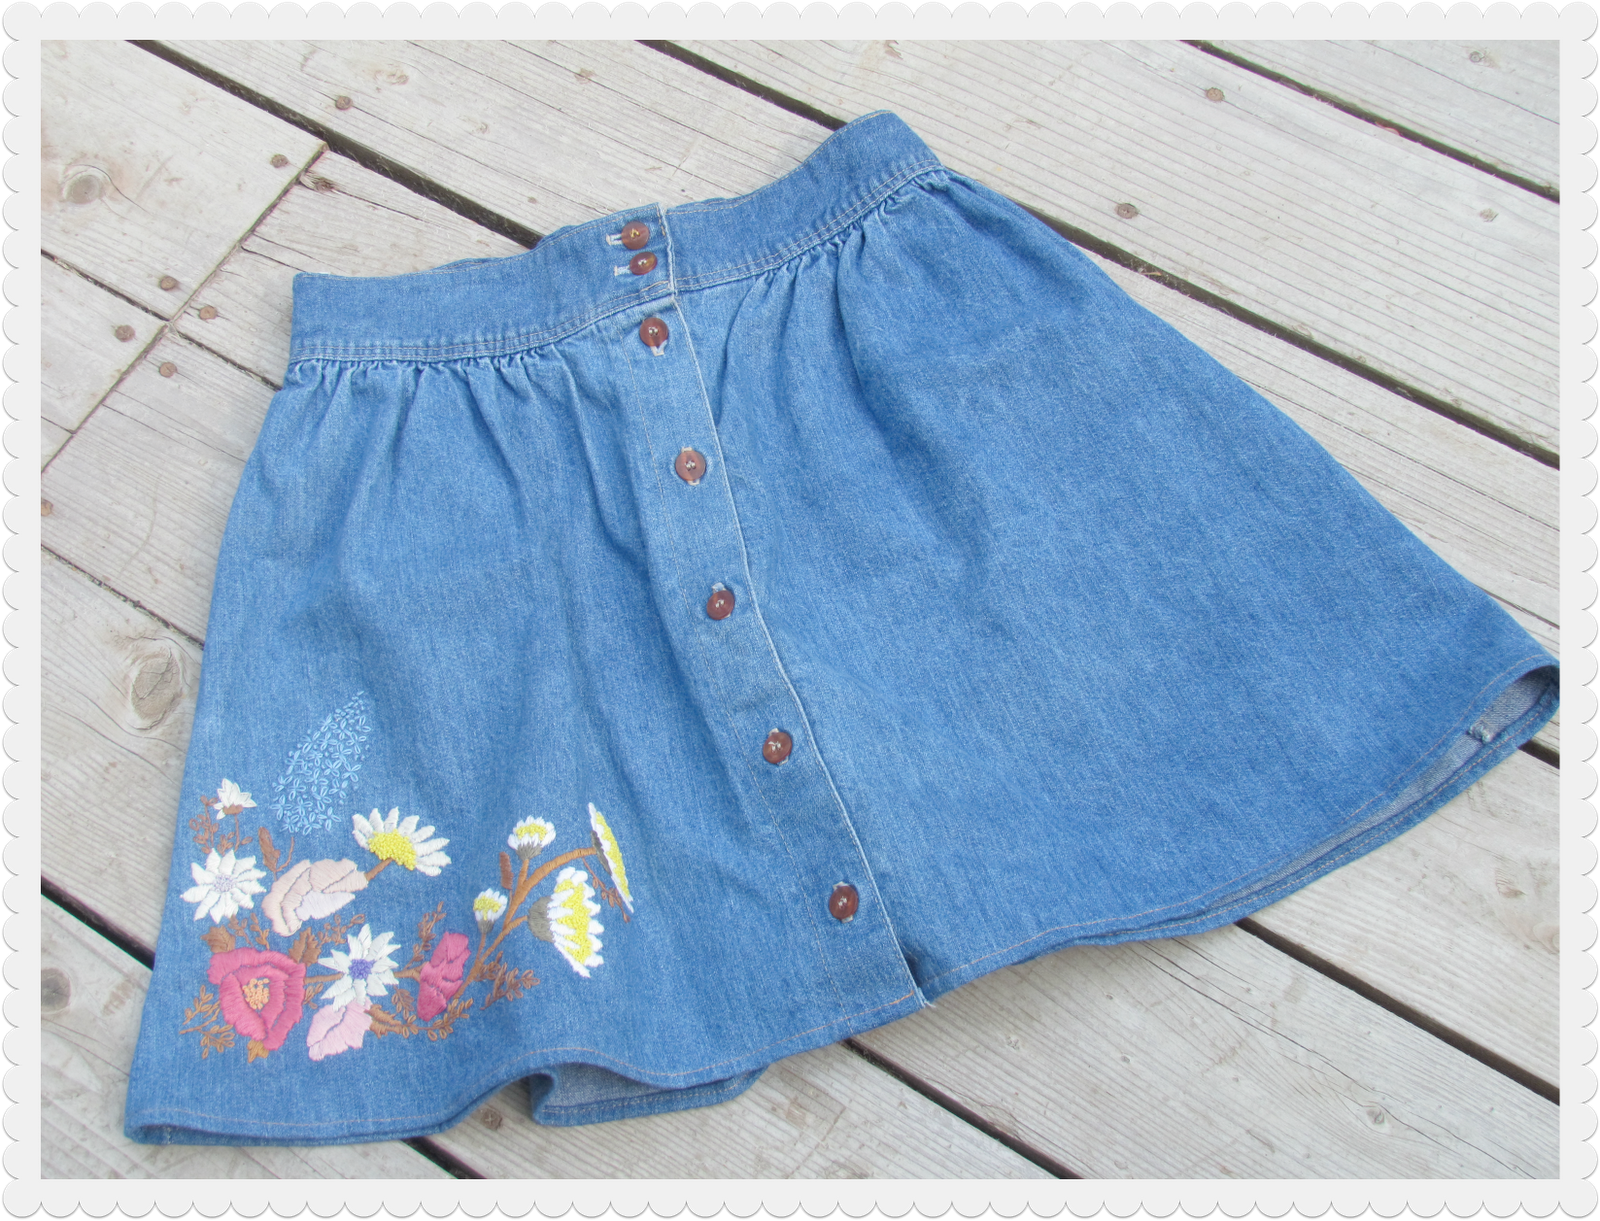
Up first, I left this one way too long do a quick repair. It's an elastic-waisted knit skirt but office appropriate and I wear it a lot in winter (which it is right now in my Southern hemisphere home). 


The lining is not only ripped but wearing through, almost shattered (and impossible to photograph well).  I unpicked the whole waistband to remove the lining.  The elastic was okay still, so I reused that.


As the outer fabric is opaque (the lining is to stop clinging) I don't need to match the colour.  When this is the case I pick a bright colour to make me smile.  This one is butter yellow (paler in the photo than real life) and adds to the scarlet, aqua and hot pink linings I've replaced in other skirts.


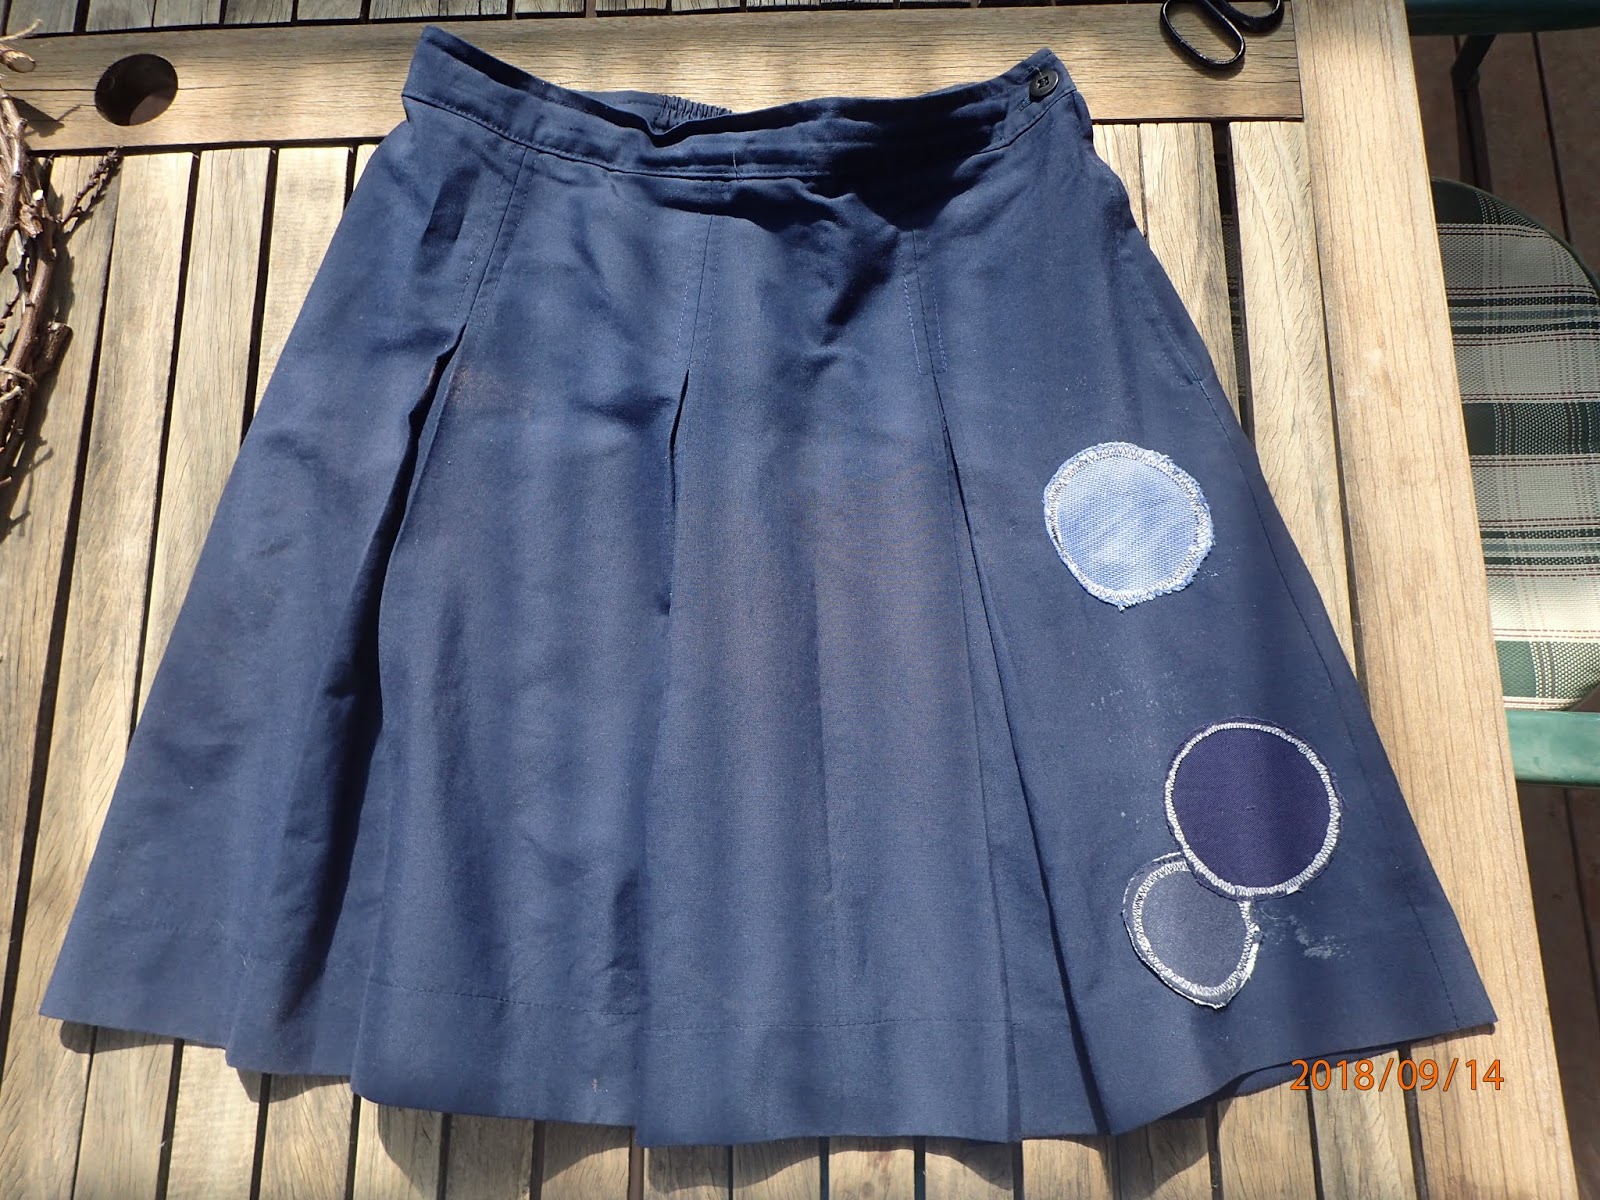
The second pencil skirt lining is also well on the way to destruction.  It's ripped along the seam and the lining fabric is starting to wear thin either side.  But still reparable for many more wears before I need to replace the lining completely.

 I keep the fabric that is still in good condition for repairs and pocket bags when I replace a lining.  In this case, I used a sleeve lining from a jacket refashion.  I fused it over the damaged areas of the skirt lining with double sided fusible interfacing - is that what it's called?  The one you fuse on one side to fabric, take off the paper backing, then fuse the other side to a different fabric eg for applique.  That stabilised the fabric so I could sew it back together as normal.


Sewn back together and all finished!  For good measure I added a couple of hand sewn arrowheads at the top and bottom of the seam in embroidery thread to take some of the stress.


Happy refashioning (and mending).

Mimi


Friday, October 12, 2018

Back in Rotation


It's been a while and that's because some of my 'simple' projects are taking me a looooong time to finish.  Like this one - all I had to do was cover the school logo on this ex-school uniform skirt, alter the length of the stitched down pleats so the skirt was a bit roomier over the hips, and sew up the hem.  How easy is that?

I'm not putting a before photo as I don't want to identify the school, but I think you can all picture this skirt with those circles gone and a school logo where the light blue one was?  Right - so first I had this idea of a print fabric panel over that whole pleat with thread-painting over the top.  I interfaced it all down and started in with the free motion stitching on the machine - but it started to wrinkle up and looked awful.  Once I was about 1/2 finished stitching.  It took me an age to unpick all that stitching and then remove the interfacing glue (actually the glue is not all gone, but it's enough gone).

So Plan B is what you see - in progress with the logo covered and the new pleat stitching line marked in soap where it wanted to be:


Of course, then the interfacing I used to keep the circle fabrics stiff while sewing with my circular stitching foot wouldn't rip away from the stitches like it was supposed to (sigh!).  I got the owner of the skirt to unpick that as much as possible and it looks okay (if you don't get up real close).  She's usually in motion and likes it the way it is, and it should improve with future washes.


I'm happy if she's happy.  Happy sewing yourselves!

Mimi

Saturday, January 06, 2018

Happy sewing in 2018!

I was pretty slack and barely posted in 2017, so I'm hoping to do much better this year. 

This is not a radical refashion by any means, but this skirt is now back in rotation (it actually looks better on me than Gabbi the mannequin in the photo).


I made this 8-gore skirt a loooong time ago, and I wore it a lot.  But I made some odd decisions at the time and then it shrank in the wash (I swear, that's the reason it became too small). 

Then, the zip broke (under some stress).  I have a love / hate relationship with invisible zippers, they look (or maybe don't look?) really good as they disappear into a seam, but they are so fragile I am always replacing them.  I have learned the hard way not to put them in trousers, mid-working day wardrobe malfunctions are the pits. 

So I replaced the zip, but then those bits at the top of the zip kept digging in my back when sitting in chairs - hence the tab with velcro. 

Then, and this is odd decision number one, I put inseam pockets in this skirt originally.  Even though it has a fitted waist and hip line.  Pockets are great of course, except when the shirt started to 'shrink' they popped out even more than usual and looked awful. 

And odd decision number two was to make the lining much smaller than the shell.  I mean, it made sense to make a straight skirt style lining instead of an 8-gore one, but when I released the side seams on the lining the skirt suddenly fit again.  It was always the lining. Unfortunately that was after I'd cut the pockets out or I might have been able to save them.  I've added knit panels to the lining to make it bigger, which is not my genius idea but from here: judith turner - alteration genius  Not only does the skirt now fit, it's sooo much more comfortable especially as I like to stride about and usually wear trousers.  I might start doing that all the time.

Happy refashioning in 2018!

Thursday, October 31, 2013

My Frumpy-to-Fabulous Skirt Refashion

Hello everyone!

This is my first post here on the Refashion Co-op. I am so excited to be contributing, and I love the fact that now I will have a reason to finish some of the projects that I start and maybe would not be as motivated to finish!

A little bit about me: I am a military veteran, a graduate student (but only for a few more weeks, I graduate in December!), a wife, a burlesque dancer (I know! Scandalous!), the loving and doting companion to three "fur kids", and an animal rescue/adoption advocate. I blog over at Em-provising, and am really enjoying it. I love getting to know fellow bloggers and am sooo impressed with the amount of talent and creativity I see in these other women.

For my first contribution, I am posting a skirt I made a little while ago that has become one of my favorites for fall. I love it! The best part? I got it for free!

"Before": this skirt was about a size 18. Since I forgot to take a picture of it then, this is a picture of the original length, which was a weird, mid-calf length that was not flattering on me. This is FatSpice, our fat cat, who likes being in on the projects. 


After I had taken in the waist, making sure to preserve that cute waist-tie thing that the skirt originally had, I shortened it. Here is the finished product!! I love wearing it with my go-to booties and a white shirt. Of course, I pair it with a sweater now because it has FINALLY gotten cooler in Georgia. :)


If you would like to see more of the steps, you can go to the original post. Thanks so much for taking a look! :)

Wool & Winter White

If' you've been following along with the Renegade Seamstress's Refashion Runway - and if you haven't you've been missing out - you know that this week's theme is winter white.

refashion-runway 2

I sewed along with the peplum challenge a few weeks ago, and I thought I'd sew along again this week. I didn't have any white in my "to do" pile, but I was able to find an off-white top and a blue-gray wool skirt for $1 each. Both were ill-fitting and outdated. Perfect.

beforeFrumpy squared.

The shirt was just a bit too big and had an attached polyester lining. I cut the lining away from the lace, pinned, and sewed the sleeves and sides to make the shirt fit a little better. Then I reassembled the lining into an undershirt.

lace shirtSeparate and take it in.

The skirt was way too small. To make it fit I cut off the waist band and removed the unnecessary pleat down the front. Then I undid the hem around the bottom, and added two new small pleats in the front of the skirt to match the original pleats and nip in the waist.

skirt 1De-pleat and re-pleat.

I didn't feel like creating a new waistband (lazy me) so I finished the edge around the top with 1/4 inch double fold bias tape and added a hook and eye above the zipper to keep the top closed.

I paired my winter white top and wool pencil skirt with gray tights, black shoes, and the wide black belt that I altered a while back. 

after copyNew winter office wear.

This project has me antsy to start on the winter refashions I have lined up. I should probably finish my fall projects first, right? 

More photos of the refashion in process and a lot of other projects can be found on my blog.

- Elizabeth
aka The Hungry Octopus
Now blogging at www.TheHungryOctopus.com!

Wednesday, November 14, 2012

Waist not


You couldn’t pay me enough to be 35 again. Or even 25. I would -- for one day-- like to have my size ten waist back. Just because.


Then again, I’m good with my current toned 12 and the hips that go along with it. A long, high-waisted denim skirt came back to this side of the pond with me a few years ago after a sort-through of one of my remaining boxes of clothes in Mom’s attic. I used the skirt panels for something or another craft-related but the late high school/early college leftover waistband of the skirt has been lurking in the Denim Scraps Tub. I quite like my obi refashion from this summer so knew just what I wanted to do with this remaining bit of skirt when I stumbled across it this afternoon.


The straps and buckles used to close OVER the buttoned waist -- the button holes are hidden by that denim scrap flower -- and once picked off I sewed 'em into the edges of the waistband. It sits nice and low on my hips. Must go rummage through the closet to see what might go with it after I chop the vegetables for tonight's fried rice.

IWOM

Wednesday, August 01, 2012

Two skirts refashioned into a bag

You know that feeling when you find a scrummy piece of clothing in a charity shop and you just *know* that it will come in useful?

Well, I found not one but TWO skirts like that in the same shop on the same day! 

What are the chances, eh?


I didn't really have any plans but I knew that they would go together beautifully.

As I only wanted to use one half of the pink skirt I was limited as to what I could make.

But I do love to make a nice bag or two!

So I set about designing a bag to incorporate both skirts.

And this is how it turned out :


It's softly padded throughout.  I even figured out a way to make ultra-padded handles which have a nice feel about them.

The top of the bag on the inside was pink and I also utilised the skirt lining as the interior fabric.


I had so much fun with this project!!!

More details on this and other refashions and projects can be found on my blog:


Happy refashioning!

Wednesday, June 20, 2012

Embroidered Skirt


Embroidered denim skirt made from 1 thrifted long denim skirt, hemmed to above the knee, then hand embroidered.
Inspired by these Anthropologie shorts (no longer available):

 seen on Keiko Lynn

Thursday, June 07, 2012

A New Shirt From an Old Skirt

shirt refashion

Hello.  I am so excited about my first post on Refashion Co-op!  My name is Mandy, but my superhero name is MysticMandy. I recently started a blog I call Mandy Made.


Do you ever look in your closet and think "I have NOTHING to wear!!"  Well, that happens to me.  All. The. Time.  And since I'm broke, I try to change the old things into new things.  This shirt, for example, went from being a skirt that I NEVER wear, to a fun summer top... In FIVE minutes!


Here is the skirt I started with.  It's a stretchy knit.  It looks innocent enough, but the waistband (which is SUPPOSED to fold over) always manages to unfold itself throughout the day, adding an additional few inches to my waist.  Who wants that?  Not me.

To learn how I made this easy-peasy shirt, head on over to Mandy Made.  I am always happy to meet new refashionistas, learn about fun projects, read comments and attract new followers.  Thanks for reading my first post :) 
refashion upcycle shirt

Thursday, April 26, 2012

Vintage Valentino -inspired- Refashion

For this refashion, I was inspired by this Valentino Boutique late 70s  jeweled tunic, which has an embroidered Roman God motif in cashmere.  
Okay, first I do know this is an ambitious project and I didn’t have a black top to work with… but I did have this black skirt that I had no  idea what to do with, perfect! it was plain solid black and would be the blank canvas to my Valentino Refashion…


 so with glitter and glue here’s what I did…